HP R1.5 HP UPS Network Module User Guide - Page 32
Network Settings screen
 |
View all HP R1.5 manuals
Add to My Manuals
Save this manual to your list of manuals |
Page 32 highlights
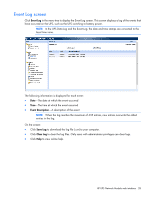
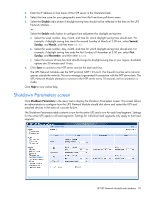
4. Click Save. Click Help to view online help. Network Settings screen Click Network in the menu tree to display the Network Settings screen. This screen allows an administrator to configure network settings and authorize remote firmware upgrades for the UPS Network Module. To configure the network settings: 1. Select Enabled from the BootP/DHCP pull-down menu to allow configuration of network parameters by a BootP or DHCP server. After each restart, the UPS Network Module makes five attempts to recover the network parameters. If a response is not received from the server, the UPS Network Module boots with the last saved parameters from the most recent start. 2. If your network is not configured with a BootP or DHCP server, select Disabled from the BootP/DHCP pull-down menu, and then enter the network settings: a. Enter the IP address of the UPS Network Module in the IP Address field. The UPS Network Module must have a unique IP address for use on a TCP/IP network. b. Enter the subnet mask of the UPS Network Module in the Subnet Mask field to identify the class of the sub-network to which the UPS Network Module is connected. c. Enter the gateway address of the UPS Network Module in the Gateway Address field to allow connection to devices or hosts attached to different network segments. HP UPS Network Module web interface 32
-
 1
1 -
2
-
3
-
4
-
5
-
6
-
7
-
8
-
9
-
10
-
11
-
12
-
13
-
14
-
15
-
16
-
17
-
18
-
19
-
20
-
21
-
22
-
23
-
24
-
25
-
26
-
 27
27 -
 28
28 -
 29
29 -
 30
30 -
 31
31 -
 32
32 -
 33
33 -
 34
34 -
 35
35 -
 36
36 -
 37
37 -
38
-
39
-
40
-
41
-
42
-
43
-
44
-
45
-
46
-
47
-
48
-
49
-
50
-
51
-
52
-
53
-
54
-
55
-
56
-
57
-
58
-
59
-
60
-
61
-
62
-
63
-
64
-
65
-
66
-
67
-
68
-
69
-
70
-
71
-
72
-
73
-
74
-
75
-
76
-
77
-
78
-
79
-
80
-
81
-
82
-
83
-
84
-
85
-
86
-
87
 |
 |
