Epson C117001-N Service Manual - Page 85
theprznter, 2.3.lfor, remooing, carejid, ptinter, ROMcarejidly, damagnng, ZNDEXmark, ROMis, Insert
 |
UPC - 010343816480
View all Epson C117001-N manuals
Add to My Manuals
Save this manual to your list of manuals |
Page 85 highlights
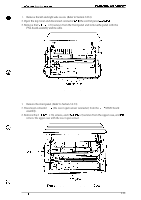
DFX-5000+ Service Manual 3.2.2 Replacing the ROM You can replace the ROM without disassembling the printer. ~"sassambly and Assembiy il Zt is best to remove the top cover before you tilt back theprz"nter as described in the steps below. Refer to Section 3.2.3.lfor instructions on remooing the top cover. ~ If you tilt back the printer with the top cover attached, be carejid not to put too much weight on the top cover or any other ptinter components. ~ Spread a thick, sofl cloth under theprz"nter before you follow the steps below. ~ Remove the ROMcarejidly to avoid damagn"ng the board. ~ Before you install a new ROM, check the ZNDEXmark on the socket to be sure the ROMis oriented correctly. Insert the ROM care filly to avoid damafl"ng the ROMp"ns and the board. 1. Tilt back the printer and lay it on its back. Hold the top cover closed if it is not removed. 2. Remove the CBB (M3 x 10) screw securing the ROM cover, remove the cover, and replace the ROM using the ROM holder. c.
-
 1
1 -
2
-
3
-
4
-
5
-
6
-
7
-
8
-
9
-
10
-
11
-
12
-
13
-
14
-
15
-
16
-
17
-
18
-
19
-
20
-
21
-
22
-
23
-
24
-
25
-
26
-
27
-
28
-
29
-
30
-
31
-
32
-
33
-
34
-
35
-
36
-
37
-
38
-
39
-
40
-
41
-
42
-
43
-
44
-
45
-
46
-
47
-
48
-
49
-
50
-
51
-
52
-
53
-
54
-
55
-
56
-
57
-
58
-
59
-
60
-
61
-
62
-
63
-
64
-
65
-
66
-
67
-
68
-
69
-
70
-
71
-
72
-
73
-
74
-
75
-
76
-
77
-
78
-
79
-
 80
80 -
 81
81 -
 82
82 -
 83
83 -
 84
84 -
 85
85 -
 86
86 -
 87
87 -
 88
88 -
 89
89 -
 90
90 -
91
-
92
-
93
-
94
-
95
-
96
-
97
-
98
-
99
-
100
-
101
-
102
-
103
-
104
-
105
-
106
-
107
-
108
-
109
-
110
-
111
-
112
-
113
-
114
-
115
-
116
-
117
-
118
-
119
-
120
-
121
-
122
-
123
-
124
-
125
-
126
-
127
-
128
-
129
-
130
-
131
-
132
-
133
-
134
-
135
-
136
-
137
-
138
-
139
-
140
-
141
-
142
-
143
-
144
-
145
-
146
-
147
-
148
-
149
-
150
-
151
-
152
-
153
-
154
-
155
-
156
-
157
-
158
-
159
-
160
-
161
-
162
-
163
-
164
-
165
-
166
-
167
-
168
-
169
-
170
-
171
-
172
-
173
-
174
-
175
-
176
-
177
-
178
-
179
-
180
-
181
-
182
-
183
-
184
-
185
-
186
 |
 |
