2012 Yamaha Motorsports RS Venture Owners Manual - Page 78
2012 Yamaha Motorsports RS Venture Manual

Page 78 highlights
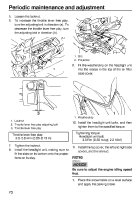
Periodic maintenance and adjustment (b) (a) 2 1 3 1 1. Weatherstrip 1. Locknut 2. Throttle lever free play adjusting bolt 3. Throttle lever free play Throttle lever free play: 2.0-3.0 mm (0.08-0.12 in) 7. 8. Tighten the locknut. Install the headlight unit, making sure to fit the slots on its bottom onto the projections on its stay. 10. Install the headlight unit bolts and windshield stay bolts, and then tighten them to their specified torques. Tightening torques: Headlight unit bolt: 3.0 Nm (0.30 m·kgf, 2.2 ft·lbf) Windshield stay bolt: 14 Nm (1.4 m·kgf, 10 ft·lbf) 11. Install the top cover and the shroud. ESU11863 1 Checking the throttle override system (T.O.R.S.) EWS00352 WARNING 2 1. Slot 2. Projection 9. Fit the weatherstrip on the headlight unit into the recess in the top of the air filter case cover. When checking the T.O.R.S., take precautions to avoid snowmobile movement which could cause an accident: G Make sure that the throttle lever moves smoothly with the engine off before checking the T.O.R.S. G Make sure that the parking brake is applied. G Do not rev the engine to the point that the clutch engages. 72
-
 1
1 -
2
-
3
-
4
-
5
-
6
-
7
-
8
-
9
-
10
-
11
-
12
-
13
-
14
-
15
-
16
-
17
-
18
-
19
-
20
-
21
-
22
-
23
-
24
-
25
-
26
-
27
-
28
-
29
-
30
-
31
-
32
-
33
-
34
-
35
-
36
-
37
-
38
-
39
-
40
-
41
-
42
-
43
-
44
-
45
-
46
-
47
-
48
-
49
-
50
-
51
-
52
-
53
-
54
-
55
-
56
-
57
-
58
-
59
-
60
-
61
-
62
-
63
-
64
-
65
-
66
-
67
-
68
-
69
-
70
-
71
-
72
-
 73
73 -
 74
74 -
 75
75 -
 76
76 -
 77
77 -
 78
78 -
 79
79 -
 80
80 -
 81
81 -
 82
82 -
 83
83 -
84
-
85
-
86
-
87
-
88
-
89
-
90
-
91
-
92
-
93
-
94
-
95
-
96
-
97
-
98
-
99
-
100
-
101
-
102
-
103
-
104
-
105
-
106
-
107
-
108
-
109
-
110
-
111
-
112
-
113
-
114
-
115
-
116
-
117
-
118
-
119
-
120
-
121
-
122
-
123
-
124
-
125
-
126
-
127
-
128
-
129
-
130
-
131
-
132
-
133
-
134
-
135
-
136
-
137
-
138
-
139
-
140
-
141
-
142
 |
 |
