2012 Yamaha Motorsports RS Venture Owners Manual - Page 112
2012 Yamaha Motorsports RS Venture Manual

Page 112 highlights
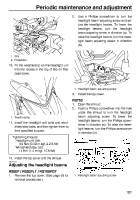
Periodic maintenance and adjustment 6. Unhook the bulb holder, and then remove the burnt-out bulb. 2 1 1. Headlight unit bolt 2. Windshield stay bolt 1 1. Bulb holder 3. Unhook the headlight unit as shown, then lift it up and move it forward, away from the handlebar. NOTICE: Be careful not to scratch the snowmobile when moving the headlight unit. [ECS00920] 7. 1 Install a new bulb, and then hook the bulb holder onto the headlight unit. NOTICE: Keep oil and your hands away from the glass part of the bulb or its life and illumination will be affected. If the glass is oil stained, thoroughly clean it with a cloth moistened with alcohol or lacquer thinner. [ECS00621] 1. Headlight unit 1 4. 5. Disconnect the headlight coupler. Remove the bulb holder cover. 1. Do not touch the glass part of the bulb. 1 8. Bulb type: Halogen bulb Install the bulb holder cover, and then connect the headlight coupler. Install the headlight unit, making sure to fit the slots on its bottom onto the projections on its stay. 2 9. 1. Headlight coupler 2. Bulb holder cover 106
-
 1
1 -
2
-
3
-
4
-
5
-
6
-
7
-
8
-
9
-
10
-
11
-
12
-
13
-
14
-
15
-
16
-
17
-
18
-
19
-
20
-
21
-
22
-
23
-
24
-
25
-
26
-
27
-
28
-
29
-
30
-
31
-
32
-
33
-
34
-
35
-
36
-
37
-
38
-
39
-
40
-
41
-
42
-
43
-
44
-
45
-
46
-
47
-
48
-
49
-
50
-
51
-
52
-
53
-
54
-
55
-
56
-
57
-
58
-
59
-
60
-
61
-
62
-
63
-
64
-
65
-
66
-
67
-
68
-
69
-
70
-
71
-
72
-
73
-
74
-
75
-
76
-
77
-
78
-
79
-
80
-
81
-
82
-
83
-
84
-
85
-
86
-
87
-
88
-
89
-
90
-
91
-
92
-
93
-
94
-
95
-
96
-
97
-
98
-
99
-
100
-
101
-
102
-
103
-
104
-
105
-
106
-
 107
107 -
 108
108 -
 109
109 -
 110
110 -
 111
111 -
 112
112 -
 113
113 -
 114
114 -
 115
115 -
 116
116 -
 117
117 -
118
-
119
-
120
-
121
-
122
-
123
-
124
-
125
-
126
-
127
-
128
-
129
-
130
-
131
-
132
-
133
-
134
-
135
-
136
-
137
-
138
-
139
-
140
-
141
-
142
 |
 |
