TRENDnet TDM-E400 User's Guide - Page 84
Configuring Special Bridging Features, Configuring WAN-to-WAN Bridging
 |
View all TRENDnet TDM-E400 manuals
Add to My Manuals
Save this manual to your list of manuals |
Page 84 highlights
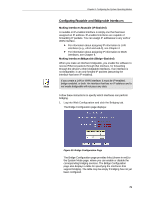
TDM-E400 / TDM-C400 ADSL2+ Ethernet Modem Router User's Manual Configuring Special Bridging Features Configuring WAN-to-WAN Bridging WAN-to-WAN bridging refers to the bridging of data between WAN interfaces. This can occur only when bridging is enabled on the device and it has two or more WAN interfaces. With WAN-to-WAN bridging enabled, if a packet with an unknown destination address is received from a WAN interface, that packet is forwarded to all the other ports - including the other bridge-enabled WAN interface(s). This ability may not, however, be desirable for all users, due to security concerns and bandwidth constraints. If this is the case, WAN-to-WAN bridging should be disabled. Follow this procedure to enable or disable WAN-to-WAN bridging: 1. Click the Bridging tab. 2. In the interface table, select all WAN interfaces and any others on which you want to perform bridging and click . 3. Click the WAN-to-WAN bridging: Enable/Disable link. 4. On the System Mode Page, click the WAN-to-WAN Bridging: Enabled (or Disabled) radio button, and then click . A page will display briefly to confirm your changes, and will return you to the Bridge Configuration page. 5. If you want the changes to be permanent, follow the instructions on page 46 to commit them. 84
-
 1
1 -
2
-
3
-
4
-
5
-
6
-
7
-
8
-
9
-
10
-
11
-
12
-
13
-
14
-
15
-
16
-
17
-
18
-
19
-
20
-
21
-
22
-
23
-
24
-
25
-
26
-
27
-
28
-
29
-
30
-
31
-
32
-
33
-
34
-
35
-
36
-
37
-
38
-
39
-
40
-
41
-
42
-
43
-
44
-
45
-
46
-
47
-
48
-
49
-
50
-
51
-
52
-
53
-
54
-
55
-
56
-
57
-
58
-
59
-
60
-
61
-
62
-
63
-
64
-
65
-
66
-
67
-
68
-
69
-
70
-
71
-
72
-
73
-
74
-
75
-
76
-
77
-
78
-
 79
79 -
 80
80 -
 81
81 -
 82
82 -
 83
83 -
 84
84 -
 85
85 -
 86
86 -
 87
87 -
 88
88 -
 89
89 -
90
-
91
-
92
-
93
-
94
-
95
-
96
-
97
-
98
-
99
-
100
-
101
-
102
-
103
-
104
-
105
-
106
-
107
-
108
-
109
-
110
-
111
-
112
-
113
-
114
-
115
-
116
-
117
-
118
-
119
-
120
-
121
-
122
-
123
-
124
-
125
-
126
-
127
-
128
-
129
-
130
-
131
-
132
-
133
-
134
-
135
-
136
-
137
-
138
-
139
-
140
-
141
-
142
-
143
-
144
-
145
-
146
-
147
-
148
-
149
-
150
-
151
-
152
-
153
-
154
-
155
-
156
-
157
-
158
-
159
-
160
-
161
-
162
-
163
-
164
-
165
-
166
-
167
-
168
-
169
-
170
-
171
-
172
-
173
-
174
-
175
-
176
-
177
-
178
-
179
-
180
-
181
-
182
-
183
-
184
-
185
-
186
-
187
-
188
-
189
-
190
-
191
-
192
-
193
-
194
-
195
-
196
-
197
-
198
-
199
-
200
-
201
-
202
-
203
-
204
-
205
 |
 |
