Panasonic PT-EX620 Operating Instructions - Page 40
Connecting, Before connecting
 |
View all Panasonic PT-EX620 manuals
Add to My Manuals
Save this manual to your list of manuals |
Page 40 highlights
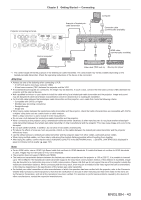
Connecting Chapter 2 Getting Started - Connecting Before connecting ffBefore connecting, carefully read the operating instructions for the external device to be connected. ffTurn off the power of all devices before connecting cables. ffTake note of the following points before connecting the cables. Failure to do so may result in malfunctions. ggWhen connecting a cable to a device connected to the projector or the projector itself, touch any nearby metallic objects to eliminate static electricity from your body before performing work. ggDo not use unnecessarily long cables to connect a device to the projector or to the projector body. The longer the cable, the more susceptible to noise it becomes. Since using a cable while it is wound makes it act like an antenna, it is more susceptible to noise. ggWhen connecting cables, connect GND first, then insert the connecting terminal of the connecting device in a straight manner. ffAcquire any connection cable necessary to connect the external device to the system that is neither supplied with the device nor available as an option. ffIf video signals from video equipment contain too much jitter, the images on the screen may wobble. In this case, a time base corrector (TBC) must be connected. ffThe projector accepts video signals, Y/C signals, YCBCR/YPBPR signals, analog RGB signals (synchronization signals are TTL level), and digital signals. ffSome computer models or graphics cards are not compatible with the projector. ffUse a cable compensator when you connect devices to the projector using long cables. Otherwise the image may not display properly. ffRefer to "List of compatible signals" (x page 156) for the types of video signals that can be used with the projector. terminal pin assignments and signal names Outside view (11) (15) (6) (10) (1) (5) Pin No. (1) (2) (3) (4) (5) (6) (7) (8) Signal name R/PR G/Y B/PB ― GND GND GND GND Pin No. (9) (10) (11) (12) (13) (14) (15) terminal pin assignments and signal names Signal name +5 V GND GND DDC data HD/SYNC VD DDC clock Outside view (11) (15) (6) (10) (1) (5) Pin No. (1) (2) (3) (4) (5) (6) (7) (8) Signal name R/PR G/Y B/PB ― GND GND GND GND Pin No. (9) (10) (11) (12) (13) (14) (15) Signal name ― GND GND ― HD/SYNC VD ― 40 - ENGLISH
-
 1
1 -
2
-
3
-
4
-
5
-
6
-
7
-
8
-
9
-
10
-
11
-
12
-
13
-
14
-
15
-
16
-
17
-
18
-
19
-
20
-
21
-
22
-
23
-
24
-
25
-
26
-
27
-
28
-
29
-
30
-
31
-
32
-
33
-
34
-
 35
35 -
 36
36 -
 37
37 -
 38
38 -
 39
39 -
 40
40 -
 41
41 -
 42
42 -
 43
43 -
 44
44 -
 45
45 -
46
-
47
-
48
-
49
-
50
-
51
-
52
-
53
-
54
-
55
-
56
-
57
-
58
-
59
-
60
-
61
-
62
-
63
-
64
-
65
-
66
-
67
-
68
-
69
-
70
-
71
-
72
-
73
-
74
-
75
-
76
-
77
-
78
-
79
-
80
-
81
-
82
-
83
-
84
-
85
-
86
-
87
-
88
-
89
-
90
-
91
-
92
-
93
-
94
-
95
-
96
-
97
-
98
-
99
-
100
-
101
-
102
-
103
-
104
-
105
-
106
-
107
-
108
-
109
-
110
-
111
-
112
-
113
-
114
-
115
-
116
-
117
-
118
-
119
-
120
-
121
-
122
-
123
-
124
-
125
-
126
-
127
-
128
-
129
-
130
-
131
-
132
-
133
-
134
-
135
-
136
-
137
-
138
-
139
-
140
-
141
-
142
-
143
-
144
-
145
-
146
-
147
-
148
-
149
-
150
-
151
-
152
-
153
-
154
-
155
-
156
-
157
-
158
-
159
-
160
-
161
-
162
-
163
-
164
 |
 |
