Panasonic PT-EW550 PT-EZ590 Series Operating Instructions - Page 75
ENGLISH - 75, Adjusting [LENS THROW RATIO]
 |
View all Panasonic PT-EW550 manuals
Add to My Manuals
Save this manual to your list of manuals |
Page 75 highlights
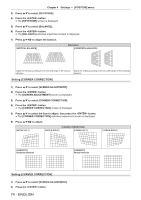
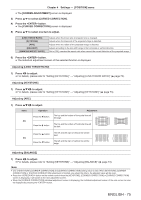
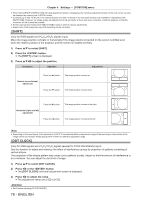
Chapter 4 Settings - [POSITION] menu ffThe [SCREEN ADJUSTMENT] screen is displayed. 3) Press as to select [CURVED CORRECTION]. 4) Press the button. ffThe [CURVED CORRECTION] screen is displayed. 5) Press as to select one item to adjust. [LENS THROW RATIO] [KEYSTONE] [ARC] [BALANCE] [MAINTAIN ASPECT RATIO] Adjusts when the throw ratio of projector lens is changed. Adjusts when the trapezoid of the projected image is distorted. Adjusts when the radian of the projected image is distorted. Adjusts according to the lens shift range in the horizontal or vertical direction. Set to [ON], maintain the aspect ratio when correct the curved distortion of the projected image. 6) Press the button. ffThe individual adjustment screen of the selected function is displayed. Adjusting [LENS THROW RATIO] 1) Press qw to adjust. ffFor details, please refer to "Setting [KEYSTONE]" → "Adjusting [LENS THROW RATIO]" (x page 73). Adjusting [KEYSTONE] 1) Press asqw to adjust. ffFor details, please refer to "Setting [KEYSTONE]" → "Adjusting [KEYSTONE]" (x page 73). Adjusting [ARC] 1) Press asqw to adjust. Items Operation Press the q button. [H] Press the w button. Adjustment The top and the bottom of horizontal line will be bulge. The top and the bottom of horizontal line will be dent. Press the a button. The left and the right of vertical line will be dent. [V] Press the s button. The left and the right of vertical line will be bulge. Adjusting [BALANCE] 1) Press qw to adjust. ffFor details, please refer to "Setting [KEYSTONE]" → "Adjusting [BALANCE]" (x page 73). Note ff One of [KEYSTONE], [CORNER CORRECTION] and [CURVED CORRECTION] setting value is valid. When [KEYSTONE], [CORNER CORRECTION] or [CURVED CORRECTION] adjustment is finished, you adjust the others, the adjusted value will be reset. ff Press the button on the remote control when the [KEYSTONE], [CORNER CORRECTION] or [CURVED CORRECTION] screen is displaying, it will switch to the next adjustment screen. ff When the [CORNER CORRECTION] individual adjustment screen is displaying, the individual adjustment screen of the next corner can also be displayed by pressing the button. ENGLISH - 75
-
 1
1 -
2
-
3
-
4
-
5
-
6
-
7
-
8
-
9
-
10
-
11
-
12
-
13
-
14
-
15
-
16
-
17
-
18
-
19
-
20
-
21
-
22
-
23
-
24
-
25
-
26
-
27
-
28
-
29
-
30
-
31
-
32
-
33
-
34
-
35
-
36
-
37
-
38
-
39
-
40
-
41
-
42
-
43
-
44
-
45
-
46
-
47
-
48
-
49
-
50
-
51
-
52
-
53
-
54
-
55
-
56
-
57
-
58
-
59
-
60
-
61
-
62
-
63
-
64
-
65
-
66
-
67
-
68
-
69
-
 70
70 -
 71
71 -
 72
72 -
 73
73 -
 74
74 -
 75
75 -
 76
76 -
 77
77 -
 78
78 -
 79
79 -
 80
80 -
81
-
82
-
83
-
84
-
85
-
86
-
87
-
88
-
89
-
90
-
91
-
92
-
93
-
94
-
95
-
96
-
97
-
98
-
99
-
100
-
101
-
102
-
103
-
104
-
105
-
106
-
107
-
108
-
109
-
110
-
111
-
112
-
113
-
114
-
115
-
116
-
117
-
118
-
119
-
120
-
121
-
122
-
123
-
124
-
125
-
126
-
127
-
128
-
129
-
130
-
131
-
132
-
133
-
134
-
135
-
136
-
137
-
138
-
139
-
140
-
141
-
142
-
143
-
144
-
145
-
146
-
147
-
148
-
149
-
150
-
151
-
152
-
153
-
154
-
155
-
156
-
157
-
158
-
159
-
160
-
161
-
162
-
163
-
164
-
165
 |
 |
