Invacare TDXSP2 Owners Manual 2 - Page 42
Fixed Hip Support, Adjusting Position of Hip Support, Adjusting Height of Hip Support
 |
View all Invacare TDXSP2 manuals
Add to My Manuals
Save this manual to your list of manuals |
Page 42 highlights
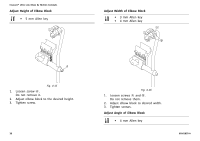
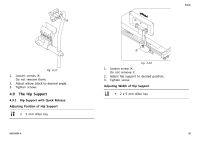
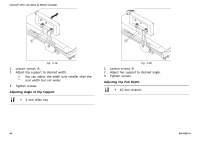
Invacare® Ultra Low Maxx by Motion Concepts 1. 4.9.2 Fixed Hip Support Adjusting Position of Hip Support • 4 mm Allen key Fig. 4-25 Remove upper screw and friction cap A. 2. Remove small friction link B. 3. Fig. 4-26 Remove hip pad with bracket, turn upside down and reinstall. 4. Insert friction link, friction cap, screw and tighten. 42 Fig. 4-27 1. Loosen screws A. Do not remove them. 2. Adjust hip support to desired position. 3. Tighten screws. Adjusting Height of Hip Support The height of the fixed hip support can be adjusted at two points. • 4 mm Allen key • 10 mm wrench 60101832-A
-
 1
1 -
2
-
3
-
4
-
5
-
6
-
7
-
8
-
9
-
10
-
11
-
12
-
13
-
14
-
15
-
16
-
17
-
18
-
19
-
20
-
21
-
22
-
23
-
24
-
25
-
26
-
27
-
28
-
29
-
30
-
31
-
32
-
33
-
34
-
35
-
36
-
 37
37 -
 38
38 -
 39
39 -
 40
40 -
 41
41 -
 42
42 -
 43
43 -
 44
44 -
 45
45 -
 46
46 -
 47
47 -
48
-
49
-
50
-
51
-
52
-
53
-
54
-
55
-
56
-
57
-
58
-
59
-
60
-
61
-
62
-
63
-
64
-
65
-
66
-
67
-
68
-
69
-
70
-
71
-
72
-
73
-
74
-
75
-
76
-
77
-
78
-
79
-
80
-
81
-
82
-
83
-
84
 |
 |

Invacare® Ultra Low Maxx by Motion Concepts
1.
Fig. 4-25
Remove upper screw and friction cap
A
.
2.
Remove small friction link
B
.
3.
Fig. 4-26
Remove hip pad with bracket, turn upside down and
reinstall.
4.
Insert friction link, friction cap, screw and tighten.
4.9.2
Fixed Hip Support
Adjusting Position of Hip Support
•
4 mm Allen key
Fig. 4-27
1.
Loosen screws
A
.
Do not remove them.
2.
Adjust hip support to desired position.
3.
Tighten screws.
Adjusting Height of Hip Support
The height of the fixed hip support can be adjusted at two
points.
•
4 mm Allen key
•
10 mm wrench
42
60101832-A