IBM x3455 User Manual - Page 66
Installation, Instructions
 |
UPC - 000435947109
View all IBM x3455 manuals
Add to My Manuals
Save this manual to your list of manuals |
Page 66 highlights
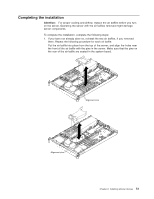
2. Position the internal cables so that they do not interfere with the cover installation. 3. Reinstall the cover on the server. Captive screw a. Position the cover on top of the server. b. Align the tabs on the sides of the cover with the matching slots on the sides of the chassis; then, slide the tabs into the slots. Important: Before you slide the cover forward, make sure that all the tabs on the cover engage the chassis correctly. If all the tabs do not engage the chassis correctly, it will be very difficult to remove the cover later. c. Slide the cover toward the front of the server. d. Secure the cover to the server by tightening the captive screw on the back of the cover. 4. Install the server in the rack. For details, see the Rack Installation Instructions that come with the server. Note: Depending on the optional devices that you installed, after you cable the server, you might have to run the Configuration/Setup Utility program to update the server configuration. For more information, see "Updating the server configuration" on page 55 and Chapter 3, "Configuring the server," on page 57. 5. To attach peripheral devices and connect the power cord, continue with "Connecting the cables" on page 53. 52 System x3455 Types 7984 and 7986: User's Guide
-
 1
1 -
2
-
3
-
4
-
5
-
6
-
7
-
8
-
9
-
10
-
11
-
12
-
13
-
14
-
15
-
16
-
17
-
18
-
19
-
20
-
21
-
22
-
23
-
24
-
25
-
26
-
27
-
28
-
29
-
30
-
31
-
32
-
33
-
34
-
35
-
36
-
37
-
38
-
39
-
40
-
41
-
42
-
43
-
44
-
45
-
46
-
47
-
48
-
49
-
50
-
51
-
52
-
53
-
54
-
55
-
56
-
57
-
58
-
59
-
60
-
 61
61 -
 62
62 -
 63
63 -
 64
64 -
 65
65 -
 66
66 -
 67
67 -
 68
68 -
 69
69 -
 70
70 -
 71
71 -
72
-
73
-
74
-
75
-
76
-
77
-
78
-
79
-
80
-
81
-
82
-
83
-
84
-
85
-
86
-
87
-
88
-
89
-
90
-
91
-
92
-
93
-
94
-
95
-
96
-
97
-
98
-
99
-
100
-
101
-
102
-
103
-
104
-
105
-
106
-
107
-
108
-
109
-
110
-
111
-
112
 |
 |
