Epson SureColor P5370 Standard Edition Users Guide - Page 177
Cleaning the Print Head Using a Computer Utility
 |
View all Epson SureColor P5370 Standard Edition manuals
Add to My Manuals
Save this manual to your list of manuals |
Page 177 highlights
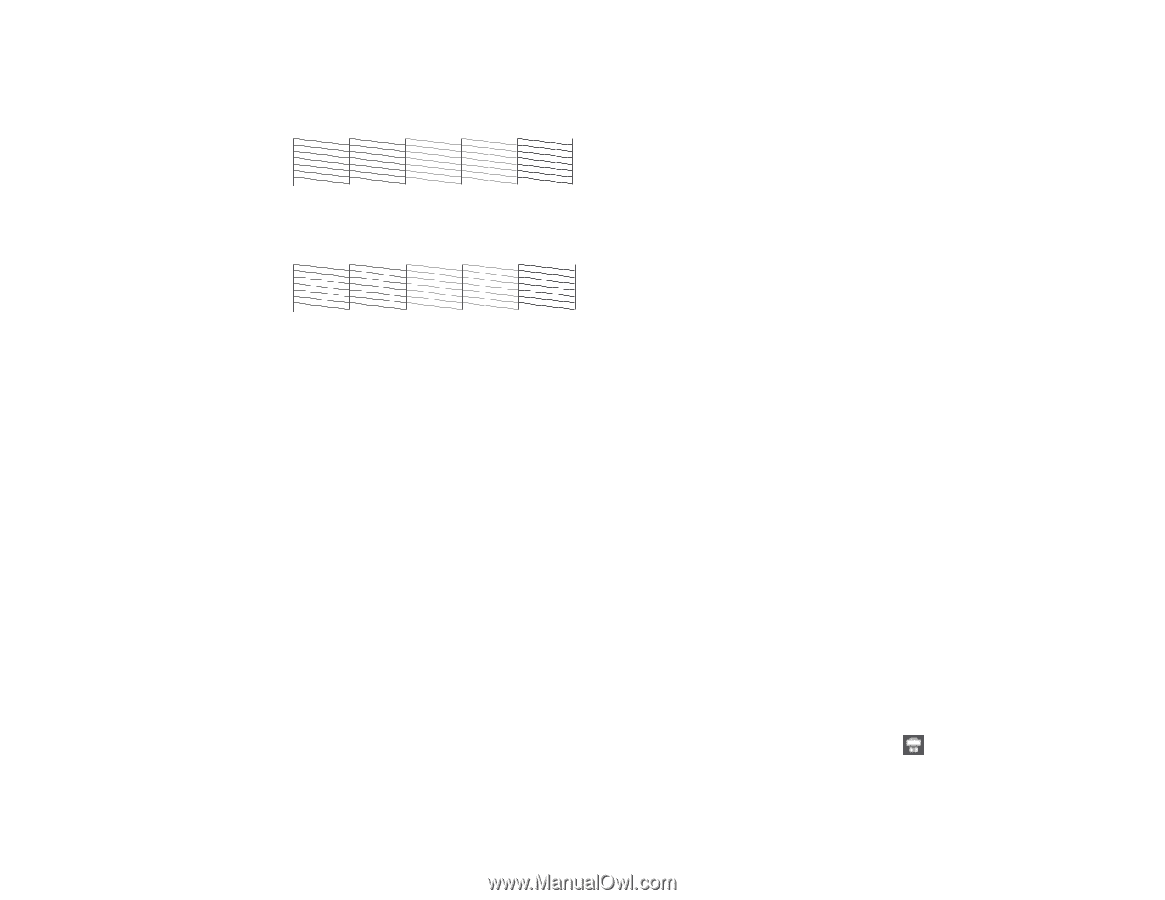
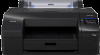
6. Check the printed pattern to see if there are gaps in the lines. Print head is clean Print head needs cleaning 7. Follow the instructions on the screen to clean the print head, check the nozzles, and repeat the process as necessary. If you don't see any improvement after cleaning the print head three times, run a Power Cleaning. Parent topic: Print Head Cleaning Related tasks Loading Cut Sheets in the Rear Manual Feeder Loading Media in the Front Manual Feeder Loading Cut Sheets in the Paper Cassette Loading Roll Paper Checking the Nozzles Using the Product Control Panel Running a Power Cleaning Using the Product Control Panel Cleaning the Print Head Using a Computer Utility You can clean the print head using a utility on your Windows computer or Mac. 1. Load roll or cut sheet paper in the printer. 2. Make sure the correct paper type is selected. 3. Do one of the following: • Windows 11: On the right side of the Windows taskbar, click the up arrow, click the icon, and then click on your product. 177
-
 1
1 -
2
-
3
-
4
-
5
-
6
-
7
-
8
-
9
-
10
-
11
-
12
-
13
-
14
-
15
-
16
-
17
-
18
-
19
-
20
-
21
-
22
-
23
-
24
-
25
-
26
-
27
-
28
-
29
-
30
-
31
-
32
-
33
-
34
-
35
-
36
-
37
-
38
-
39
-
40
-
41
-
42
-
43
-
44
-
45
-
46
-
47
-
48
-
49
-
50
-
51
-
52
-
53
-
54
-
55
-
56
-
57
-
58
-
59
-
60
-
61
-
62
-
63
-
64
-
65
-
66
-
67
-
68
-
69
-
70
-
71
-
72
-
73
-
74
-
75
-
76
-
77
-
78
-
79
-
80
-
81
-
82
-
83
-
84
-
85
-
86
-
87
-
88
-
89
-
90
-
91
-
92
-
93
-
94
-
95
-
96
-
97
-
98
-
99
-
100
-
101
-
102
-
103
-
104
-
105
-
106
-
107
-
108
-
109
-
110
-
111
-
112
-
113
-
114
-
115
-
116
-
117
-
118
-
119
-
120
-
121
-
122
-
123
-
124
-
125
-
126
-
127
-
128
-
129
-
130
-
131
-
132
-
133
-
134
-
135
-
136
-
137
-
138
-
139
-
140
-
141
-
142
-
143
-
144
-
145
-
146
-
147
-
148
-
149
-
150
-
151
-
152
-
153
-
154
-
155
-
156
-
157
-
158
-
159
-
160
-
161
-
162
-
163
-
164
-
165
-
166
-
167
-
168
-
169
-
170
-
171
-
 172
172 -
 173
173 -
 174
174 -
 175
175 -
 176
176 -
 177
177 -
 178
178 -
 179
179 -
 180
180 -
 181
181 -
 182
182 -
183
-
184
-
185
-
186
-
187
-
188
-
189
-
190
-
191
-
192
-
193
-
194
-
195
-
196
-
197
-
198
-
199
-
200
-
201
-
202
-
203
-
204
-
205
-
206
-
207
-
208
-
209
-
210
-
211
-
212
-
213
-
214
-
215
-
216
-
217
-
218
-
219
-
220
-
221
-
222
-
223
-
224
-
225
-
226
-
227
-
228
-
229
-
230
-
231
-
232
-
233
-
234
-
235
-
236
-
237
-
238
-
239
-
240
-
241
-
242
-
243
-
244
-
245
-
246
-
247
-
248
-
249
-
250
 |
 |