Epson FastFoto FF-640 Users Guide - Page 61
Sharing Photos with Epson FastFoto, Start Scanning
 |
View all Epson FastFoto FF-640 manuals
Add to My Manuals
Save this manual to your list of manuals |
Page 61 highlights
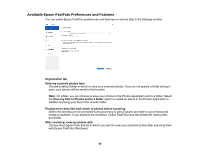
5. If you want, enter a subject and date for this batch of photos. This information is added to the name of each scanned image, as shown in the preview text. 6. If you want to create a new subfolder for the scanned images, select the Create a subfolder for this batch of pictures checkbox. 7. If you do not want to see this window every time you scan, select the Do not prompt me to describe my photos when scanning checkbox. 8. Click Start Scanning. The scanner scans your photos and prompts you to load more photos. When you are finished, the photos are processed and saved in the location you chose. After you scan your photos, you can share, upload, or edit them using Epson FastFoto. Sharing Photos with Epson FastFoto Uploading Photos with Epson FastFoto Epson FastFoto Edit Menu Available Epson FastFoto Preferences and Features Parent topic: Scanning Related references Where to Get Help Related tasks Cleaning Inside Your Scanner Loading Photos in the Input Tray Changing the Default Scan Button Application Loading Photos in the Input Tray Sharing Photos with Epson FastFoto You can share your scanned photos via email with the Epson FastFoto software. 1. Do one of the following to start FastFoto: • Windows 10: Click and select EPSON Software > Epson FastFoto. • Windows 8.x: Navigate to the Apps screen and select Epson FastFoto. • Windows (other versions): Click or Start, and select All Programs or Programs. Select EPSON Software > Epson FastFoto. • Mac: Open the Applications folder and select Epson FastFoto. 61
-
 1
1 -
2
-
3
-
4
-
5
-
6
-
7
-
8
-
9
-
10
-
11
-
12
-
13
-
14
-
15
-
16
-
17
-
18
-
19
-
20
-
21
-
22
-
23
-
24
-
25
-
26
-
27
-
28
-
29
-
30
-
31
-
32
-
33
-
34
-
35
-
36
-
37
-
38
-
39
-
40
-
41
-
42
-
43
-
44
-
45
-
46
-
47
-
48
-
49
-
50
-
51
-
52
-
53
-
54
-
55
-
 56
56 -
 57
57 -
 58
58 -
 59
59 -
 60
60 -
 61
61 -
 62
62 -
 63
63 -
 64
64 -
 65
65 -
 66
66 -
67
-
68
-
69
-
70
-
71
-
72
-
73
-
74
-
75
-
76
-
77
-
78
-
79
-
80
-
81
-
82
-
83
-
84
-
85
-
86
-
87
-
88
-
89
-
90
-
91
-
92
-
93
-
94
-
95
-
96
-
97
-
98
-
99
-
100
-
101
-
102
-
103
-
104
-
105
-
106
-
107
-
108
-
109
-
110
-
111
-
112
-
113
-
114
-
115
-
116
-
117
-
118
-
119
-
120
-
121
-
122
-
123
-
124
-
125
-
126
-
127
-
128
-
129
-
130
-
131
-
132
-
133
-
134
-
135
-
136
-
137
-
138
-
139
-
140
-
141
-
142
-
143
-
144
-
145
-
146
-
147
-
148
-
149
-
150
-
151
-
152
-
153
-
154
-
155
-
156
-
157
-
158
-
159
-
160
-
161
-
162
-
163
-
164
-
165
-
166
-
167
 |
 |
