Epson FX-890II Users Guide - Page 72
Accessing EPSON Status Monitor 3, EPSON Status Monitor 3 - drive
 |
View all Epson FX-890II manuals
Add to My Manuals
Save this manual to your list of manuals |
Page 72 highlights
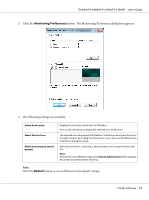
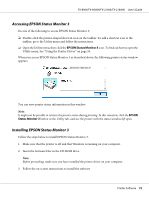
FX-890II/FX-890IIN/FX-2190II/FX-2190IIN User's Guide Accessing EPSON Status Monitor 3 Do one of the following to access EPSON Status Monitor 3; ❏ Double-click the printer-shaped shortcut icon on the taskbar. To add a shortcut icon to the taskbar, go to the Utility menu and follow the instructions. ❏ Open the Utility menu, then click the EPSON Status Monitor 3 icon. To find out how to open the Utility menu, See "Using the Printer Driver" on page 59. When you access EPSON Status Monitor 3 as described above, the following printer status window appears. You can view printer status information in this window. Note: It might not be possible to retrieve the printer status during printing. In this situation, click the EPSON Status Monitor 3 button in the Utility tab, and use the printer with the status window left open. Installing EPSON Status Monitor 3 Follow the steps below to install EPSON Status Monitor 3. 1. Make sure that the printer is off and that Windows is running on your computer. 2. Insert the Software Disc in the CD-ROM drive. Note: Before proceeding, make sure you have installed the printer driver on your computer. 3. Follow the on-screen instructions to install the software. Printer Software 72
-
 1
1 -
2
-
3
-
4
-
5
-
6
-
7
-
8
-
9
-
10
-
11
-
12
-
13
-
14
-
15
-
16
-
17
-
18
-
19
-
20
-
21
-
22
-
23
-
24
-
25
-
26
-
27
-
28
-
29
-
30
-
31
-
32
-
33
-
34
-
35
-
36
-
37
-
38
-
39
-
40
-
41
-
42
-
43
-
44
-
45
-
46
-
47
-
48
-
49
-
50
-
51
-
52
-
53
-
54
-
55
-
56
-
57
-
58
-
59
-
60
-
61
-
62
-
63
-
64
-
65
-
66
-
 67
67 -
 68
68 -
 69
69 -
 70
70 -
 71
71 -
 72
72 -
 73
73 -
 74
74 -
 75
75 -
 76
76 -
 77
77 -
78
-
79
-
80
-
81
-
82
-
83
-
84
-
85
-
86
-
87
-
88
-
89
-
90
-
91
-
92
-
93
-
94
-
95
-
96
-
97
-
98
-
99
-
100
-
101
-
102
-
103
-
104
-
105
-
106
-
107
-
108
-
109
-
110
-
111
-
112
-
113
-
114
-
115
-
116
-
117
-
118
-
119
-
120
-
121
-
122
-
123
-
124
-
125
-
126
-
127
-
128
-
129
-
130
-
131
-
132
-
133
-
134
-
135
-
136
-
137
-
138
-
139
-
140
-
141
-
142
-
143
-
144
-
145
-
146
-
147
-
148
-
149
-
150
-
151
-
152
-
153
-
154
-
155
-
156
-
157
-
158
-
159
-
160
-
161
-
162
-
163
-
164
-
165
 |
 |
