Epson FX-890II Users Guide - Page 25
Removing the tractor from the rear push position, Caution
 |
View all Epson FX-890II manuals
Add to My Manuals
Save this manual to your list of manuals |
Page 25 highlights
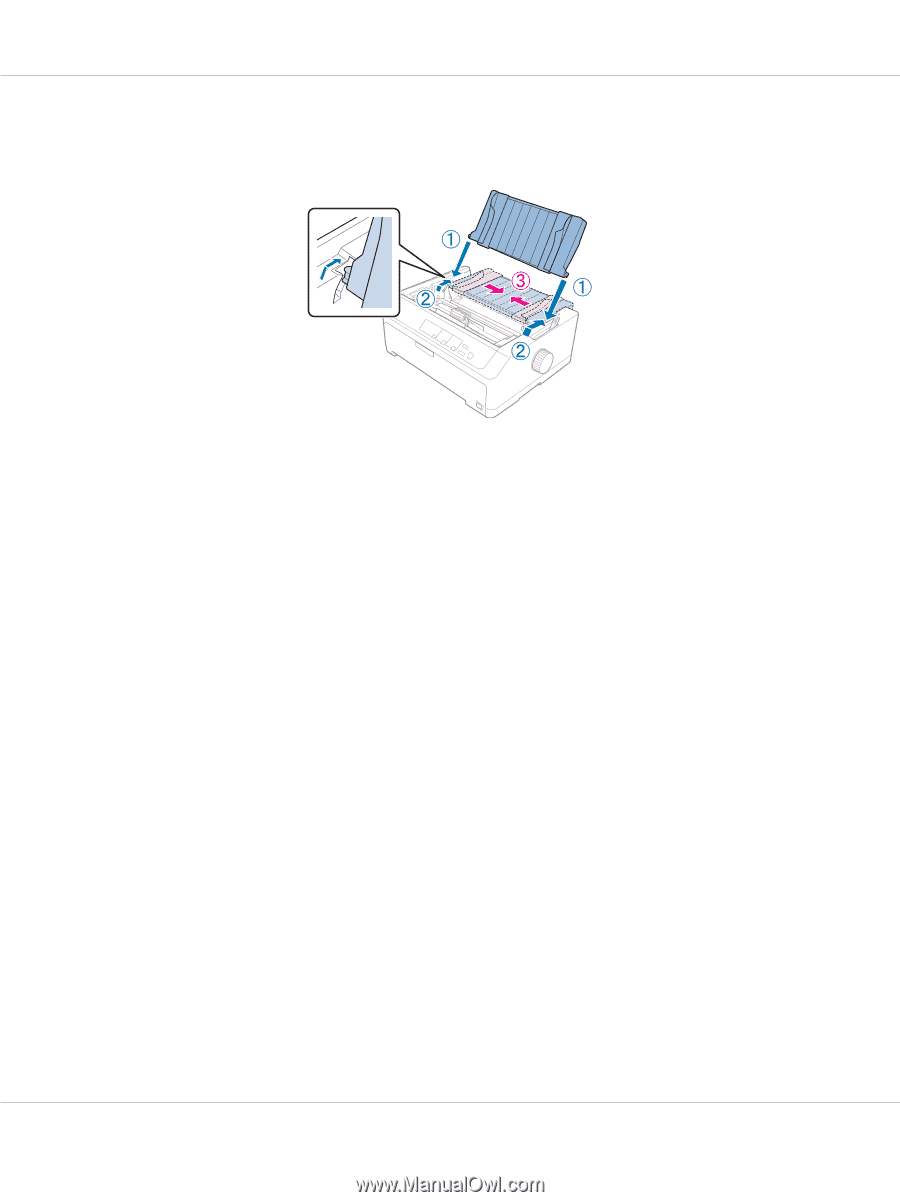
FX-890II/FX-890IIN/FX-2190II/FX-2190IIN User's Guide 9. Attach the sheet guide and lay it flat on the printer and slide the edge guides to the middle of the sheet guide. Note: For your safety, Epson recommends operating the printer with the printer cover closed. The printer will function with the printer cover opened or removed, but maximum safety and print speed are achieved when the cover is closed. 10. Turn on the printer. When the printer receives data, it automatically loads the paper and starts printing. 11. After you finish printing, follow the steps in "Removing continuous paper" on page 42 to remove your printed document. If the first line on your page appears too high or low, you can change its position using the Micro Adjust function as described in "Adjusting the top-of-form position" on page 56. ! Caution: Never use the knob to adjust the top-of-form position; this may damage the printer or cause it to lose the top-of-form position. Removing the tractor from the rear push position Follow these steps to remove the tractor from the rear push position: 1. Make sure the printer is turned off. 2. Remove any paper from the tractor as described in "Removing continuous paper" on page 42. Paper Handling 25
-
 1
1 -
2
-
3
-
4
-
5
-
6
-
7
-
8
-
9
-
10
-
11
-
12
-
13
-
14
-
15
-
16
-
17
-
18
-
19
-
 20
20 -
 21
21 -
 22
22 -
 23
23 -
 24
24 -
 25
25 -
 26
26 -
 27
27 -
 28
28 -
 29
29 -
 30
30 -
31
-
32
-
33
-
34
-
35
-
36
-
37
-
38
-
39
-
40
-
41
-
42
-
43
-
44
-
45
-
46
-
47
-
48
-
49
-
50
-
51
-
52
-
53
-
54
-
55
-
56
-
57
-
58
-
59
-
60
-
61
-
62
-
63
-
64
-
65
-
66
-
67
-
68
-
69
-
70
-
71
-
72
-
73
-
74
-
75
-
76
-
77
-
78
-
79
-
80
-
81
-
82
-
83
-
84
-
85
-
86
-
87
-
88
-
89
-
90
-
91
-
92
-
93
-
94
-
95
-
96
-
97
-
98
-
99
-
100
-
101
-
102
-
103
-
104
-
105
-
106
-
107
-
108
-
109
-
110
-
111
-
112
-
113
-
114
-
115
-
116
-
117
-
118
-
119
-
120
-
121
-
122
-
123
-
124
-
125
-
126
-
127
-
128
-
129
-
130
-
131
-
132
-
133
-
134
-
135
-
136
-
137
-
138
-
139
-
140
-
141
-
142
-
143
-
144
-
145
-
146
-
147
-
148
-
149
-
150
-
151
-
152
-
153
-
154
-
155
-
156
-
157
-
158
-
159
-
160
-
161
-
162
-
163
-
164
-
165
 |
 |