Epson FX-890II Users Guide - Page 23
Set the paper release lever to the rear push tractor position.
 |
View all Epson FX-890II manuals
Add to My Manuals
Save this manual to your list of manuals |
Page 23 highlights
FX-890II/FX-890IIN/FX-2190II/FX-2190IIN User's Guide 2. Make sure the tractor is installed in the rear push position and the sheet guide is removed from the printer. 3. Set the paper release lever to the rear push tractor position. 4. Release the left and right sprockets by pulling the blue sprocket lock levers forward. Paper Handling 23
-
 1
1 -
2
-
3
-
4
-
5
-
6
-
7
-
8
-
9
-
10
-
11
-
12
-
13
-
14
-
15
-
16
-
17
-
 18
18 -
 19
19 -
 20
20 -
 21
21 -
 22
22 -
 23
23 -
 24
24 -
 25
25 -
 26
26 -
 27
27 -
 28
28 -
29
-
30
-
31
-
32
-
33
-
34
-
35
-
36
-
37
-
38
-
39
-
40
-
41
-
42
-
43
-
44
-
45
-
46
-
47
-
48
-
49
-
50
-
51
-
52
-
53
-
54
-
55
-
56
-
57
-
58
-
59
-
60
-
61
-
62
-
63
-
64
-
65
-
66
-
67
-
68
-
69
-
70
-
71
-
72
-
73
-
74
-
75
-
76
-
77
-
78
-
79
-
80
-
81
-
82
-
83
-
84
-
85
-
86
-
87
-
88
-
89
-
90
-
91
-
92
-
93
-
94
-
95
-
96
-
97
-
98
-
99
-
100
-
101
-
102
-
103
-
104
-
105
-
106
-
107
-
108
-
109
-
110
-
111
-
112
-
113
-
114
-
115
-
116
-
117
-
118
-
119
-
120
-
121
-
122
-
123
-
124
-
125
-
126
-
127
-
128
-
129
-
130
-
131
-
132
-
133
-
134
-
135
-
136
-
137
-
138
-
139
-
140
-
141
-
142
-
143
-
144
-
145
-
146
-
147
-
148
-
149
-
150
-
151
-
152
-
153
-
154
-
155
-
156
-
157
-
158
-
159
-
160
-
161
-
162
-
163
-
164
-
165
 |
 |

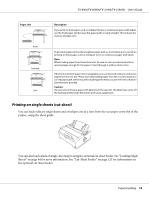
2.
Make sure the tractor is installed in the rear push position and the sheet guide is removed from the
printer.
3.
Set the paper release lever to the rear push tractor position.
4.
Release the left and right sprockets by pulling the blue sprocket lock levers forward.
FX-890II/FX-890IIN/FX-2190II/FX-2190IIN
User’s Guide
Paper Handling
23