D-Link DIR-859 User Manual
D-Link DIR-859 Manual
 |
View all D-Link DIR-859 manuals
Add to My Manuals
Save this manual to your list of manuals |
D-Link DIR-859 manual content summary:
- D-Link DIR-859 | User Manual - Page 1
Version 1.00 | June 22, 2015 User Manual Wireless AC1750 High Power Wi-Fi Gigabit Router DIR-859 - D-Link DIR-859 | User Manual - Page 2
of D-Link. All other third-party marks mentioned herein may be trademarks of their respective owners. This publication may not be reproduced, in whole or in part, without prior express written permission from D-Link Systems, Inc. © 2015 D-Link. All Rights Reserved. D-Link DIR-859 User Manual i - D-Link DIR-859 | User Manual - Page 3
you Begin 6 Wireless Installation Considerations 7 Manual Setup 8 Configuration 11 Setup Wizard 12 QRS Mobile App 17 Web-based Configuration Utility 21 Home 22 Internet 22 DIR-859 23 Connected Clients 24 Settings 25 Wizard 25 Internet 25 Dynamic IP (DCHP 26 Static IP 27 PPPoE 28 - D-Link DIR-859 | User Manual - Page 4
...90 Wireless Modes 91 Networking Basics 92 Check your IP address 92 Statically Assign an IP address 93 Wireless Security 94 What is WPA 94 Technical Specifications 95 Contacting Technical Support 96 GPL Code Statement 97 Warranty 109 Registration 116 D-Link DIR-859 User Manual iii - D-Link DIR-859 | User Manual - Page 5
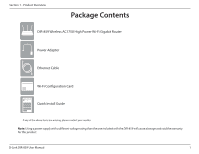
Section 1 - Product Overview PProacdkuacgteOCvoentrevnietsw DIR-859 Wireless AC1750 High Power Wi-Fi Gigabit Router Power Adapter Ethernet Cable Wi-Fi Configuration Card Quick Install Guide If any of the above items are missing, please contact your reseller. Note: Using a power supply with a - D-Link DIR-859 | User Manual - Page 6
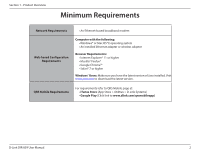
or wireless adapter Browser Requirements: • Internet download the latest version. QRS Mobile Requirements For requirements refer to QRS Mobile page at: • iTunes Store (App Store > Utilities > D-Link Systems) • Google Play (Click link to www.dlink.com/qrsmobileapp) D-Link DIR-859 User Manual - D-Link DIR-859 | User Manual - Page 7
without the need to enter settings or create passwords. In addition, the built-in firewall protects against malicious attacks from the Internet, and access control features allow you to restrict access to your network. High-Speed Wired and Wireless Connectivity The DIR-859 uses the latest high-speed - D-Link DIR-859 | User Manual - Page 8
, storage (NAS) devices, and video game consoles. 2 Reset Button Press and hold the reset button with a paper clip for six seconds to reset the router to the factory default settings. The button is located on the bottom of the router. 3 Internet Port Connect your broadband modem to this port - D-Link DIR-859 | User Manual - Page 9
4 Wireless LED A solid green light indicates the wireless function is working properly. This light will blink during data transmission. 5 LAN LED (1-4) A solid green light indicates a connection to a device is working properly. The LED will blink during data transmission. D-Link DIR-859 User - D-Link DIR-859 | User Manual - Page 10
and password. If you do not have this information, contact your ISP (Internet Service Provider router combo, you will need to set it to "bridge" mode so the DIR-859 can work properly. For details, contact your ISP or refer to the user manual for your modem/router device. D-Link DIR-859 User Manual - D-Link DIR-859 | User Manual - Page 11
to position access points, wireless routers, and computers wireless connection may degrade dramatically or drop completely. Make sure your 2.4 GHz phone base is as far away from your wireless devices as possible. The base transmits a signal even if the phone is not in use. D-Link DIR-859 User Manual - D-Link DIR-859 | User Manual - Page 12
Installation Manual Setup 1. Turn off and unplug the power to your cable or DSL modem. This is required. Modem 2. Connect an Ethernet cable from the Internet port of the router to the Ethernet port on your cable or DSL modem. Ethernet Port Ethernet Cable Modem DIR-859 4 3 2 1 INTERNET 12V - D-Link DIR-859 | User Manual - Page 13
ports on the router. You can also connect wirelessly to the router with your computer. Use the supplied Wi-Fi Configuration Card for the Wi-Fi network name (SSID) and Wi-Fi password of the router. Complete steps 4 and 5 before attempting to connect. 4 3 2 1 DIR-859 INTERNET 12V --1.5A POWER - D-Link DIR-859 | User Manual - Page 14
wirelessly, you may now connect to the router using the supplied Wi-Fi Configuration Card for the Wi-Fi network name (SSID) and Wi-Fi password. 6. After the router has powered up, verify that the Power and Internet LEDs are both lit. Proceed with router configuration. D-Link DIR-859 User Manual - D-Link DIR-859 | User Manual - Page 15
using your web browser. Refer to page 12. • QRS Mobile App - Use your iPhone, iPad, iPod Touch, or Android device to configure your router. Refer to page 17. • Manual Setup - Log into the router using a web browser and manually configure your router. Refer to page 21 D-Link DIR-859 User Manual 11 - D-Link DIR-859 | User Manual - Page 16
launch the Setup Wizard. If the wizard does not start automatically, you can enter http://dlinkrouter.local./ or the IP address of the router (192.168.0.1). The wizard will guide you through a step-by-step process to configure your new D-Link router and connect to the Internet. When the - D-Link DIR-859 | User Manual - Page 17
selected Username/Password Connection (PPPoE), enter your PPPoE username and password supplied by your ISP. Click Next to continue. Note: Make sure you remove your PPPoE software from your computer. The software is no longer needed and will not work through a router. D-Link DIR-859 User Manual 13 - D-Link DIR-859 | User Manual - Page 18
5GHz bands, create a Wi-Fi network name (SSID) using up to 32 characters. Create a Wi-Fi password (between 8-63 characters). Your wireless devices will need to have this passphrase or key entered to be able to connect to your wireless network. Click Next to continue. D-Link DIR-859 User Manual 14 - D-Link DIR-859 | User Manual - Page 19
3 - Configuration In order to secure your DIR-859, enter a new Admin Password. You will be prompted for this password every time you want to use the router's web configuration utility. Click Next to continue you can configure your Wi-Fi devices. Click Next to continue. D-Link DIR-859 User Manual 15 - D-Link DIR-859 | User Manual - Page 20
Section 3 - Configuration At the end of the wizard, you will see a final summary of your settings. Click Finish to close the wizard. D-Link DIR-859 User Manual 16 - D-Link DIR-859 | User Manual - Page 21
the QRS mobile app from your mobile device. D-Link DIR-859 User Manual Wi-Fi Name(SSID) 2.4Ghz: dlink-xxxx Wi-Fi Name(SSID) 5GHz: dlink-xxxx-5GHz Password: xxxxxxxx To con gure your router, go to: http://dlinkrouter.local. Or http://192.168.0.1 Username: "Admin" Password:"" (leave the eld blank) 17 - D-Link DIR-859 | User Manual - Page 22
point, make sure that your router is connected to a modem. Plug one end of the provided Ethernet cable into your DSL or cable modem, and plug the other end into the port marked INTERNET on the DIR-859. Tap Next to automatically detect your Internet connection and proceed to the next step. D-Link - D-Link DIR-859 | User Manual - Page 23
7 Enter the Device Password (Admin Password) of your choice. Unlike the Wi-Fi password, this password is only required when you need to configure the router. Refer to "Web-based Configuration Utility" on page 21 to learn how this password is used. Tap Next to proceed. D-Link DIR-859 User Manual 19 - D-Link DIR-859 | User Manual - Page 24
would like to receive notification whenever a new firmware update is available, tap the Notify me when new firmware is available check box and tap Next. setup. Congratulations, your device has been successfully configured! You may now exit the QRS Mobile app. D-Link DIR-859 User Manual 20 - D-Link DIR-859 | User Manual - Page 25
or the IP address of the router (http://192.168.0.1). Enter your password. If you did not create a password with the Setup Wizard, leave the Admin Password field blank by default. Click Log In to proceed. Note: If you cannot remember your password and cannot log in, press the reset button (see page - D-Link DIR-859 | User Manual - Page 26
"Setup Wizard" on page 12.) To view details about your Internet connection, click on the Internet icon. Click Release IP Address to disconnect from the Internet. If you do this and wish to reconnect, click Renew. To reconfigure the Internet settings, refer to "Internet" on page 25. D-Link DIR-859 - D-Link DIR-859 | User Manual - Page 27
Section 3 - Configuration DIR-859 Click on the DIR-859 icon to view details about the router and its wireless settings. Here you can see the router's current wireless settings, as well as its MAC address. To reconfigure the router's network settings, either click Go to settings (at the bottom left - D-Link DIR-859 | User Manual - Page 28
specific IP address for this client. Reserve IP: Enable if you would like to reserve this IP address for this client. Everytime this device joins the network, it will receive this IP address. Access: Allow or Block access to your router. Click Save when you are done. D-Link DIR-859 User Manual 24 - D-Link DIR-859 | User Manual - Page 29
the Setup Wizard and connect to the Internet. This is the same wizard that you launched when you first installed the router. Internet From the Settings menu on the bar on the top of the page, click Internet to configure your Internet connection manually. My Internet Choose your Internet Connection - D-Link DIR-859 | User Manual - Page 30
. MAC Address The default MAC address is set to the Internet port's physical interface Clone: MAC address on the router. You can use the drop-down menu to replace the Internet port's MAC address with the MAC address of a connected client. Click Save when you are done. D-Link DIR-859 User Manual 26 - D-Link DIR-859 | User Manual - Page 31
ISP. MAC Address The default MAC address is set to the Internet port's physical interface Clone: MAC address on the router. You can use drop-down menu to replace the Internet port's MAC address with the MAC address of a connected client. Click Save when you are done. D-Link DIR-859 User Manual 27 - D-Link DIR-859 | User Manual - Page 32
Server: Secondary DNS Enter the Secondary DNS Server IP address assigned by your ISP. Server: MTU: Maximum Transmission Unit - by default this field will be set to Auto. Select Manual if you need to change the MTU for optimal performance. Click Save when you are done. D-Link DIR-859 User Manual 28 - D-Link DIR-859 | User Manual - Page 33
PPTP Choose PPTP (Point-to-Point-Tunneling Protocol) if your Internet Service Provider (ISP) uses a PPTP connection. Your Internet service provider (ISP) can provide you with a username and password. PPTP Server IP Enter the PPTP Server IP Address provided by your ISP. Address: Username: Enter the - D-Link DIR-859 | User Manual - Page 34
Section 3 - Configuration MTU: Maximum Transmission Unit - by default this field will be set to Auto. Select Manual if you need to change the MTU for optimal performance with your ISP. Click Save when you are done. D-Link DIR-859 User Manual 30 - D-Link DIR-859 | User Manual - Page 35
IP Enter the L2TP Server IP Address provided by your ISP. Address: Username: Enter the Username provided by your ISP. Password: Enter the Password provided by your ISP. Reconnect Mode: Select either Always on, On demand, or Manual. Maximum Idle Enter a maximum idle time during which the Internet - D-Link DIR-859 | User Manual - Page 36
Section 3 - Configuration MTU: Maximum Transmission Unit - by default this field will be set to Auto. Select Manual if you need to change the MTU for optimal performance with your ISP. Click Save when you are done. D-Link DIR-859 User Manual 32 - D-Link DIR-859 | User Manual - Page 37
IPv6 Enter the B4 IPv4 address value used here. Address: WAN IPv6 Once connected, the WAN IPv6 address will be displayed here. Address: IPv6 WAN Once connected, the IPv6 WAN Default Gateway address will be Default displayed here. Gateway: Click Save when you are done. D-Link DIR-859 User Manual 33 - D-Link DIR-859 | User Manual - Page 38
Configuration IPv6 To configure an IPv6 connection, click the IPv6 link. To return to the IPv4 settings, click IPv4. My Internet Choose your IPv6 Internet Connection type from the drop-down Connection Is: menu. page 44. For Local Connectivity Only refer to page 46. D-Link DIR-859 User Manual 34 - D-Link DIR-859 | User Manual - Page 39
Enable or disable Automatic DHCP-PD in LAN services. DHCP-PD in LAN: Autoconfiguration Select SLAAC + RDNSS, SLAAC + Stateless DHCP, or Stateful Type: DHCPv6. Router Enter the IPv6 address lifetime (in minutes). Advertisement Lifetime: Click Save when you are done. D-Link DIR-859 User Manual 35 - D-Link DIR-859 | User Manual - Page 40
Link- Displays the router's LAN IPv6 Link-Local Address. Local Address: Enable Automatic Enable or disable the Automatic IPv6 Address Assignment feature. IPv6 Address Assignment: Autoconfiguration Select SLAAC + RDNSS, SLAAC + Stateless DHCP, or Stateful Type: DHCPv6. D-Link DIR-859 User Manual - D-Link DIR-859 | User Manual - Page 41
Section 3 - Configuration Router Enter the IPv6 address lifetime (in minutes). Advertisement Lifetime: Click Save when you are done. D-Link DIR-859 User Manual 37 - D-Link DIR-859 | User Manual - Page 42
Enable or disable Automatic DHCP-PD in LAN services. DHCP-PD in LAN: Autoconfiguration Select SLAAC + RDNSS, SLAAC + Stateless DHCP, or Stateful Type: DHCPv6. Router Enter the IPv6 address lifetime (in minutes). Advertisement Lifetime: Click Save when you are done. D-Link DIR-859 User Manual 38 - D-Link DIR-859 | User Manual - Page 43
, enter the PPPoE Password provided by your ISP. Address Mode: Select Static IP if your ISP assigned you the IP address, subnet mask, gateway, and DNS server addresses. In most cases, select Dynamic IP. IP Address: Enter the IP Address provided by your ISP (for Static IP only). Service Name: If you - D-Link DIR-859 | User Manual - Page 44
IPv6 Address Assignment feature. Automatic IPv6 Address Assignment: Auto Select SLAAC + RDNSS, SLAAC + Stateless DHCP or Stateful DHCPv6. Configuration Type: Router Enter the IPv6 address lifetime (in minutes). Advertisement Lifetime: Click Save when you are done. D-Link DIR-859 User Manual 40 - D-Link DIR-859 | User Manual - Page 45
Server: DNS Server address. Enable DHCP- Enable or disable prefix delegation services. PD: LAN IPv6 If you disabled DHCP-PD, enter the LAN (local) IPv6 address for the Address: router. LAN IPv6 Link- Displays the router's LAN IPv6 Link-Local Address. Local Address: D-Link DIR-859 User Manual 41 - D-Link DIR-859 | User Manual - Page 46
Enable or disable Automatic DHCP-PD in LAN services. DHCP-PD in LAN: Autoconfiguration Select SLAAC + RDNSS, SLAAC + Stateless DHCP, or Stateful Type: DHCPv6. Router Enter the IPv6 address lifetime (in minutes). Advertisement Lifetime: Click Save when you are done. D-Link DIR-859 User Manual 42 - D-Link DIR-859 | User Manual - Page 47
Automatic IPv6 Address Assignment feature. IPv6 Address Assignment: Autoconfiguration Select SLAAC + RDNSS or SLAAC + Stateless DHCP, or Stateful Type: DHCPv6. Router Enter the IPv6 address lifetime (in minutes). Advertisement Lifetime: Click Save when you are done. D-Link DIR-859 User Manual 43 - D-Link DIR-859 | User Manual - Page 48
Border Enter the 6rd border relay IPv4 Address supplied by your ISP (for Relay IPv4 manual configuration only). Address: LAN IPv6 Displays the LAN (local) IPv6 address for the router. Address: LAN IPv6 Link- Displays the router's LAN Link-Local Address. Local Address: D-Link DIR-859 User Manual 44 - D-Link DIR-859 | User Manual - Page 49
the Automatic IPv6 Address Assignment feature. IPv6 Address Assignment: Autoconfiguration Select SLAAC + RDNSS, SLAAC + Stateless DHCP, or Stateful Type: DHCPv6. Router Enter the IPv6 address lifetime (in minutes). Advertisement Lifetime: Click Save when you are done. D-Link DIR-859 User Manual 45 - D-Link DIR-859 | User Manual - Page 50
Unicast Addresses settings. Use Default When ULA is enabled, you may also enable automatic configuration ULA Prefix: of the ULA prefix. Current ULA Will display the Current ULA Prefix. Prefix: LAN IPv6 ULA: Will display the LAN IPv6 ULA. Click Save when you are done. D-Link DIR-859 User Manual 46 - D-Link DIR-859 | User Manual - Page 51
are not using any 802.11n wireless clients. For the 5GHz band: Select Auto 20/40/80 MHz if you are using 802.11ac, 802.11n, and non-802.11n wireless devices, or select Auto 20/40 MHz if you are using both 802.11n and non-802.11n wireless devices. D-Link DIR-859 User Manual 47 - D-Link DIR-859 | User Manual - Page 52
the SSID of your wireless network. Schedule: Use the drop-down menu to select a schedule for enabling the rule. The schedule may be set to Always Enable, or you can create your own schedules in the Schedules section (refer to page 64). Click Save when you are done. D-Link DIR-859 User Manual 48 - D-Link DIR-859 | User Manual - Page 53
Wireless clients will need to enter this password to successfully connect to the guest zone. Internet Access Enabling this option will limit connectivity to the Internet. Guests Only: will not be allowed to access other local network devices. Click Save when you are done. D-Link DIR-859 User Manual - D-Link DIR-859 | User Manual - Page 54
need to enter the new IP address in your browser to get back into the configuration utility. Subnet Mask: Enter the Subnet Mask of the router. The default subnet mask is 255.255.255.0. Management The default address to access the router's configuration utility is Link: http://dlinkrouter.local./ You - D-Link DIR-859 | User Manual - Page 55
and peripherals. IPv4 Multicast Enable to allow IPv4 multicast traffic to pass through the router from Streams: the Internet. IPv6 Multicast Enable to allow IPv6 multicast traffic to pass through the router from Streams: the Internet. Click Save when you are done. D-Link DIR-859 User Manual 51 - D-Link DIR-859 | User Manual - Page 56
slot and release the mouse button. The card will remain in the slot. If you want to remove a priority assignment from a device and return it to the Connected Clients list, click the cross icon in the top right corner of the device card. Click Save when you are done. D-Link DIR-859 User Manual 52 - D-Link DIR-859 | User Manual - Page 57
expose a single computer to the Internet for applications that do not run well behind the router. This may expose the computer to a variety of security risks and is not recommended. DMZ IP If you enabled DMZ, enter the IP Address of the client you wish to Address: expose, or select a Computer Name - D-Link DIR-859 | User Manual - Page 58
and devices have the ability to discover NAT devices and work around them. This Application Level Gateway (ALG) may interfere with the operation of such devices. If you are having trouble making VoIP calls, try turning this ALG off. Click Save when you are done. D-Link DIR-859 User Manual 54 - D-Link DIR-859 | User Manual - Page 59
is a WAN or LAN IP address. Destination IP Enter the Destination IP Address Range that the rule applies to. Address Range: Using the drop-down menu, specify whether it is a WAN or LAN IP address. Port Range: Select (refer to page 64). Click Apply when you are done. D-Link DIR-859 User Manual 55 - D-Link DIR-859 | User Manual - Page 60
below: Name: Enter a Name for the new rule. Local IP: Enter the IP address of the computer on your local network that you want to allow the incoming service to. Or, select the Computer Name from the drop-down section (refer to page 64). Click Apply when you are done. D-Link DIR-859 User Manual 56 - D-Link DIR-859 | User Manual - Page 61
for redirection to an internal LAN IP Address and Private LAN port. From the Port Forwarding page click Virtual Server. The DIR-859 can store a maximum of 15 the new rule. Local IP: Enter the IP address of the computer on your local network that you want to allow the incoming service to. Or, select - D-Link DIR-859 | User Manual - Page 62
, select DENY clients access to ONLY these sites from the drop-down menu. All other sites will be accessible. If you want to specify a list of sites to allow, select ALLOW clients access to ONLY these sites replace the URL or Domain. Click Save when you are done. D-Link DIR-859 User Manual 58 - D-Link DIR-859 | User Manual - Page 63
that indicates the cost of using this route. A value 1 is the lowest cost and 15 is the highest cost. Interface: Select the interface that the IP packet must use to transit out of the router when this route is used. Click Apply when you are done. D-Link DIR-859 User Manual 59 - D-Link DIR-859 | User Manual - Page 64
that indicates the cost of using this route. A value 1 is the lowest cost and 15 is the highest cost. Interface: Select the interface that the IP packet must use to transit out of the router when this route is used. Click Apply when you are done. D-Link DIR-859 User Manual 60 - D-Link DIR-859 | User Manual - Page 65
Configuration Dynamic DNS Most Internet Service Providers (ISPs) assign dynamic (changing) IP addresses. Using a Dynamic DNS (DDNS) service provider, people can enter your domain name in their web browser to connect to your server, no matter what your current IP address assignment. From the Advanced - D-Link DIR-859 | User Manual - Page 66
wish to create a new rule, click the Add Record button. Click Save when you are done. When you click on service provider. IPv6 Address: Enter the IPv6 Address of the dynamic DNS server. Or, select the Computer Name from the drop-down menu. Click Apply when you are done. D-Link DIR-859 User Manual - D-Link DIR-859 | User Manual - Page 67
the router's time and date manually, disable the Update Time Using NTP Server option and use the drop-down menus that appear to input the time and date. Click Save when you are done. To configure and manage your schedules, click Schedule and refer to page 64. D-Link DIR-859 User Manual 63 - D-Link DIR-859 | User Manual - Page 68
on its pencil icon in the Edit column. If you wish to create a new rule, click the Add Rule button. Click Save when you are done. When you click on Add Rule, the following screen will appear: First, enter icon at the end of the row. Click Apply when you are done. D-Link DIR-859 User Manual 64 - D-Link DIR-859 | User Manual - Page 69
be no other options on this page. Server: Syslog Server IP Enter the IP address for the Syslog server. If the Syslog server is Address: connected to the router, you can select it from the drop-down menu to (refer to page 64). Click Save when you are done. D-Link DIR-859 User Manual 65 - D-Link DIR-859 | User Manual - Page 70
from the Management: Internet by a web browser. A password is still required to access the web management interface. Remote Admin The port number used to access the DIR-859 is used in the URL. Example: Port: http://x.x.x.x:8080 where x.x.x.x is the Internet IP address of the DIR859 and 8080 is the - D-Link DIR-859 | User Manual - Page 71
System This page allows you to save the DIR-859's current configuration, load a previously saved configuration, and reset the router to the factory default settings. From the Admin page click System. Save Settings Click Save to save the current router configuration settings to a file on To Local - D-Link DIR-859 | User Manual - Page 72
will allow you to upgrade the router's firmware, either automatically or manually. To manually upgrade the firmware or language pack, you must first download the file from http://support.dlink.com. From the Management menu, click Upgrade. Firmware Displays the Current Firmware Version and Current - D-Link DIR-859 | User Manual - Page 73
. You can view the Internet, LAN, Wi-Fi 2.4GHz, or Wi-Fi 5GHz statistics by clicking on the respective tabs at the top. The graph will update in real time. To clear the information on the graph, click Clear. The traffic counter will reset if the device is rebooted. D-Link DIR-859 User Manual 69 - D-Link DIR-859 | User Manual - Page 74
-Fi Protected Setup). Most wireless devices such as wireless adapters, media players, Blu-ray DVD players, wireless printers and cameras will have a WPS button (or a software utility with WPS) that you can press to connect to the DIR-859 router. Refer to your user manual for the wireless device you - D-Link DIR-859 | User Manual - Page 75
8 WPA/WPA2 It is recommended that you enable wireless security (WPA/WPA2) on your wireless router or access point before configuring your wireless adapter. If you are joining an existing network, you will need to know the security key (Wi-Fi password) being used. To join an existing network, locate - D-Link DIR-859 | User Manual - Page 76
the router, you can also press the WPS button on your router during this step to enable the WPS function. When you have established a successful connection to a wireless network, the word Connected will appear next to the name of the network to which you are connected to. D-Link DIR-859 User Manual - D-Link DIR-859 | User Manual - Page 77
you enable wireless security (WPA/WPA2) on your wireless router or access point before configuring your wireless adapter. If wireless icon in your system tray (lower-right corner). 2. The utility will display any available wireless networks in your area. Wireless Icon D-Link DIR-859 User Manual - D-Link DIR-859 | User Manual - Page 78
button. If you get a good signal but cannot access the Internet, check your TCP/ IP settings for your wireless adapter. Refer to the Networking Basics section in this manual for more information. 4. The following window appears while your computer tries to connect to the router. D-Link DIR-859 - D-Link DIR-859 | User Manual - Page 79
by pushing the WPS button on the router. It may take 20-30 seconds to connect to the wireless network. If the connection fails, please verify that the security settings are correct. The key or passphrase must be exactly the same as the one on the wireless router. D-Link DIR-859 User Manual 75 - D-Link DIR-859 | User Manual - Page 80
Wireless Network WPS The WPS feature of the DIR-859 can be configured using Windows® 7. Carry out the following steps to use Windows® 7 to configure the WPS feature: 1. Click the Start button and select Computer from the Start menu. 2. Click Network on the left side. D-Link DIR-859 User Manual 76 - D-Link DIR-859 | User Manual - Page 81
Section 5 - Connecting to a Wireless Network 3. Double-click the DIR-859. 4. Input the WPS PIN number (on the router label) in the Setup > Wireless Setup menu in the Router's Web UI) and click Next. D-Link DIR-859 User Manual 77 - D-Link DIR-859 | User Manual - Page 82
Section 5 - Connecting to a Wireless Network 5. Type a name to identify the network. 6. To configure advanced settings, click the icon. Click Next to continue. D-Link DIR-859 User Manual 78 - D-Link DIR-859 | User Manual - Page 83
8. The following window informs you that WPS on the router has been set up successfully. Make a note of the security key as you may need to provide this security key if adding an older wireless device to the network in the future. 9. Click Close to complete WPS setup. D-Link DIR-859 User Manual 79 - D-Link DIR-859 | User Manual - Page 84
area. Click on a network (displayed using the SSID) and click the Connect button. If you get a good signal but cannot access the Internet, check you TCP/IP settings for your wireless adapter. Refer to the Networking Basics section in this manual for more information. D-Link DIR-859 User Manual 80 - D-Link DIR-859 | User Manual - Page 85
Network WPA/WPA2 It is recommended that you enable wireless security (WPA/WPA2) on your wireless router or access point before configuring your wireless adapter. If you are joining an existing network, you will need to know the security key or passphrase being used. 1. Open the Windows Vista - D-Link DIR-859 | User Manual - Page 86
-Fi password) that is on your router and click Connect. It may take 20-30 seconds to connect to the wireless network. If the connection fails, please verify that the security settings are correct. The key or passphrase must be exactly the same as the one on the wireless router. D-Link DIR-859 User - D-Link DIR-859 | User Manual - Page 87
Section 6 - Troubleshooting Troubleshooting This chapter provides solutions to problems that may occur during the installation and operation of the DIR-859. 1. Why can't I access the web-based configuration utility? When entering the IP address of the D-Link router (192.168.0.1 for example), you - D-Link DIR-859 | User Manual - Page 88
not run the Setup Wizard or you reset the router to its default settings, refer to the Wi-Fi Configuration Card included for the default Wi-Fi Network Name and Wi-Fi Password. You can also connect wireless devices to the DIR-859 router using WPS: 1. Press the WPS button on the DIR-859 for a minimum - D-Link DIR-859 | User Manual - Page 89
connect the DIR-859 to an existing router? We recommend that you replace your existing router with the DIR-859 instead of using both. If your modem is a combo router, you may want to contact your ISP or review the manufacturer's user guide so you can put the combo router into Bridge mode, which will - D-Link DIR-859 | User Manual - Page 90
steps below: • Open your browser, enter the IP address of your router (192.168.0.1) and click OK. • Enter your username (admin) and password (blank by default). Click OK to enter the web configuration page for the device. • Click on Setup and then click Manual Configure. • To change the MTU, enter - D-Link DIR-859 | User Manual - Page 91
cards. Under many circumstances, it may be desirable for mobile network devices to link to a conventional Ethernet LAN in order to use servers, printers or an Internet connection supplied through the wired LAN. A Wireless Router is a device used to provide this link. D-Link DIR-859 User Manual 87 - D-Link DIR-859 | User Manual - Page 92
indoor access point the signal can travel up to 300 feet. With an outdoor access point the signal can reach out up to 30 miles to serve places like manufacturing plants, industrial locations, university and high school campuses, airports, golf courses, and many other outdoor venues. D-Link DIR-859 - D-Link DIR-859 | User Manual - Page 93
up to 30 feet away. Compared to WLAN the speed and wireless operation range are both less than WLAN, but in return it doesn Remotely access your office network from home • Share Internet connection and printer with multiple computers • No need to dedicate office space D-Link DIR-859 User Manual - D-Link DIR-859 | User Manual - Page 94
Interference Place home appliances such as cordless telephones, microwaves, and televisions as far away as possible from the router/access point. This would significantly reduce any interference that the appliances might cause since they operate on same frequency. D-Link DIR-859 User Manual 90 - D-Link DIR-859 | User Manual - Page 95
an Access Point or wireless router. All the wireless devices, or clients, will connect to the wireless router or access point. An Ad-Hoc network contains only clients, such as laptops with wireless cardbus adapters. All the adapters must be in Ad-Hoc mode to communicate. D-Link DIR-859 User Manual - D-Link DIR-859 | User Manual - Page 96
Basics Check your IP address After you install your new D-Link adapter, by default, the TCP/IP settings should be set to obtain an IP address from a DHCP server (i.e., wireless router) automatically. To verify your IP address, please follow the steps below. Click on Start button in the lower - D-Link DIR-859 | User Manual - Page 97
Default Gateway the same as the LAN IP address of your router (i.e.,. 192.168.0.1). Set Primary DNS the same as the LAN IP address of your router (192.168.0.1). The Secondary DNS is not needed or you may enter a DNS server from your ISP. Step 5 Click OK twice to save your settings. D-Link DIR-859 - D-Link DIR-859 | User Manual - Page 98
on your wireless router or access point. WPA/WPA2 incorporates user authentication through the Extensible Authentication Protocol (EAP). EAP is built on a more secure public key encryption system to ensure that only authorized network users can access the network. D-Link DIR-859 User Manual 94 - D-Link DIR-859 | User Manual - Page 99
port • WPS (Wi-Fi Protected Setup) Push Button • Reset Button Standards • IEEE 802.11ac • IEEE 802.11n • IEEE 802.11g • IEEE 802.11a • IEEE 802.3ab • IEEE 802.3u Security • Wi-Fi Protected Access (WPA/WPA2) • WPS (Wi-Fi Protected Setup) LEDs • Power/WPS • Internet Power • DC 12 V/1.5A Operating - D-Link DIR-859 | User Manual - Page 100
asked questions and answers to technical issues. For customers within the United States: Phone Support: (877) 453-5465 Internet Support: http://support.dlink.com For customers within Canada: Phone Support: (800) 361-5265 Internet Support: http://support.dlink.ca D-Link DIR-859 User Manual 96 - D-Link DIR-859 | User Manual - Page 101
of the GPL and LGPL, and information on obtaining access to the GPL code and LGPL code used in this product, are available to you at: http://tsd.dlink.com.tw/GPL.asp The GPL code and LGPL code verbatim copies of this license document, but changing it is not allowed. D-Link DIR-859 User Manual 97 - D-Link DIR-859 | User Manual - Page 102
Public License for most of our software; it applies also to any other work released this way by its authors. You can apply it to your their problems will not be attributed erroneously to authors of previous versions. Some devices are designed to deny users access to D-Link DIR-859 User Manual 98 - D-Link DIR-859 | User Manual - Page 103
a work. A "Standard Interface" means an interface that either is an official standard defined by a recognized standards body, or, in the case of interfaces specified for a particular programming language, one that is widely used among developers working in that language. D-Link DIR-859 User Manual - D-Link DIR-859 | User Manual - Page 104
conveying all material for which you do not control copyright. Those thus making or running the covered works for you must do so exclusively on your behalf, under your direction and control, on terms that . Sublicensing is not allowed; section 10 makes it unnecessary. D-Link DIR-859 User Manual 100 - D-Link DIR-859 | User Manual - Page 105
You must license the entire work, as a whole, under work has interactive user interfaces, each must display Appropriate Legal Notices; however, if the Program has interactive interfaces that do not display Appropriate Legal Notices, your work need not make them do so. D-Link DIR-859 User Manual - D-Link DIR-859 | User Manual - Page 106
(2) access to work are being offered to the general public at no charge under subsection 6d. A separable portion of the object code, whose source code is excluded from the Corresponding Source as a System Library, need not be included in conveying the object code work. D-Link DIR-859 User Manual - D-Link DIR-859 | User Manual - Page 107
the only significant mode of use of service, warranty, or updates for a work that has been modified or installed by the recipient, or for the User Product in which it has been modified or installed. Access and must require no special password or key for unpacking, reading Link DIR-859 User Manual 103 - D-Link DIR-859 | User Manual - Page 108
trademark law for use of some trade names, trademarks, or service marks; or f ) Requiring indemnification of licensors and authors of survive such relicensing or conveying. If you add terms to a covered work in accord with this section, you must place, in the relevant D-Link DIR-859 User Manual 104 - D-Link DIR-859 | User Manual - Page 109
for any work) from work the party's predecessor in interest had or could give under the previous paragraph, plus a right to possession of the Corresponding Source of the work from the predecessor in interest, if the predecessor has it or can get it with reasonable efforts. D-Link DIR-859 User Manual - D-Link DIR-859 | User Manual - Page 110
to some of the parties receiving the covered work authorizing them to use, propagate, modify or convey a specific copy of the covered work, then the patent license you grant is automatically extended to all recipients of the covered work and works based on it. D-Link DIR-859 User Manual 106 - D-Link DIR-859 | User Manual - Page 111
are specifically granted under this License. You may not convey a covered work if you are a party to an arrangement with a third party that the present version, but may differ in detail to address new problems or concerns. Each version is given a distinguishing version Link DIR-859 User Manual 107 - D-Link DIR-859 | User Manual - Page 112
NECESSARY SERVICING, REPAIR reviewing courts shall apply local law that most closely approximates an absolute waiver of all civil liability in connection with the Program, unless a warranty or assumption of liability accompanies a copy of the Program in return for a fee. D-Link DIR-859 User Manual - D-Link DIR-859 | User Manual - Page 113
Link at an Authorized D-Link Service Office. The replacement Link upon return to D-Link of the defective Hardware. All Hardware or part thereof that is replaced by D-Link, or for which the purchase price is refunded, shall become the property of D-Link upon replacement or refund. D-Link DIR-859 User Manual - D-Link DIR-859 | User Manual - Page 114
The customer shall return the product to the original purchase point based on its return policy. In case the return customer must obtain a Case ID Number from D-Link Technical Support at https://support.dlink.com, who will attempt to assist the customer dlink.com/. D-Link DIR-859 User Manual 110 - D-Link DIR-859 | User Manual - Page 115
prominently marked on the outside of the package. Please refer to shipping and packaging instructions located online at http://rma.dlink.com/. • The customer is responsible for all in-bound shipping charges to D-Link. No Cash on Delivery ("COD") is allowed. Products sent COD will either be rejected - D-Link DIR-859 | User Manual - Page 116
common carrier selected by D-Link. Return shipping charges shall be prepaid by D-Link if you use an address in Canada, otherwise we damage; Any hardware, software, firmware or other products or services provided by anyone other than D-Link; and Products that have been Link DIR-859 User Manual 112 - D-Link DIR-859 | User Manual - Page 117
notice. Copyright ©2014 by D-Link Corporation/D-Link Systems, Inc. All rights reserved. CE Mark Warning: This is a Class B product. In a domestic environment, this product may cause radio interference, in which case the user may be required to take adequate measures. D-Link DIR-859 User Manual 113 - D-Link DIR-859 | User Manual - Page 118
and, if not installed and used in accordance with the instructions, may cause harmful interference to radio communications. However, there is firmware programmed at the factory to match the intended destination. The firmware setting is not accessible by the end user. D-Link DIR-859 User Manual - D-Link DIR-859 | User Manual - Page 119
End users must follow the specific operating instructions for satisfying RF exposure compliance. This equipment MHz) to comply with the e.i.r.p. limits specified for point-to-point and non point-to-point operation as appropriate, as stated in section A9.2(3). érique. D-Link DIR-859 User Manual 115 - D-Link DIR-859 | User Manual - Page 120
Appendix G - Registration Registration Product registration is entirely voluntary and failure to complete or return this form will not diminish your warranty rights. Version 1.00 June 22, 2015 D-Link DIR-859 User Manual 116
-
 1
1 -
 2
2 -
 3
3 -
 4
4 -
 5
5 -
 6
6 -
 7
7 -
8
-
9
-
10
-
11
-
12
-
13
-
14
-
15
-
16
-
17
-
18
-
19
-
20
-
21
-
22
-
23
-
24
-
25
-
26
-
27
-
28
-
29
-
30
-
31
-
32
-
33
-
34
-
35
-
36
-
37
-
38
-
39
-
40
-
41
-
42
-
43
-
44
-
45
-
46
-
47
-
48
-
49
-
50
-
51
-
52
-
53
-
54
-
55
-
56
-
57
-
58
-
59
-
60
-
61
-
62
-
63
-
64
-
65
-
66
-
67
-
68
-
69
-
70
-
71
-
72
-
73
-
74
-
75
-
76
-
77
-
78
-
79
-
80
-
81
-
82
-
83
-
84
-
85
-
86
-
87
-
88
-
89
-
90
-
91
-
92
-
93
-
94
-
95
-
96
-
97
-
98
-
99
-
100
-
101
-
102
-
103
-
104
-
105
-
106
-
107
-
108
-
109
-
110
-
111
-
112
-
113
-
114
-
115
-
116
-
117
-
118
-
119
-
120
 |
 |
Version 1.00 | June 22, 2015
User Manual
DIR-859
Wireless AC1750
High Power Wi-Fi Gigabit Router