D-Link DGS-3312SR Product Manual - Page 21
Installation, Package Contents, Before You Connect to the Network - user manual
 |
View all D-Link DGS-3312SR manuals
Add to My Manuals
Save this manual to your list of manuals |
Page 21 highlights
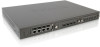
DGS-3312SR Gigabit Layer 3 Switch SECTION 2 Installation Package Contents Before You Connect to the Network Installing the Switch without a Rack Installing the Switch in a Rack Connecting Stacked Switch Groups Configuring a Switch Group for Stacking External Redundant Power System Connecting the Console Port Password Protection SNMP Settings IP Address Assignment Connecting Devices to the Switch Package Contents Before you begin installing the Switch, confirm that your package contains the following items: • One DGS-3312SR Layer 3 Switch • Mounting kit: 2 mounting brackets and screws • Four rubber feet with adhesive backing • One AC power cord • This Manual • CLI Reference Before You Connect to the Network Before you connect to the network, you must install the Switch on a flat surface or in a rack, set up a terminal emulation program, plug in the power cord, and then set up a password and IP address. NOTICE: Do not connect the Switch to the network until you have established the correct IP settings, user accounts and proper stacking configuration (if the Switch is stacked). Installing the Switch without the Rack The Switch is supplied with rubber feet for stationing it on a flat surface and mounting brackets and screws for mounting the Switch in a rack. 1. Install the Switch on a level surface that can safely support the weight of the Switch and its attached cables. The Switch must have adequate space for ventilation and for accessing cable connectors. 8
-
 1
1 -
2
-
3
-
4
-
5
-
6
-
7
-
8
-
9
-
10
-
11
-
12
-
13
-
14
-
15
-
 16
16 -
 17
17 -
 18
18 -
 19
19 -
 20
20 -
 21
21 -
 22
22 -
 23
23 -
 24
24 -
 25
25 -
 26
26 -
27
-
28
-
29
-
30
-
31
-
32
-
33
-
34
-
35
-
36
-
37
-
38
-
39
-
40
-
41
-
42
-
43
-
44
-
45
-
46
-
47
-
48
-
49
-
50
-
51
-
52
-
53
-
54
-
55
-
56
-
57
-
58
-
59
-
60
-
61
-
62
-
63
-
64
-
65
-
66
-
67
-
68
-
69
-
70
-
71
-
72
-
73
-
74
-
75
-
76
-
77
-
78
-
79
-
80
-
81
-
82
-
83
-
84
-
85
-
86
-
87
-
88
-
89
-
90
-
91
-
92
-
93
-
94
-
95
-
96
-
97
-
98
-
99
-
100
-
101
-
102
-
103
-
104
-
105
-
106
-
107
-
108
-
109
-
110
-
111
-
112
-
113
-
114
-
115
-
116
-
117
-
118
-
119
-
120
-
121
-
122
-
123
-
124
-
125
-
126
-
127
-
128
-
129
-
130
-
131
-
132
-
133
-
134
-
135
-
136
-
137
-
138
-
139
-
140
-
141
-
142
-
143
-
144
-
145
-
146
-
147
-
148
-
149
-
150
-
151
-
152
-
153
-
154
-
155
-
156
-
157
-
158
-
159
-
160
-
161
-
162
-
163
-
164
-
165
-
166
-
167
-
168
-
169
-
170
-
171
-
172
-
173
-
174
-
175
-
176
-
177
-
178
-
179
-
180
-
181
-
182
-
183
-
184
-
185
-
186
-
187
-
188
-
189
-
190
-
191
-
192
-
193
-
194
-
195
-
196
-
197
-
198
-
199
-
200
-
201
-
202
-
203
-
204
-
205
-
206
-
207
-
208
-
209
-
210
-
211
-
212
-
213
-
214
-
215
-
216
-
217
-
218
-
219
-
220
-
221
-
222
-
223
-
224
-
225
-
226
-
227
-
228
-
229
-
230
-
231
-
232
-
233
-
234
-
235
-
236
-
237
-
238
-
239
-
240
-
241
-
242
-
243
-
244
 |
 |
