D-Link DES-3226L User Manual - Page 47
SNMP View Table
 |
UPC - 790069262722
View all D-Link DES-3226L manuals
Add to My Manuals
Save this manual to your list of manuals |
Page 47 highlights
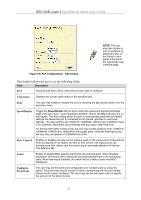
DES-3226L Layer 2 Fast Ethernet Switch User's Guide SNMP View Table The SNMP View Table is used to assign views to community strings that define which MIB objects can be accessed by an SNMP manager. To access the view table, click Basic Setup > Network Management > SNMP V3 > SNMP View Table. Figure 5-12. SNMP View Table To delete an existing SNMP View Table entry, click the selection button on the far left that corresponds to the port you want to configure and click the Delete button. To create a new entry, click the New button, and a separate menu will appear. Figure 5-13. SNMP View Table - Add window The SNMP Group created with this table maps SNMP users (identified in the SNMP User Table) to the views created in the previous menu. The following parameters can be set: 35
-
 1
1 -
2
-
3
-
4
-
5
-
6
-
7
-
8
-
9
-
10
-
11
-
12
-
13
-
14
-
15
-
16
-
17
-
18
-
19
-
20
-
21
-
22
-
23
-
24
-
25
-
26
-
27
-
28
-
29
-
30
-
31
-
32
-
33
-
34
-
35
-
36
-
37
-
38
-
39
-
40
-
41
-
 42
42 -
 43
43 -
 44
44 -
 45
45 -
 46
46 -
 47
47 -
 48
48 -
 49
49 -
 50
50 -
 51
51 -
 52
52 -
53
-
54
-
55
-
56
-
57
-
58
-
59
-
60
-
61
-
62
-
63
-
64
-
65
-
66
-
67
-
68
-
69
-
70
-
71
-
72
-
73
-
74
-
75
-
76
-
77
-
78
-
79
-
80
-
81
-
82
-
83
-
84
-
85
-
86
-
87
-
88
-
89
-
90
-
91
-
92
-
93
-
94
-
95
-
96
-
97
-
98
-
99
-
100
-
101
-
102
-
103
-
104
-
105
-
106
-
107
-
108
-
109
-
110
-
111
-
112
-
113
-
114
-
115
-
116
-
117
-
118
-
119
-
120
-
121
-
122
-
123
-
124
-
125
-
126
-
127
-
128
-
129
-
130
-
131
-
132
-
133
-
134
 |
 |
