Cisco C1861-SRST-B/K9 Hardware Installation Guide - Page 74
Installing and Removing DIMMs, Removing a DIMM
 |
UPC - 882658171147
View all Cisco C1861-SRST-B/K9 manuals
Add to My Manuals
Save this manual to your list of manuals |
Page 74 highlights
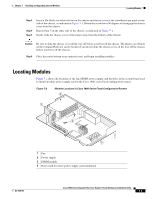
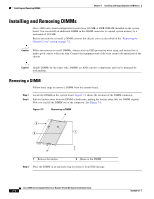
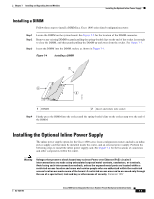
Installing and Removing DIMMs Chapter 7 Installing and Upgrading Internal Modules Installing and Removing DIMMs Cisco 1800 series fixed-configuration routers have 128 MB of DDR SDRAM installed on the system board. You can install an additional DIMM in the DIMM connector to expand system memory to a maximum of 384 MB. Before you remove or install a DIMM, remove the chassis cover as described in the "Removing the Chassis Cover" section on page 7-2. Caution When you remove or install DIMMs, always wear an ESD-preventive wrist strap, and ensure that it makes good contact with your skin. Connect the equipment end of the wrist strap to the metal part of the chassis. Caution Handle DIMMs by the edges only. DIMMs are ESD-sensitive components and can be damaged by mishandling. Removing a DIMM Follow these steps to remove a DIMM from the system board: Step 1 Step 2 Locate the DIMM on the system board. Figure 7-2 shows the location of the DIMM connector. Pull the latches away from the DIMM at both ends; pulling the latches away lifts the DIMM slightly. Now you can lift the DIMM out of the connector. See Figure 7-3. Figure 7-3 Removing a DIMM 3 2 1 103155 1 Release the latches 2 Remove the DIMM Step 3 Place the DIMM in an antistatic bag to protect it from ESD damage. Cisco 1800 Series Integrated Services Routers (Fixed) Hardware Installation Guide 7-4 OL-6425-03
-
 1
1 -
2
-
3
-
4
-
5
-
6
-
7
-
8
-
9
-
10
-
11
-
12
-
13
-
14
-
15
-
16
-
17
-
18
-
19
-
20
-
21
-
22
-
23
-
24
-
25
-
26
-
27
-
28
-
29
-
30
-
31
-
32
-
33
-
34
-
35
-
36
-
37
-
38
-
39
-
40
-
41
-
42
-
43
-
44
-
45
-
46
-
47
-
48
-
49
-
50
-
51
-
52
-
53
-
54
-
55
-
56
-
57
-
58
-
59
-
60
-
61
-
62
-
63
-
64
-
65
-
66
-
67
-
68
-
 69
69 -
 70
70 -
 71
71 -
 72
72 -
 73
73 -
 74
74 -
 75
75 -
 76
76 -
 77
77 -
 78
78 -
 79
79 -
80
-
81
-
82
 |
 |
