Canon REALiS LCOS 4K600STZ 4K600STZ 4K601STZ 4K600Z 4K601Z Users Manual - Page 161
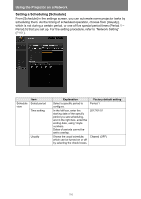
Network Setting, Select a function to set up from the settings screen menu.
 |
View all Canon REALiS LCOS 4K600STZ manuals
Add to My Manuals
Save this manual to your list of manuals |
Page 161 highlights
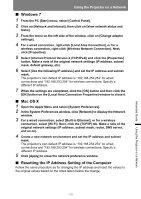
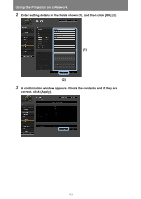
Using the Projector on a Network The factory default IP address is "192.168.254.254" for wired connections (IPv4) and "192.168.253.254" for wireless connections (IPv4). If DHCP settings are used, ask the network administrator for the projector IP address. It is possible to check the IP address from the projector menu. (P142, P149) 3 Click [Settings] on the web screen. The password input window appears. 4 Enter the user name and password on the password input window, then click [OK]. The factory default user name is "root" and the password is "system". The settings screen is displayed. Complete the network settings on this screen. To control the projector from the computer, click [Projector control]. (P181) ■ Network Setting 1 Select a function to set up from the settings screen menu. 161 Advanced Guide Using the Projector on a Network
-
 1
1 -
2
-
3
-
4
-
5
-
6
-
7
-
8
-
9
-
10
-
11
-
12
-
13
-
14
-
15
-
16
-
17
-
18
-
19
-
20
-
21
-
22
-
23
-
24
-
25
-
26
-
27
-
28
-
29
-
30
-
31
-
32
-
33
-
34
-
35
-
36
-
37
-
38
-
39
-
40
-
41
-
42
-
43
-
44
-
45
-
46
-
47
-
48
-
49
-
50
-
51
-
52
-
53
-
54
-
55
-
56
-
57
-
58
-
59
-
60
-
61
-
62
-
63
-
64
-
65
-
66
-
67
-
68
-
69
-
70
-
71
-
72
-
73
-
74
-
75
-
76
-
77
-
78
-
79
-
80
-
81
-
82
-
83
-
84
-
85
-
86
-
87
-
88
-
89
-
90
-
91
-
92
-
93
-
94
-
95
-
96
-
97
-
98
-
99
-
100
-
101
-
102
-
103
-
104
-
105
-
106
-
107
-
108
-
109
-
110
-
111
-
112
-
113
-
114
-
115
-
116
-
117
-
118
-
119
-
120
-
121
-
122
-
123
-
124
-
125
-
126
-
127
-
128
-
129
-
130
-
131
-
132
-
133
-
134
-
135
-
136
-
137
-
138
-
139
-
140
-
141
-
142
-
143
-
144
-
145
-
146
-
147
-
148
-
149
-
150
-
151
-
152
-
153
-
154
-
155
-
 156
156 -
 157
157 -
 158
158 -
 159
159 -
 160
160 -
 161
161 -
 162
162 -
 163
163 -
 164
164 -
 165
165 -
 166
166 -
167
-
168
-
169
-
170
-
171
-
172
-
173
-
174
-
175
-
176
-
177
-
178
-
179
-
180
-
181
-
182
-
183
-
184
-
185
-
186
-
187
-
188
-
189
-
190
-
191
-
192
-
193
-
194
-
195
-
196
-
197
-
198
-
199
-
200
-
201
-
202
-
203
-
204
-
205
-
206
-
207
-
208
-
209
-
210
-
211
-
212
-
213
-
214
-
215
-
216
-
217
 |
 |
