2009 Yamaha Motorsports FX Nytro XTX Owners Manual - Page 63
2009 Yamaha Motorsports FX Nytro XTX Manual

Page 63 highlights
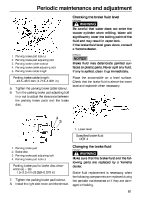
Periodic maintenance and adjustment TIP Apply the parking brake before replacing the V-belt. 1. Remove the shroud and the left side cover, and then remove the drive guard. (See pages 17 and 44 for removal procedures.) Rotate the secondary sliding sheave clockwise and push it so that it separates from the secondary fixed sheave. force the V-belt between the sheaves; the secondary sliding and fixed sheaves must touch each other. 2. 1. Secondary fixed sheave 2. Secondary sliding sheave 3. Pull the V-belt up over the secondary fixed sheave. 1. Edge of the secondary sheave assembly 2. V-belt position Standard V-belt position: From 1.5 mm (0.06 in) above the edge of the secondary sheave assembly to 0.5 mm (0.02 in) below the edge 6. If the V-belt position is incorrect, adjust it by removing or adding a spacer on each V-belt position adjusting bolt. 1. V-belt 4. 5. Remove the V-belt from the secondary sheave assembly and primary sheave assembly. Temporarily install the new V-belt on the secondary sheave assembly only, and then measure the V-belt position. Do not 57
-
 1
1 -
2
-
3
-
4
-
5
-
6
-
7
-
8
-
9
-
10
-
11
-
12
-
13
-
14
-
15
-
16
-
17
-
18
-
19
-
20
-
21
-
22
-
23
-
24
-
25
-
26
-
27
-
28
-
29
-
30
-
31
-
32
-
33
-
34
-
35
-
36
-
37
-
38
-
39
-
40
-
41
-
42
-
43
-
44
-
45
-
46
-
47
-
48
-
49
-
50
-
51
-
52
-
53
-
54
-
55
-
56
-
57
-
 58
58 -
 59
59 -
 60
60 -
 61
61 -
 62
62 -
 63
63 -
 64
64 -
 65
65 -
 66
66 -
 67
67 -
 68
68 -
69
-
70
-
71
-
72
-
73
-
74
-
75
-
76
-
77
-
78
-
79
-
80
-
81
-
82
-
83
-
84
-
85
-
86
-
87
-
88
-
89
-
90
-
91
-
92
 |
 |
