Sharp XG-PH70X XG-PH70X Operation Manual - Page 41
Using the Adjustment Feet, Basic Operation
 |
UPC - 074000365117
View all Sharp XG-PH70X manuals
Add to My Manuals
Save this manual to your list of manuals |
Page 41 highlights
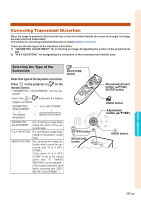
1 Press on the projector or on the remote control. • Pressing on the projector or on the remote control displays the test pattern. Checking the test pattern is use- ful for more accurate adjustment. ▼On-screen Display H & V LENS SHIFT button H & V LENS SHIFT button Mouse/adjustment button ('/"/\/|) ENTER button Adjustment button ('/"/\/|) 2 Press ', ", \ or | on the pro- jector or the remote control to adjust the image position. ENTER button Using the Adjustment Feet • When the position of the projected image cannot be adjusted with the lens shift function, use the adjustment feet to adjust the projected angle. • The height of the projector can be adjusted using the adjustment feet when the screen is located higher than the projector, the screen is inclined or when the installation site is slightly inclined. • Install the projector so that it is as perpendicular to the screen as possible. 1 While lifting the projector, rotate the adjustment feet. • The projector is adjustable up to approximately 9 degrees. 2 Lower the projector, and then ro- tate the adjustment feet for the fine adjustment. • When lowering the projector, be careful not to get your fingers caught in the area between the adjustment feet and the projector. Adjustment feet Basic Operation Down Up Up Down -39
-
 1
1 -
2
-
3
-
4
-
5
-
6
-
7
-
8
-
9
-
10
-
11
-
12
-
13
-
14
-
15
-
16
-
17
-
18
-
19
-
20
-
21
-
22
-
23
-
24
-
25
-
26
-
27
-
28
-
29
-
30
-
31
-
32
-
33
-
34
-
35
-
 36
36 -
 37
37 -
 38
38 -
 39
39 -
 40
40 -
 41
41 -
 42
42 -
 43
43 -
 44
44 -
 45
45 -
 46
46 -
47
-
48
-
49
-
50
-
51
-
52
-
53
-
54
-
55
-
56
-
57
-
58
-
59
-
60
-
61
-
62
-
63
-
64
-
65
-
66
-
67
-
68
-
69
-
70
-
71
-
72
-
73
-
74
-
75
-
76
-
77
-
78
-
79
-
80
-
81
-
82
-
83
-
84
-
85
-
86
-
87
-
88
-
89
-
90
-
91
-
92
-
93
-
94
-
95
-
96
-
97
-
98
-
99
-
100
-
101
-
102
-
103
-
104
-
105
-
106
-
107
-
108
-
109
-
110
 |
 |
