Pioneer S-LX70C User Manual - Page 11
Black, Colour-coded wire
 |
View all Pioneer S-LX70C manuals
Add to My Manuals
Save this manual to your list of manuals |
Page 11 highlights
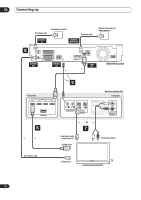
Connecting up 02 1 Connect the display unit to the receiver subwoofer. Plug the display cable into the connector on the rear of the display unit, then plug the other end of the display cable into SYSTEM connector on the receiver subwoofer. Caution • Do not attempt to attach the display unit to the wall. 2 Assemble the AM loop antenna. a b c 4 Connect each speaker. • Each speaker cable has a colour-coded connector at one end and two wires at the other end. Colour-coded wire (Connect to speaker) Colour-coded connector (Connect to receiver subwoofer) • Twist and pull off the protective shields on each wire. a. Bend the stand in the direction indicated by the arrow. b. Clip the loop onto the stand. c. If you want to fix to a wall or other surface, perform step b after first securing the stand with screws. It is recommended that you determine the reception strength before securing the stand with the screws. 3 Connect the AM and FM antennas1. a. Connect one wire of the AM loop antenna to each AM antenna terminal2. For each terminal, press down on the tab to open; insert the wire, then release to secure. 2 3 1 b. Push the FM antenna3 plug onto the center pin of the FM antenna socket. • Connect the wires to the speaker. Each speaker in the illustration can be identified by means of the colourcoded indicator provided on the rear-surface model label. Match the colour-coded wire with the colour indicator on the model label, then insert the colourcoded wire into the red (+) side and the other wire into the black (-) side. Black (-) Red (+) Colour-coded wire • Connect the other end to the colour-coded speaker terminals on the side of the receiver subwoofer. Make sure to insert completely. Be careful when inserting the speaker plug, as it must be inserted in the proper direction when being plugged into one of the terminals. Please make sure to connect correctly. Note 1 • Keep antenna cables away from other cables, the display unit, receiver subwoofer and HDD/DVD recorder. • If reception with the supplied antenna is poor, see Improving poor FM reception and Improving poor AM sound on page 35 or Connecting external antennas on page 42. • Do not attach any antenna other than the provided loop antenna, or an external antenna as described on page 43. 2 • Don't let it come into contact with metal objects and avoid placing near computers, television sets or other electrical appliances. • If radio reception is poor, you may be able improve it by re-inserting each antenna wire into the opposite terminal. • For best reception, do not untwist the AM loop antenna wires or wrap them around the loop antenna. 3 To ensure optimum reception, make sure the FM antenna is fully extended and not coiled or hanging at the rear of the unit. 11 En
-
 1
1 -
2
-
3
-
4
-
5
-
 6
6 -
 7
7 -
 8
8 -
 9
9 -
 10
10 -
 11
11 -
 12
12 -
 13
13 -
 14
14 -
 15
15 -
 16
16 -
17
-
18
-
19
-
20
-
21
-
22
-
23
-
24
-
25
-
26
-
27
-
28
-
29
-
30
-
31
-
32
-
33
-
34
-
35
-
36
-
37
-
38
-
39
-
40
-
41
-
42
-
43
-
44
-
45
-
46
-
47
-
48
-
49
-
50
-
51
-
52
-
53
-
54
-
55
-
56
-
57
-
58
-
59
-
60
-
61
-
62
-
63
-
64
-
65
-
66
-
67
-
68
-
69
-
70
-
71
-
72
-
73
-
74
-
75
-
76
-
77
-
78
-
79
-
80
-
81
-
82
-
83
-
84
-
85
-
86
-
87
-
88
-
89
-
90
-
91
-
92
-
93
-
94
-
95
-
96
-
97
-
98
-
99
-
100
-
101
-
102
-
103
-
104
-
105
-
106
-
107
-
108
-
109
-
110
-
111
-
112
-
113
-
114
-
115
-
116
-
117
-
118
-
119
-
120
-
121
-
122
-
123
-
124
-
125
-
126
-
127
-
128
-
129
-
130
-
131
-
132
-
133
-
134
-
135
-
136
-
137
-
138
-
139
-
140
-
141
-
142
-
143
-
144
-
145
-
146
-
147
-
148
-
149
-
150
-
151
-
152
-
153
-
154
-
155
-
156
-
157
-
158
-
159
-
160
-
161
-
162
-
163
-
164
-
165
-
166
-
167
-
168
-
169
-
170
-
171
-
172
-
173
-
174
-
175
-
176
-
177
-
178
-
179
 |
 |
