Panasonic AJSDC915 AJSDC915 User Guide - Page 35
Adjusting The Diopter And Screen, Adjusting The Eyepiece Position, Adjusting The Diopter
 |
View all Panasonic AJSDC915 manuals
Add to My Manuals
Save this manual to your list of manuals |
Page 35 highlights
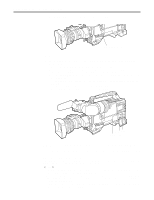
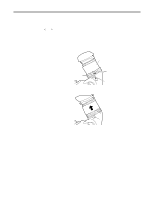
-3 -2 -1 0 +1 +2 +3 Adjusting the Viewfinder (The viewfinder shown in the illustration is the optional AJ-VF10P.) Adjusting the Diopter and Screen Adjusting the diopter 1 Set the POWER switch to ON. A picture will appear in the viewfinder. 2 Turn the diopter adjustment ring to adjust the diopter so that the viewfinder picture can be clearly seen. Diopter Adjustment Ring Adjusting the screen Adjust the condition of the viewfinder screen. Brightness: Adjust the BRIGHT control Contrast: Adjust the CONTRAST control Contour: Adjust the PEAKING control PEAKING Control CONTRAST Control BRIGHT Control 1 Set the POWER switch to ON. 2 Set the OUTPUT switch to CAM. 3 Turn the viewfinder BRIGHT and CONTRAST controls to adjust the picture brightness and contrast. Turning the PEAKING control makes the picture appear softer or sharper. A sharp picture facilitates focusing the lens. Adjusting the Eyepiece Position Turn the eyepiece forward-backward movement ring to adjust the position of the eyepiece in the forward-backward direction. Eyepiece Forward-backward Movement Ring - 35 -
-
 1
1 -
2
-
3
-
4
-
5
-
6
-
7
-
8
-
9
-
10
-
11
-
12
-
13
-
14
-
15
-
16
-
17
-
18
-
19
-
20
-
21
-
22
-
23
-
24
-
25
-
26
-
27
-
28
-
29
-
 30
30 -
 31
31 -
 32
32 -
 33
33 -
 34
34 -
 35
35 -
 36
36 -
 37
37 -
 38
38 -
 39
39 -
 40
40 -
41
-
42
-
43
-
44
-
45
-
46
-
47
-
48
-
49
-
50
-
51
-
52
-
53
-
54
-
55
-
56
-
57
-
58
-
59
-
60
-
61
-
62
-
63
-
64
-
65
-
66
-
67
-
68
-
69
-
70
-
71
-
72
-
73
-
74
-
75
-
76
-
77
-
78
-
79
-
80
-
81
-
82
-
83
-
84
-
85
-
86
-
87
-
88
-
89
-
90
-
91
-
92
-
93
-
94
-
95
-
96
-
97
-
98
-
99
-
100
-
101
-
102
-
103
-
104
-
105
-
106
-
107
-
108
-
109
-
110
-
111
-
112
-
113
-
114
-
115
-
116
-
117
-
118
-
119
-
120
-
121
-
122
-
123
-
124
-
125
-
126
-
127
-
128
-
129
-
130
-
131
-
132
-
133
-
134
-
135
-
136
-
137
-
138
-
139
-
140
-
141
-
142
-
143
-
144
-
145
-
146
-
147
-
148
-
149
-
150
-
151
-
152
-
153
-
154
-
155
-
156
-
157
-
158
-
159
-
160
 |
 |
