Oki C9300nccs C9300/C9500 Finisher User Guide - Page 16
Printing a Menu Map, Printing a Demo Checking the Finisher Operation
 |
View all Oki C9300nccs manuals
Add to My Manuals
Save this manual to your list of manuals |
Page 16 highlights
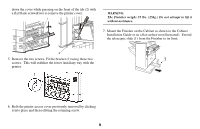
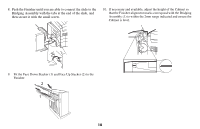
some value greater than 1, then press Select (3) to confirm your selection. 4. Press Item (1) until Output Bin appears. Press Value (2) to cycle through the available options and press Select to enable the desired choice. The standard bin is the bin on top of the printer, the first option bin is the Finisher's face-up stacker, and the second option bin is the Finisher's face-down (staple) stacker. 5. Press Item (1) until Hole Punch appears. Press Value (2) to see either On or Off and press Select to enable the desired choice. 6. Press Item (1) until Staple appears. Press Value (2) to see either On or Off and press Select to enable the desired choice. 7. Press Item (1) until Job Offset appears. Press Value (2) to see either On or Off and press Select to enable the desired choice. 8. Press Item (1) until Paper Feed appears. The display will prompt you for your preferred feed tray. Press Value (2) several times to cycle through the available trays. When the tray you wish to feed from is displayed, press Select (3) to confirm your selection. 9. Press Online to exit the menu system and return the printer to standby operation. Printing a Menu Map This function prints a map of all the menu settings and shows all the new settings now available with your Finisher installed. 1. Press Menu (0) to access the Information Menu. 2. Press Item (1) and then press Select (3) to confirm that you wish to print the menu map. After a few seconds the menu map appears over two pages. These may be punched and/or stapled, depending on the selections you made in the previous section. Printing a Demo Page The built-in demo page can also be used to check that the various functions of your Finisher perform correctly. 1. Press Menu (0) to access the Information Menu. If you have a hard disk installed you will need to press Menu (0) twice to access the Information Menu. 2. Press Item (1) several times until prompted to print a demo page, press Select (3) to print the page. Checking the Finisher Operation 1. Changing the output bin. Use the procedure described earlier to choose each of the Finisher settings, print a menu map or multiple copies of demo pages using each of the available output bins to ensure that paper is stacked in the correct bin. Note that the size of paper which can be accommodated in each bin is restricted, so be sure to choose an appropriate paper size for each bin. (All bins can accommodate A4 or Letter sizes, so these might be the most convenient sizes for testing.) 13
-
 1
1 -
2
-
3
-
4
-
5
-
6
-
7
-
8
-
9
-
10
-
 11
11 -
 12
12 -
 13
13 -
 14
14 -
 15
15 -
 16
16 -
 17
17 -
 18
18 -
 19
19 -
 20
20 -
 21
21 -
22
-
23
-
24
-
25
-
26
-
27
-
28
-
29
-
30
-
31
-
32
-
33
-
34
-
35
-
36
-
37
-
38
-
39
-
40
-
41
-
42
-
43
-
44
-
45
-
46
-
47
-
48
-
49
-
50
-
51
 |
 |
