Metabo SSW 650 Operating Instructions - Page 9
Accessories, Repairs, Environmental Protection, Technical specifications
 |
View all Metabo SSW 650 manuals
Add to My Manuals
Save this manual to your list of manuals |
Page 9 highlights
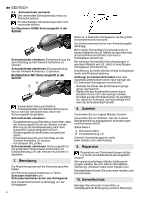
For machines WITHOUT locking pin in the spindle Inserting the screwdriving bit: Fit the tool on the square attachment until the limit stop (1) . Removing the screwdriving bit: Remove the tool from the square attachment (1) . For machines WITH locking pin in the spindle b a ENGLISH en With a hard screwdriving application (screwcouplings in hard material such as metal), maximum tightening torque is already reached after a short impact duration (a). With a soft screwdriving application (screwcouplings in soft material such as wood), a longer impact duration (b) is required. Recommendation: determine the correct impact duration by carrying out trial screwdriving. Caution! With small screws, maximum torque can be reached even below an impact duration of 0.5 seconds. - This is why the duration of the screwdriving process must be monitored exactly. - Adjust the tightening torque by pressing firmly or lightly on the trigger (3), ensuring that the screw is not damaged or that the screw head does not tear off. 8. Accessories Use only screwdriving bits with a lateral drilled hole (a). Only like this will the screwdriving bit be retained by the locking pin (b). Inserting the screwdriving bit: - Align the tool and spindle such as the locking pin (b) at the spindle and the drilled hole (a) at the tool can be interlock after the fitting. - Press in the locking pin (b) and keep pressed. - Fit the tool on the square attachment until the limit stop (1) . - Make sure that the guard is placed securely. Removing the screwdriving bit: Press in the locking pin (b) with an appropriate object and remove the tool from the square attachment (1) . 7. Use Mount the machine on the screw, ensuring it is aligned straight. The screwdriving process has two elements: inserting the screw and tightening the screw with the percussion mechanism. The tightening torque depends on the impact duration. Use only genuine Metabo accessories. Use only accessories that fulfil the requirements and specifications listed in these operating instructions. See page 4. A Screwdriving bits B 1/2" tool For a complete range of accessories, see www.metabo.com or the catalogue. 9. Repairs Repairs to electrical tools must be carried out by qualified electricians ONLY! If you have Metabo electrical tools that require repairs, please contact your Metabo service centre. For addresses see www.metabo.com. You can download spare parts lists from www.metabo.com. 10. Environmental Protection Observe national regulations on environmentally compatible disposal and on the recycling of disused machines, packaging and accessories. Only for EU countries: Never dispose of power tools in your household waste! In accordance with European Guideline 2002/ 96/EC on used electronic and electric equipment and its implementation in national legal systems, used power tools must be collected separately and handed in for environmentally compatible recycling. 11. Technical specifications Explanatory notes on the specifications on page 3. With Changes due to technological progress reserved. an impact duration of approx. 5 seconds, the maximum tightening torque has been reached. sn0 = No-load speed = Impact frequency The torque curve depends on the type of application: H m = Machine tool attachment = Weight (with smallest battery pack) 9
-
 1
1 -
2
-
3
-
 4
4 -
 5
5 -
 6
6 -
 7
7 -
 8
8 -
 9
9 -
 10
10 -
 11
11 -
 12
12 -
 13
13 -
 14
14 -
15
-
16
-
17
-
18
-
19
-
20
-
21
-
22
-
23
-
24
-
25
-
26
-
27
-
28
-
29
-
30
-
31
-
32
-
33
-
34
-
35
-
36
-
37
-
38
-
39
-
40
-
41
-
42
-
43
-
44
-
45
-
46
-
47
-
48
-
49
-
50
-
51
-
52
 |
 |
