LiftMaster LMSC1000 Instructions Manual - English French Spanish - Page 4
LMUNTG LiftMaster Dual-Purpose RFID Tag
 |
View all LiftMaster LMSC1000 manuals
Add to My Manuals
Save this manual to your list of manuals |
Page 4 highlights
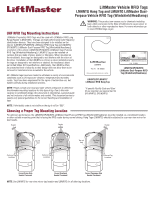
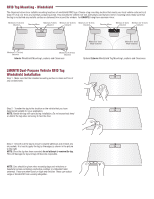
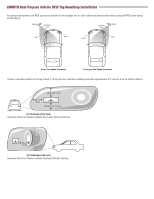
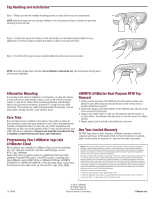
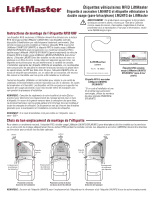
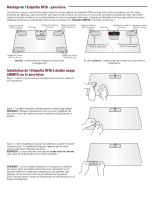
Tag Handling and Installation Step 1 - Make sure that the intended mounting surface is clean and free of any contaminants. NOTE: Handle the tags with care during installation. Do not excessively bend or distort the tag when removing it from the liner. Step 2 - Transfer the tag to the location on the vehicle that you have determined suitable for your application. It is best to apply the tag by the edges as shown in the picture below. Step 3 - Smooth out the tag to ensure complete adhesion and remove any air pockets. NOTE: Once the tag has been mounted, do not attempt to remove the tag, this will damage the tag and it will become inoperable. Alternative Mounting If mounting to the vehicle's headlamp is not feasible, you may also choose to mount the tag on other plastic surfaces, such as the vehicle's bumper, valance or side mirror. Many of the preceding guidelines will still apply and the tag must still be mounted a minimum 2" (5 cm) from any metal structures. This includes any metal structures behind the bumper, such as metal grilles, bumper mounts or the vehicle's frame. Cure Time Once the tag has been installed on the vehicle, there will be a period of time necessary to allow the tag's adhesive to cure. Due to temperature and humidity variations the total cure time may vary. Most applications will experience an 80% cure of the adhesive within 1 hour and full adhesive cure within 24 hours of application. Please do not wash the area where the tag is installed or disturb the tag for 24 hours after installation. Programming Your LiftMaster tags into LiftMaster Cloud When adding a new credential in LiftMaster Cloud, go to the credentials tab, click "Add new credentials" and when selecting type, choose RFID_Tags_LiftMaster. Please note, there is a section option for installations that have a Non LiftMaster Branded RFID system. If the RFID system is anything other than LiftMaster reader (LMSC1000) or LiftMaster RFID tags (LMUNTG/ SPLMUNTG or LMHNTG/SPLMHNTG), follow the steps above, except when the drop down menu step comes up, choose RFID_Tags_Other_Mfgs. LMUNTG LiftMaster Dual-Purpose RFID Tag Removal 1. Gently peel the top layer of the RFID tag from the vehicle surface, the adhesive and antenna tag layer should remain on the vehicle and is a function of the tag's security. 2. Generously spray a mild glass cleaner on the adhesive layer and let it soak in for around 10-20 seconds. 3. Using a micro-fiber towel or cloth, rub the adhesive with the towel in a circular motion. The adhesive should pull up in a similar manner to rubber cement. 4. Repeat steps 2 and 3 until all of the adhesive is removed. One Year Limited Warranty All RFID Tags sales are final. However, LiftMaster warrants to the first consumer purchaser of this product that it is free from defect in materials and/or workmanship for a period of 1 year from the date of purchase. NOTICE: This device complies with Part 15 of the FCC rules and Industry Canada's license-exempt RSSs. Operation is subject to the following two conditions: (1) this device may not cause harmful interference, and (2) this device must accept any interference received, including interference that may cause undesired operation. Any changes or modifications not expressly approved by the party responsible for compliance could void the user's authority to operate the equipment. This device has been tested and found to comply with the limits for a Class B digital device, pursuant to part 15 of the FCC rules and Industry Canada ICES standard. These limits are designed to provide reasonable protection against harmful interference in a residential installation. This equipment generates, uses and can radiate radio frequency energy and, if not installed and used in accordance with the instructions, may cause harmful interference to radio communications. However, there is no guarantee that interference will not occur in a particular installation. If this equipment does cause harmful interference to radio or television reception, which can be determined by turning the equipment off and on, the user is encouraged to try to correct the interference by one or more of the following measures: • Reorient or relocate the receiving antenna. • Increase the separation between the equipment and receiver. • Connect the equipment into an outlet on a circuit different from that to which the receiver is connected. • Consult the dealer or an experienced radio/TV technician for help. 01-39460 © 2018, LiftMaster All Rights Reserved Tous droits réservés Todos los derechos reservados LiftMaster.com
-
 1
1 -
 2
2 -
 3
3 -
 4
4 -
 5
5 -
 6
6 -
 7
7 -
 8
8 -
 9
9 -
 10
10 -
11
-
12
 |
 |
