LiftMaster LMSC1000 Instructions Manual - English French Spanish - Page 2
RFID Tag Mounting - Windshield, LMUNTG Dual-Purpose Vehicle RFID Tag, Windshield Installation
 |
View all LiftMaster LMSC1000 manuals
Add to My Manuals
Save this manual to your list of manuals |
Page 2 highlights
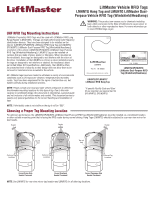
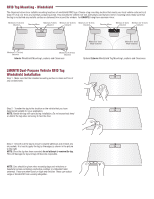
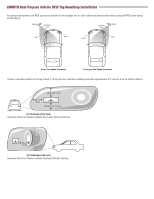
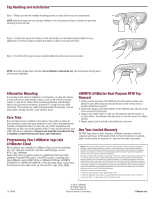
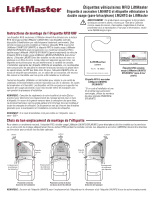
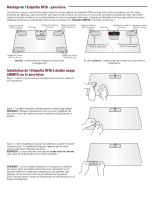
RFID Tag Mounting - Windshield The diagrams below show suitable mounting locations of windshield RFID tags. Choose a tag mounting location that meets your local vehicle code and is at least 2.5" (6.4 cm) from any materials containing metal. This includes the vehicle roof line, side pillars and rearview mirror mounting block. Make sure that the tag is not behind any metallic surface or darkened trim around the window. For LMHNTG, hang from rearview mirror. Minimum 2.5" (6.4cm) Clearance Rearview Mirror Minimum 2" (5cm) Minimum 2.5" (6.4cm) Minimum 2.5" (6.4cm) Clearance Clearance Clearance Rearview Mirror Minimum 2" (5cm) Minimum 2.5" (6.4cm) Clearance Clearance Minimum 2.5" (6.4cm) Clearance Minimum 2.5" (6.4cm) Clearance Interior Windshield Mounting Locations and Clearances Minimum 2" (5cm) Wiper Clearance Minimum 2" (5cm) Wiper Clearance Optional Exterior Windshield Tag Mounting Locations and Clearances LMUNTG Dual-Purpose Vehicle RFID Tag Windshield Installation Step 1 - Make sure that the intended mounting surface is clean and free of any contaminants. Step 2 - Transfer the tag to the location on the vehicle that you have determined suitable for your application. NOTE: Handle the tag with care during installation. Do not excessively bend or distort the tag when removing it from the liner. Step 3 - Smooth out the tag to ensure complete adhesion and remove any air pockets. It is best to apply the tag by the edges as shown in the picture to the right. NOTE: Once the tag has been mounted, do not attempt to remove the tag. This will damage the tag and tag will become inoperable. NOTE: Care should be given when mounting tags onto windows or headlamp lenses containing conductive coatings or embedded radio antennas. These are often found on high-end vehicles. These can reduce range or block RFID from working altogether.
-
 1
1 -
 2
2 -
 3
3 -
 4
4 -
 5
5 -
 6
6 -
 7
7 -
 8
8 -
9
-
10
-
11
-
12
 |
 |
