LiftMaster LJ8950W LJ8950W Manual - Page 6
Installation, Introduction
 |
View all LiftMaster LJ8950W manuals
Add to My Manuals
Save this manual to your list of manuals |
Page 6 highlights
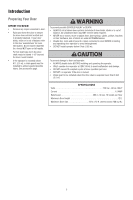
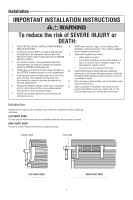
Installation IMPORTANT INSTALLATION INSTRUCTIONS To reduce the risk of SEVERE INJURY or DEATH: 1. READ AND FOLLOW ALL INSTALLATION WARNINGS 8. NEVER wear watches, rings or loose clothing while AND INSTRUCTIONS. installing or servicing operator. They could be caught in 2. Install door operator ONLY on properly balanced and door or operator mechanisms. lubricated door. An improperly balanced door may 9. Install wall-mounted door control: NOT reverse when required and could result in SEVERE • within sight of the door. INJURY or DEATH. • out of reach of children at a minimum height of 5 3. ALL repairs to cables, spring assemblies and other feet (1.5 m) above floors, landings, steps or any hardware MUST be made by a trained door systems other adjacent walking surface. technician BEFORE installing operator. • away from ALL moving parts of the door. 4. Disable ALL locks and remove ALL ropes connected to 10. Install the Emergency Release Marking. Attach the door BEFORE installing operator to avoid entanglement. marking on or next to the emergency release. Install the 5. If the operator must be installed less than 2.44m (8 ft.) Entrapment Warning Placard next to the door control in above the floor, then exposed moving parts must a prominent location. be protected by covers or guarding, provided by the operator manufacturer. 11. Place emergency release/safety reverse test label in plain view on inside of door. 6. Mount the emergency release within reach, but at least 6 feet (1.83 m) above the floor and avoiding contact with vehicles to avoid accidental release. 12. Upon completion of installation, test safety reversal system. Door MUST reverse on contact with a 1-1/2" (3.8 cm) high object (or a 2x4 laid flat) on the floor. 7. NEVER connect door operator to power source until instructed to do so. Introduction Identify the door type for your installation and review the requirements before beginning installation. LIVE SHAFT DOOR The axle rotates with the drum and door assembly when the door is opened or closed. DEAD SHAFT DOOR The axle is locked in place while the door opens and closes. Rotating Shaft Fixed Shaft LIVE SHAFT DOOR DEAD SHAFT DOOR 6
-
 1
1 -
 2
2 -
 3
3 -
 4
4 -
 5
5 -
 6
6 -
 7
7 -
 8
8 -
 9
9 -
 10
10 -
 11
11 -
 12
12 -
13
-
14
-
15
-
16
-
17
-
18
-
19
-
20
-
21
-
22
-
23
-
24
-
25
-
26
-
27
-
28
-
29
-
30
-
31
-
32
-
33
-
34
-
35
-
36
-
37
-
38
-
39
-
40
-
41
-
42
-
43
-
44
-
45
-
46
-
47
-
48
-
49
-
50
-
51
-
52
-
53
-
54
-
55
-
56
-
57
-
58
-
59
-
60
 |
 |
