Lenovo ThinkServer TS440 (English) User Guide - Page 159
Locate the rear system fan. See Server components
 |
View all Lenovo ThinkServer TS440 manuals
Add to My Manuals
Save this manual to your list of manuals |
Page 159 highlights
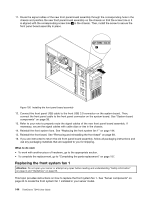
CAUTION: Hazardous moving parts. Keep fingers and other body parts away. Before you begin, print all the related instructions or ensure that you can view the PDF version on another computer for reference. Note: Depending on the model, your server might look slightly different from the illustrations in this topic. To replace the rear system fan, do the following: 1. Remove all media from the drives and turn off all attached devices and the server. Then, disconnect all power cords from electrical outlets and disconnect all cables that are connected to the server. 2. Remove the server cover. See "Removing the server cover" on page 67. 3. Locate the rear system fan. See "Server components" on page 23. 4. Disconnect the rear system fan cable from the rear system fan connector on the system board. See "System board components" on page 38. 5. The rear system fan is attached to the chassis by four rubber mounts. Remove the rear system fan by cutting the rubber mounts and pulling the rear system fan out of the chassis. Figure 103. Removing the rear system fan Chapter 6. Installing, removing, or replacing hardware 147
-
 1
1 -
2
-
3
-
4
-
5
-
6
-
7
-
8
-
9
-
10
-
11
-
12
-
13
-
14
-
15
-
16
-
17
-
18
-
19
-
20
-
21
-
22
-
23
-
24
-
25
-
26
-
27
-
28
-
29
-
30
-
31
-
32
-
33
-
34
-
35
-
36
-
37
-
38
-
39
-
40
-
41
-
42
-
43
-
44
-
45
-
46
-
47
-
48
-
49
-
50
-
51
-
52
-
53
-
54
-
55
-
56
-
57
-
58
-
59
-
60
-
61
-
62
-
63
-
64
-
65
-
66
-
67
-
68
-
69
-
70
-
71
-
72
-
73
-
74
-
75
-
76
-
77
-
78
-
79
-
80
-
81
-
82
-
83
-
84
-
85
-
86
-
87
-
88
-
89
-
90
-
91
-
92
-
93
-
94
-
95
-
96
-
97
-
98
-
99
-
100
-
101
-
102
-
103
-
104
-
105
-
106
-
107
-
108
-
109
-
110
-
111
-
112
-
113
-
114
-
115
-
116
-
117
-
118
-
119
-
120
-
121
-
122
-
123
-
124
-
125
-
126
-
127
-
128
-
129
-
130
-
131
-
132
-
133
-
134
-
135
-
136
-
137
-
138
-
139
-
140
-
141
-
142
-
143
-
144
-
145
-
146
-
147
-
148
-
149
-
150
-
151
-
152
-
153
-
 154
154 -
 155
155 -
 156
156 -
 157
157 -
 158
158 -
 159
159 -
 160
160 -
 161
161 -
 162
162 -
 163
163 -
 164
164 -
165
-
166
-
167
-
168
-
169
-
170
-
171
-
172
-
173
-
174
-
175
-
176
-
177
-
178
-
179
-
180
-
181
-
182
-
183
-
184
-
185
-
186
-
187
-
188
-
189
-
190
-
191
-
192
-
193
-
194
-
195
-
196
 |
 |
