Kenwood TM-D700A User Manual 1 - Page 59
Mhz Scan
 |
View all Kenwood TM-D700A manuals
Add to My Manuals
Save this manual to your list of manuals |
Page 59 highlights
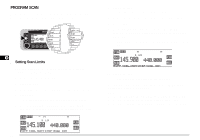
s Using Program Scan 1 Select the appropriate band. 2 Press [VFO] . 3 Select a frequency equal to or between the programmed scan limits. 4 Press [VFO] (1 s). • Scan starts at the frequency currently displayed. • The 1 MHz decimal blinks while scanning is in progress. • To reverse the scan direction, turn the Tuning control clockwise (upward scan) or counterclockwise (downward scan). You can also press Mic [UP]/ [DWN]. 5 To quit Program Scan, press [VFO] again. Note: x If the step size of the current VFO frequency differs from that of the programmed frequencies, VFO scan starts instead of Program Scan. x If the step size differs between the lower limit and the upper limit, VFO scan starts instead of Program Scan. x If the current VFO frequency is within more than one programmed scan range, the range stored in the smallest channel number is used. MHz SCAN MHz Scan monitors a 1 MHz segment of the band, using the current frequency step size. The current 1 MHz digit determines the limits of the scan. For example, if the current frequency is 145.400 MHz, then the scan range would be from 145.000 MHz to 145.995 MHz. The exact upper limit depends on the current frequency step size. 9 1 s 1 Select the desired band. 2 Press [VFO] to select VFO mode. 3 Select a frequency within the desired 1 MHz segment. 4 Press [MHz] (Tuning control) (1 s). • Scan starts at the frequency currently displayed. • The 1 MHz decimal blinks while scanning is in progress. • To reverse the scan direction, turn the Tuning control clockwise (upward scan) or counterclockwise (downward scan). You can also press Mic [UP]/ [DWN]. 5 To quit MHz Scan, press [MHz] again. 53
-
 1
1 -
2
-
3
-
4
-
5
-
6
-
7
-
8
-
9
-
10
-
11
-
12
-
13
-
14
-
15
-
16
-
17
-
18
-
19
-
20
-
21
-
22
-
23
-
24
-
25
-
26
-
27
-
28
-
29
-
30
-
31
-
32
-
33
-
34
-
35
-
36
-
37
-
38
-
39
-
40
-
41
-
42
-
43
-
44
-
45
-
46
-
47
-
48
-
49
-
50
-
51
-
52
-
53
-
 54
54 -
 55
55 -
 56
56 -
 57
57 -
 58
58 -
 59
59 -
 60
60 -
 61
61 -
 62
62 -
 63
63 -
 64
64 -
65
-
66
-
67
-
68
-
69
-
70
-
71
-
72
-
73
-
74
-
75
-
76
-
77
-
78
-
79
-
80
-
81
-
82
-
83
-
84
-
85
-
86
-
87
-
88
-
89
-
90
-
91
-
92
-
93
-
94
-
95
-
96
-
97
-
98
-
99
 |
 |
