Image Fitness 10.6 Treadmill English Manual - Page 5
Assembly
 |
View all Image Fitness 10.6 Treadmill manuals
Add to My Manuals
Save this manual to your list of manuals |
Page 5 highlights
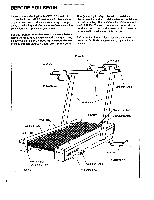
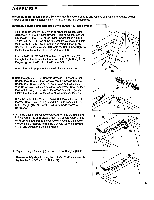
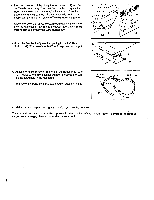
ASSEMBLY Assembly requires two people. Set the treadmill in a cleared area and remove all packing materials. Do not dispose of the packing materials until the treadmill is fully assembled. Assembly can be completed using the included 7/32" alien wrench . 1. Find the Right Upright (15), which contains the Upright Wire Harness (12) (see the inset drawing). Hold an Upright Spacer (25) inside the lower end of the Right Upright. Insert a 3/8" x 31/2" Bolt (27), with one of the four Upright Washers (26), into the lower hole in the Right Upright, and through the Upright Spacer. Slide a Star Washer (49) onto the Bolt. Finger tighten the Bolt into the indicated hole in the Frame (50). Insert a 3/8" x 3 1/2° Bolt (27), with an Upright Washer (26), through the other hole in the lower end of the Right Upright (15). Finger tighten the Bolt into the Frame (50). Attach the Left Upright (not shown) in the same manner. 1 12 50 • 15 / 26 .27 4 25 / /-N\ 26 27 2. Hold the right end of the Console Crossbar (6) near the Right Upright (15). Connect the Console Wire Harness (10) to the 2 Upright Wire Harness (12). The small latch on the Console Wire Harness should snap onto the Upright Wire Harness (see the inset drawing). If the Wire Harnesses do not fit together easily, turn them; do not force the Wire Harnesses together. Slide the ends of the 6" Cable Looms (30) against the ends of the Wire Harnesses (10, 12). Insert the Cable Looms into the Right Upright (15). Be careful not to damage the Wire Harnesses. 10 30 30 12 6 10 15 30 12 30 A 3. Slide the ends of the Console Crossbar (6) into the Right and Left Uprights (15, 2) as shown. Insert a Console Knob (3) into each Upright, and thread the Console Knobs into the ends of the Console Crossbar. Rotate the Console (9) to the desired angle, and tighten the Console Knobs. 3 9 3 3 15 2 6 4. Tap an Upright Endcap (4) into each of the Uprights (15, 2). 4 See assembly step 1. Using the included 7/32" alien wrench, tighten the four 3/8" x 3 1/2" Bolts (27). 4 4 15 2 5
-
 1
1 -
 2
2 -
 3
3 -
 4
4 -
 5
5 -
 6
6 -
 7
7 -
 8
8 -
 9
9 -
 10
10 -
 11
11 -
12
-
13
-
14
-
15
-
16
-
17
-
18
-
19
-
20
-
21
-
22
-
23
-
24
-
25
-
26
-
27
 |
 |
