| Section |
Page |
| Contents |
3 |
| Product Basics |
18 |
| Installing or Using Optional Parts |
18 |
| Optional Accessories and Replacement Parts |
19 |
| Installing the Optional Paper Cassette Units |
19 |
| Enabling the Optional Paper Cassettes - Windows |
25 |
| Enabling the Optional Paper Cassettes - PostScript Printer Software - Windows |
27 |
| Enabling the Optional Paper Cassettes - Mac |
29 |
| Enabling the Optional Paper Cassettes - PostScript Printer Software - Mac |
30 |
| Product Parts Locations |
31 |
| Product Parts - Front |
32 |
| Product Parts - Inside |
34 |
| Product Parts - Back |
36 |
| Using the Control Panel |
37 |
| Control Panel Buttons and Lights |
37 |
| Status Icon Information |
38 |
| Job/Status Screen |
40 |
| Selecting the Date and Time |
40 |
| Selecting Your Country or Region |
41 |
| Entering Characters on the LCD Screen |
42 |
| Using Presets |
42 |
| Changing LCD Screen Language |
43 |
| Adjusting Control Panel Sounds |
43 |
| Adjusting the Screen Brightness |
44 |
| Turning Off the Operation Time Out Setting |
44 |
| Checking for Software Updates |
45 |
| Using Power Saving Settings |
45 |
| Changing the Sleep Timer Settings |
46 |
| Changing the Power Off Timer Settings |
46 |
| Epson Connect Solutions for Smartphones, Tablets, and More |
47 |
| Setting Up Epson Connect Services |
47 |
| Using Epson Email Print |
49 |
| Using Epson Remote Print |
49 |
| Using Epson Scan to Cloud |
50 |
| Using the Epson Smart Panel Mobile App |
51 |
| Using AirPrint |
51 |
| Setting Up Printing on a Chromebook |
52 |
| Android Printing Using the Epson Print Enabler |
52 |
| Using the Mopria Print Service |
53 |
| Voice-activated Printing |
54 |
| Wi-Fi or Wired Networking |
55 |
| Network Security Recommendations |
55 |
| Wi-Fi Infrastructure Mode Setup |
56 |
| Selecting Wireless Network Settings from the Control Panel |
57 |
| Wi-Fi Direct Mode Setup |
59 |
| Connecting to a Mobile Device |
59 |
| Modifying the Wi-Fi Direct Network Name or Password |
60 |
| Wi-Fi Protected Setup (WPS) |
62 |
| Using WPS to Connect to a Network |
62 |
| Printing a Network Status Sheet |
63 |
| Printing a Network Connection Report |
63 |
| Network Connection Report Codes and Messages |
64 |
| Changing or Updating Network Connections |
70 |
| Changing a USB Connection to a Wi-Fi Connection |
70 |
| Changing a Wi-Fi Connection to a Wired Network Connection |
70 |
| Connecting to a New Wi-Fi Router |
71 |
| Disabling Wi-Fi Features |
71 |
| Enabling PCL or PostScript Printing |
73 |
| Installing the PCL Driver - Windows |
73 |
| Installing the PostScript (PS3) Printer Software - Windows |
75 |
| Installing the PostScript (PS3) Printer Software - Mac |
75 |
| Selecting PDL (Page Description Language) Settings |
76 |
| PDL Print Configuration Options |
76 |
| Selecting Printer Language and Interface Settings |
79 |
| Printing Language and Interface Options |
79 |
| Printing a PCL or PS3 (PostScript) Status Sheet |
80 |
| Loading Paper |
81 |
| Loading Paper in the Paper Cassettes and Rear Paper Tray |
81 |
| Paper Loading Capacity |
84 |
| Double-sided Printing Capacity |
89 |
| Compatible Epson Papers |
91 |
| Paper or Media Type Settings - Printing Software |
93 |
| Selecting the Paper Settings for Each Source - Control Panel |
94 |
| Paper Type Settings - Control Panel |
94 |
| Selecting Default Paper Settings - Administrator |
95 |
| Selecting the Default Printer Settings |
96 |
| Paper Source Settings Options |
96 |
| Selecting the Universal Print Settings |
97 |
| Universal Print Settings Options |
97 |
| Placing Originals on the Product |
99 |
| Placing Originals in the Automatic Document Feeder |
99 |
| Placing Originals on the Scanner Glass |
100 |
| Copying |
102 |
| Copying Documents or Photos |
102 |
| Copying Options |
103 |
| Printing from a Computer |
106 |
| Printing with the Standard Epson Printer Software - Windows |
106 |
| Selecting Basic Print Settings - Windows |
107 |
| Paper Source Options - Windows |
109 |
| Print Quality Options - Windows |
110 |
| Multi-Page Printing Options - Windows |
110 |
| Selecting Double-sided Printing Settings - Windows |
110 |
| Double-sided Printing Options - Windows |
113 |
| Print Density Adjustments - Windows |
113 |
| Selecting Additional Layout and Print Options - Windows |
114 |
| Custom Color Correction Options - Windows |
115 |
| Image Options and Additional Settings - Windows |
116 |
| Header/Footer Settings - Windows |
117 |
| Selecting a Printing Preset - Windows |
118 |
| Selecting Extended Settings - Windows |
120 |
| Extended Settings - Windows |
121 |
| Printing Your Document - Windows |
122 |
| Locking Printer Settings - Windows |
123 |
| Locked Setting Options |
124 |
| Entering a User ID and Password for Printing |
126 |
| Selecting Default Print Settings - Windows |
127 |
| Changing the Language of the Printer Software Screens |
128 |
| Changing Automatic Update Options |
129 |
| Printing with the Built-in Epson Driver - Windows 10 S |
130 |
| Selecting Print Settings - Windows 10 S |
130 |
| Printing with the Epson Standard Printer Software - Mac |
134 |
| Selecting Basic Print Settings - Mac |
135 |
| Paper Source Options - Mac |
138 |
| Print Quality Options - Mac |
138 |
| Selecting Page Setup Settings - Mac |
139 |
| Selecting Print Layout Options - Mac |
140 |
| Selecting Double-sided Printing Settings - Mac |
140 |
| Double-sided Printing Options and Adjustments - Mac |
141 |
| Selecting Printing Preferences - Mac |
142 |
| Printing Preferences - Mac |
143 |
| Printing Your Document - Mac |
143 |
| Checking Print Status - Mac |
144 |
| Setting Up Printing on a Chromebook |
145 |
| Printing from a Smartphone or Tablet |
145 |
| Printing with the PCL Printer Software - Windows |
146 |
| Synchronizing Printer Settings - PCL Driver - Windows |
146 |
| Selecting Basic Print Settings - PCL Driver - Windows |
147 |
| Selecting Default Print Settings - PCL Driver - Windows |
149 |
| Locking Printer Settings - PCL Driver - Windows |
150 |
| PCL Driver Locked Setting Options |
152 |
| Printing with the PostScript (PS3) Printer Software - Windows |
153 |
| Selecting Basic Print Settings - PostScript Printer Software - Windows |
153 |
| Selecting Default Print Settings - PostScript Printer Software - Windows |
155 |
| Printing with the PostScript (PS3) Printer Software - Mac |
155 |
| Selecting Basic Print Settings - PostScript Printer Software - Mac |
156 |
| Cancelling Printing Using a Product Button |
160 |
| Scanning |
161 |
| Starting a Scan |
161 |
| Starting a Scan Using the Product Control Panel |
161 |
| Scanning to Email |
162 |
| Scanning to a Connected Computer |
163 |
| Scanning to a Memory Device |
164 |
| Scanning to the Cloud |
165 |
| Setting Up a WSD Port (Windows 7/Windows Vista) |
166 |
| Control Panel Scanning Options |
167 |
| Setting Up and Scanning to a Network Folder or FTP Server |
168 |
| Creating a Shared Network Folder |
169 |
| Registering Contacts for Network Folder or FTP Scanning - Web Config |
170 |
| Registering Contacts for Email, Network, or FTP Scanning - Control Panel |
171 |
| Scanning to a Network Folder or FTP Server |
173 |
| Starting a Scan Using the Epson Scan 2 Icon |
174 |
| Starting a Scan from a Scanning Program |
177 |
| Starting a Scan from a Smartphone or Tablet |
179 |
| Scanning in Epson Scan 2 |
179 |
| Additional Scanning Settings - Main Settings Tab |
182 |
| Additional Scanning Settings - Advanced Settings Tab |
183 |
| Saving Scanned Documents as a Searchable PDF Using Epson Scan 2 |
184 |
| Image Format Options |
185 |
| Scan Resolution Guidelines |
186 |
| Scanning with Document Capture Pro or Document Capture |
186 |
| Scanning with Simple Scan in Document Capture Pro - Windows |
187 |
| Scanning with Job Scan in Document Capture Pro - Windows |
188 |
| Adding and Assigning Scan Jobs with Document Capture Pro - Windows |
190 |
| Scanning Two Originals onto One Sheet (Stitching Images) - Windows |
193 |
| Scanning Multi-Page Originals as Separate Files - Windows |
196 |
| Scanning with Document Capture - Mac |
199 |
| Adding and Assigning Scan Jobs with Document Capture - Mac |
202 |
| Entering a User ID and Password for Scanning |
203 |
| Faxing |
204 |
| Connecting a Telephone or Answering Machine |
204 |
| Setting Up Fax Features |
207 |
| Setting Up Basic Fax Features |
208 |
| Using the Fax Setup Wizard |
208 |
| Selecting the Line Type |
210 |
| Setting the Number of Rings to Answer |
211 |
| Selecting Advanced Fax Settings |
212 |
| Basic Settings - Fax |
213 |
| Send Settings - Fax |
215 |
| Receive Settings - Fax |
216 |
| Report Settings - Fax |
219 |
| Security Settings - Fax |
220 |
| Setting Up the Fax Utility - Windows |
221 |
| Setting Up Fax Features Using the Fax Utility - Mac |
223 |
| Setting Up Contacts and Contact Groups |
224 |
| Creating a Contact |
225 |
| Editing or Deleting a Contact |
226 |
| Creating a Contact Group |
226 |
| Editing or Deleting a Contact Group |
227 |
| Sending Faxes |
228 |
| Sending Faxes from the Product Control Panel |
228 |
| Sending a Fax Using the Keypad, Contact List, or History |
228 |
| Fax Sending Options |
230 |
| Sending a Fax at a Specified Time |
232 |
| Sending a Fax on Demand |
233 |
| Sending a Stored Fax |
234 |
| Dialing Fax Numbers from a Connected Telephone |
234 |
| Sending Faxes Using the Fax Utility - Windows |
235 |
| Sending Faxes Using the Fax Utility - Mac |
238 |
| Receiving Faxes |
241 |
| Fax Reception |
241 |
| Receiving Faxes Automatically |
242 |
| Receiving Faxes Manually |
242 |
| Forwarding Received Faxes |
243 |
| Receiving a Fax by Polling |
243 |
| Checking Fax Status |
244 |
| Viewing a Fax on the LCD Screen (Using the Fax Box) |
244 |
| Printing Fax Reports |
245 |
| Fax Report Options |
245 |
| Using External USB Devices with Your Product |
247 |
| Connecting a USB Device |
247 |
| Disconnecting a USB Device |
247 |
| Viewing and Printing from the LCD Screen |
248 |
| Printing JPEG Photos |
248 |
| Print Setting Options - JPEG Mode |
249 |
| Printing TIFF and PDF Files |
250 |
| Print Setting Options - TIFF Mode |
251 |
| Print Setting Options - PDF Mode |
252 |
| Transferring Files on a USB Device |
253 |
| Setting Up File Sharing for File Transfers from Your Computer |
253 |
| Transferring Files from a USB Device to Your Computer |
254 |
| Replacing the Ink Supply Unit (Ink Pack), Maintenance Box, and Cassette Rollers |
255 |
| Ink Pack Safety Instructions |
255 |
| Check Ink and Maintenance Box Status |
256 |
| Checking Ink Status on the LCD Screen |
257 |
| Checking Ink and Maintenance Box Status - Windows |
257 |
| Checking Ink and Maintenance Box Status - Mac |
259 |
| Purchase Epson Ink Packs and Maintenance Boxes |
260 |
| Ink Supply Unit (Ink Pack) and Maintenance Box Part Numbers |
261 |
| Removing and Installing the Ink Pack |
261 |
| Replacing the Maintenance Box |
262 |
| Replacing the Paper Feed Rollers |
263 |
| Resetting the Roller Counter on the LCD Screen |
263 |
| Adjusting Print Quality |
265 |
| Print Head Maintenance |
265 |
| Print Head Nozzle Check |
265 |
| Checking the Nozzles Using the Product Control Panel |
266 |
| Checking the Nozzles Using a Computer Utility |
267 |
| Print Head Cleaning |
270 |
| Cleaning the Print Head Using the Product Control Panel |
270 |
| Cleaning the Print Head Using a Computer Utility |
271 |
| Print Head Alignment |
273 |
| Aligning the Print Head Using the Product Control Panel |
274 |
| Adjusting the Print Quality Using the Product Control Panel |
274 |
| Cleaning the Paper Guide |
276 |
| Cleaning the Translucent Film |
276 |
| Checking the Number of Sheets on the LCD Screen |
278 |
| Cleaning and Transporting Your Product |
280 |
| Cleaning Your Product |
280 |
| Cleaning the Scanner Glass |
280 |
| Cleaning the Automatic Document Feeder |
281 |
| Transporting Your Product |
284 |
| Administering Your Product |
288 |
| Accessing the Web Config Utility |
288 |
| Changing the Administrator Password in Web Config |
289 |
| Configuring Product Settings |
290 |
| Checking Status Information |
291 |
| Managing the Network Connection |
291 |
| Network Settings |
292 |
| Setting Control Panel Options |
296 |
| Configuring an Email Server |
296 |
| Email Server Settings |
297 |
| Sending Email Notifications |
297 |
| Adjusting Power Saving Settings |
298 |
| Importing and Exporting Product Settings |
299 |
| Exporting Settings Using Web Config |
299 |
| Importing Settings Using Web Config |
299 |
| Updating Firmware Using Web Config |
300 |
| Synchronizing the Date and Time with a Time Server |
300 |
| Clearing the Internal Memory |
301 |
| Enabling Periodic Cleaning |
301 |
| Powering Off or Rebooting the Product Remotely |
302 |
| Restoring Default Product Settings |
302 |
| Configuring Security Settings |
302 |
| Connecting an Authentication Device |
303 |
| Restricting Features Available for Users |
304 |
| User Feature Restriction |
305 |
| Configuring User Feature Restrictions |
305 |
| Disabling the External Interface |
306 |
| Setting Up Password Encryption |
306 |
| Working with Audit Logs |
307 |
| Restricting PDL File Operations |
307 |
| Enabling Program Verification on Start Up |
307 |
| Using Your Product on a Secure Network |
308 |
| Configuring Protocols and Services in Web Config |
308 |
| Protocol Settings |
308 |
| Configuring SSL/TLS Communication |
313 |
| Configuring SSL/TLS Settings |
313 |
| Configuring a Server Certificate for the Product |
313 |
| Configuring IPsec/IP Filtering |
314 |
| About IPsec/IP Filtering |
314 |
| Configuring the Default IPsec/IP Filtering Policy |
314 |
| Configuring the Group IPsec/IP Filtering Policies |
315 |
| IPsec/IP Filtering Policy Settings |
315 |
| IPsec/IP Filtering Configuration Examples |
321 |
| Configuring an IPsec/IP Filtering Certificate |
322 |
| Connecting the Product to an IEEE 802.1X Network |
323 |
| Configuring an IEEE 802.1X Network |
323 |
| IEEE 802.1X Network Settings |
323 |
| Configuring a Certificate for an IEEE 802.1X Network |
324 |
| IEEE 802.1X Network Status |
325 |
| Using a Digital Certificate |
326 |
| About Digital Certification |
326 |
| Obtaining and Importing a CA-signed Certificate |
326 |
| CSR Setup Settings |
327 |
| CSR Import Settings |
328 |
| Deleting a CA-signed Certificate |
329 |
| Updating a Self-signed Certificate |
330 |
| Importing a CA Certificate |
330 |
| Deleting a CA Certificate |
331 |
| Setting Up Universal Print (Microsoft) |
331 |
| Using Epson Device Admin Configuration Software |
331 |
| Solving Problems |
333 |
| Viewing the Help Screen |
333 |
| Product Status Messages |
334 |
| Job Status Error Codes |
337 |
| Running a Product Check |
341 |
| Resetting Control Panel Defaults |
342 |
| Solving Setup Problems |
343 |
| Product Does Not Turn On or Off |
344 |
| Noise After Ink Installation |
344 |
| Software Installation Problems |
344 |
| Cannot Read the Authentication Card |
345 |
| Solving Network Problems |
345 |
| Product Cannot Connect to a Wireless Router or Access Point |
346 |
| Network Software Cannot Find Product on a Network |
347 |
| Wireless Network Connection is Unstable on a Mac |
349 |
| USB 3.0 Connection is Unstable When Using a USB 2.0 Cable |
349 |
| Product Does Not Appear in Mac Printer Window |
349 |
| Cannot Print Over a Network |
349 |
| Cannot Scan Over a Network |
351 |
| Solving Network Security Problems |
352 |
| Cannot Create the Secure IPP Printing Port |
352 |
| Cannot Update a Certificate or Create a CSR |
353 |
| Cannot Import a Digital Certificate |
353 |
| Deleted a CA-signed Certificate |
354 |
| Digital Certificate Warning Messages |
354 |
| Solving Copying Problems |
356 |
| Product Makes Noise, But Nothing Copies |
356 |
| Product Makes Noise When It Sits for a While |
356 |
| Solving Copy Quality Problems |
356 |
| Copies Have Incorrect or Faint Colors |
357 |
| Position, Size, or Margins of Copies are Incorrect |
357 |
| Solving Paper Problems |
358 |
| Paper Feeding Problems |
358 |
| Originals Do Not Feed From the Automatic Document Feeder |
359 |
| Paper Jams Inside the Product |
360 |
| Paper Ejection Problems |
360 |
| Solving Problems Printing from a Computer |
360 |
| Nothing Prints |
361 |
| Product Icon Does Not Appear in Windows Taskbar |
363 |
| Printing is Slow |
363 |
| Solving Page Layout and Content Problems |
365 |
| Inverted Image |
365 |
| Too Many Copies Print |
366 |
| Blank Pages Print |
366 |
| Incorrect Margins on Printout |
367 |
| Incorrect Characters Print |
367 |
| Incorrect Image Size or Position |
368 |
| Slanted Printout |
369 |
| Solving Print Quality Problems |
369 |
| White or Dark Lines in Printout |
370 |
| Blurry or Smeared Printout |
371 |
| Faint Printout or Printout Has Gaps |
372 |
| Grainy Printout |
373 |
| Solving Scanning Problems |
374 |
| Scanning Software Does Not Operate Correctly |
374 |
| Cannot Start Epson Scan 2 |
374 |
| Solving Scanned Image Quality Problems |
375 |
| Image Consists of a Few Dots Only |
375 |
| Line of Dots Appears in All Scanned Images |
376 |
| Straight Lines in an Image Appear Crooked |
376 |
| Scanned Image Quality Problems |
377 |
| Image Colors are Patchy at the Edges |
378 |
| Ripple Patterns Appear in an Image |
379 |
| Scanned Image Edges are Cropped |
379 |
| Solving Faxing Problems |
379 |
| Cannot Send or Receive Faxes |
380 |
| Cannot Receive Faxes with a Telephone Connected to Your Product |
382 |
| Fax Memory Full Error Appears |
382 |
| Fax Quality is Poor |
383 |
| Sent Fax is Received in an Incorrect Size |
384 |
| Received Fax is Not Printed |
385 |
| Solving USB Device Problems |
385 |
| Cannot View or Print from a USB Device |
385 |
| Cannot Save Files on a USB Device |
386 |
| Cannot Transfer Files To or From a USB Device |
386 |
| Uninstall Your Product Software |
387 |
| Uninstalling Product Software - Windows |
387 |
| Uninstalling Product Software - Mac |
388 |
| Where to Get Help (U.S. and Canada) |
389 |
| Where to Get Help (Latin America) |
389 |
| Technical Specifications |
392 |
| Windows System Requirements |
392 |
| Mac System Requirements |
393 |
| Paper Specifications |
394 |
| Printable Area Specifications |
395 |
| Automatic Document Feeder (ADF) Specifications |
396 |
| Scanning Specifications |
397 |
| Fax Specifications |
397 |
| Ink Pack Specifications |
399 |
| Dimension Specifications |
400 |
| Electrical Specifications |
400 |
| Environmental Specifications |
401 |
| Interface Specifications |
401 |
| External USB Device Specifications |
401 |
| Network Interface Specifications |
402 |
| Safety and Approvals Specifications |
405 |
| Notices |
406 |
| Important Safety Instructions |
406 |
| General Printer Safety Instructions |
406 |
| Wireless Connection Safety Instructions |
408 |
| Telephone Equipment Safety Instructions |
408 |
| LCD Screen Safety Instructions |
408 |
| FCC Compliance Statement |
409 |
| Binding Arbitration and Class Waiver |
410 |
| Trademarks |
413 |
| Copyright Notice |
414 |
| libTIFF Software Acknowledgment |
414 |
| A Note Concerning Responsible Use of Copyrighted Materials |
415 |
| Default Delay Times for Power Management for Epson Products |
415 |

 1
1 15
15 16
16 17
17 18
18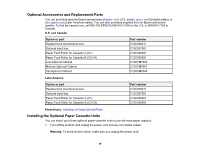 19
19 20
20 21
21 22
22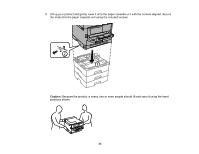 23
23 24
24 25
25

