Epson FX-2190IIN Users Guide - Page 67
Printer settings, User's Guide, Printer Software
 |
View all Epson FX-2190IIN manuals
Add to My Manuals
Save this manual to your list of manuals |
Page 67 highlights
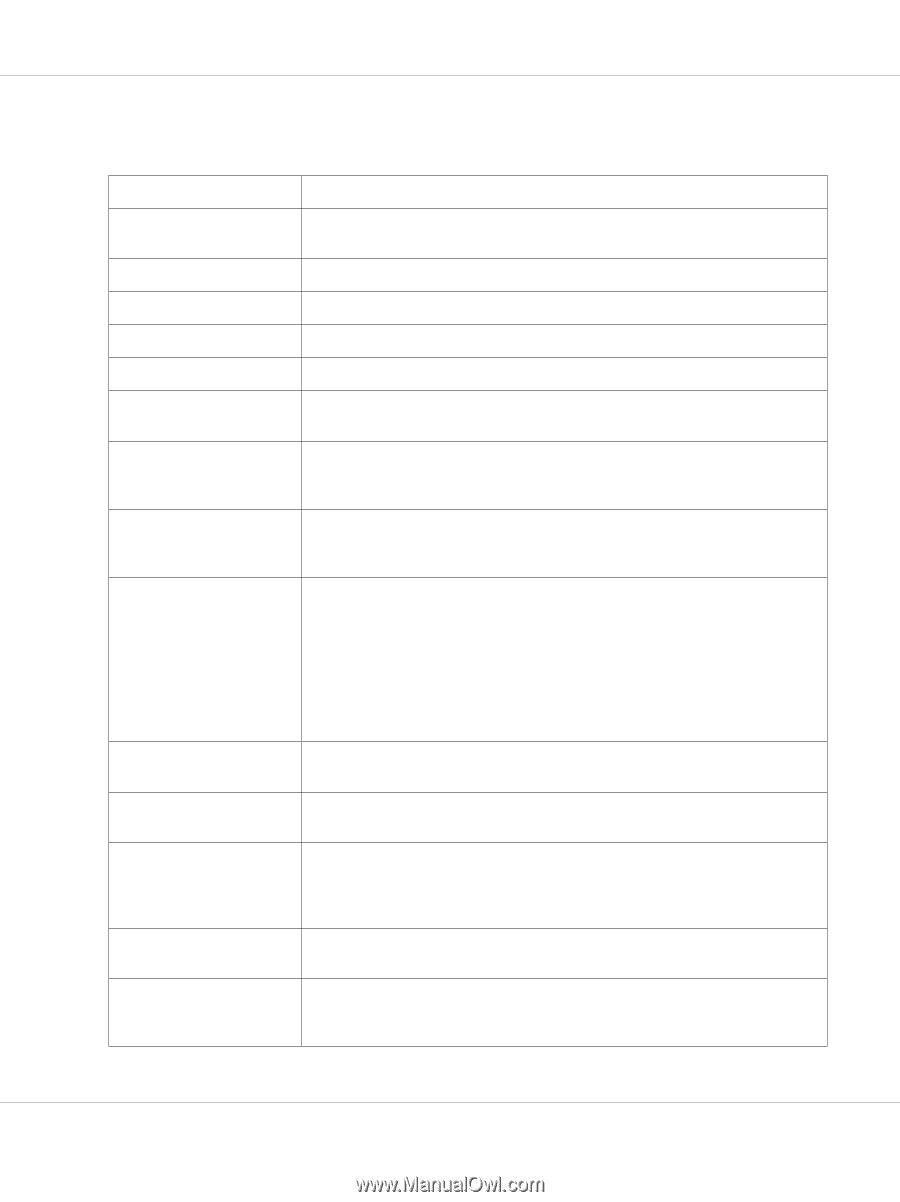
Printer settings Settings Paper Size Orientation Page Order Pages per Sheet Paper Source Graphics Paper/Output Halftone Printer Font Setting Printable Area Top Margin Priority Packet mode User Defined Paper Offset FX-890II/FX-890IIN/FX-2190II/FX-2190IIN User's Guide Explanations Select the size of the paper you want to use. If you do not see your paper size, use the scroll bar to scroll through the list. Select Portrait or Landscape. Select whether to print from front to back or back to front. Select the number of pages that you want to print onto a single page. Select the paper source you want to use. Select the printing resolution you want. The higher the resolution you select, the more detailed your printout will be; however, increasing the resolution slows printing. Check the Paper Size, Orientation, and Paper Source settings you made on the Page Setup menu and change them if necessary. Select the setting and then choose an option from the Change Setting list box. Click this button to set the brightness and contrast, input the RGB gamma, or make other settings. The Halftone Color Adjustment dialog box appears. For details, click Help in this dialog box. Select a character table group to use. You can select one of three character table groups, Standard, Expanded, and None (Bit Image printing). When Standard or Expanded is selected, the printer uses the device fonts. Expanded includes more fonts than Standard. When None is selected, the printer uses bit map images instead of the device fonts. For details on the fonts which are included in each table, see "Electronic" on page 144. If Standard is selected, the size of the top margin is 4.2mm. If Maximum is selected, it is 0mm. Select which setting for the print-start position is to be used; driver setting or printer setting. For more details, see Help for the printer driver. Ordinarily, there is no need to change this setting. If you change the printer's Packet mode settings, change this setting to match. If the printer and printer driver settings are different, you may not be able to print correctly. For more details, see Help for the printer driver. If your paper is not included in the Paper Size drop-down list, you can add the size to the list. For more details, see Help for the printer driver. This setting allows you to offset the image on the page. That is, you can adjust the position of the printed image. If the offset you specify moves a portion of the image out of the printer's printable area, that portion will not be printed. Printer Software 67
-
 1
1 -
2
-
3
-
4
-
5
-
6
-
7
-
8
-
9
-
10
-
11
-
12
-
13
-
14
-
15
-
16
-
17
-
18
-
19
-
20
-
21
-
22
-
23
-
24
-
25
-
26
-
27
-
28
-
29
-
30
-
31
-
32
-
33
-
34
-
35
-
36
-
37
-
38
-
39
-
40
-
41
-
42
-
43
-
44
-
45
-
46
-
47
-
48
-
49
-
50
-
51
-
52
-
53
-
54
-
55
-
56
-
57
-
58
-
59
-
60
-
61
-
 62
62 -
 63
63 -
 64
64 -
 65
65 -
 66
66 -
 67
67 -
 68
68 -
 69
69 -
 70
70 -
 71
71 -
 72
72 -
73
-
74
-
75
-
76
-
77
-
78
-
79
-
80
-
81
-
82
-
83
-
84
-
85
-
86
-
87
-
88
-
89
-
90
-
91
-
92
-
93
-
94
-
95
-
96
-
97
-
98
-
99
-
100
-
101
-
102
-
103
-
104
-
105
-
106
-
107
-
108
-
109
-
110
-
111
-
112
-
113
-
114
-
115
-
116
-
117
-
118
-
119
-
120
-
121
-
122
-
123
-
124
-
125
-
126
-
127
-
128
-
129
-
130
-
131
-
132
-
133
-
134
-
135
-
136
-
137
-
138
-
139
-
140
-
141
-
142
-
143
-
144
-
145
-
146
-
147
-
148
-
149
-
150
-
151
-
152
-
153
-
154
-
155
-
156
-
157
-
158
-
159
-
160
-
161
-
162
-
163
-
164
-
165
 |
 |