DeLonghi ESAM5600SL Owner Manual
DeLonghi ESAM5600SL Manual
 |
View all DeLonghi ESAM5600SL manuals
Add to My Manuals
Save this manual to your list of manuals |
DeLonghi ESAM5600SL manual content summary:
- DeLonghi ESAM5600SL | Owner Manual - Page 1
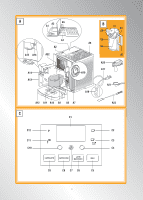
aa a3 a5 a1 a15 a16 a4 a2 a22 a14 a13 a6 a19 BB B1 B3 B6 B5 B4 B2 a20 a17 a21 a18 a12 a11 a10 a9 a8 a7 a23 cc c1 c12 c2 c11 c3 c10 c4 c9 c8 c7 c6 c5 3 - DeLonghi ESAM5600SL | Owner Manual - Page 2
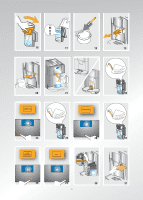
OK OK 1 2 3 4 5 6 7 8 9 10 11 12 13 14 15 4 - DeLonghi ESAM5600SL | Owner Manual - Page 3
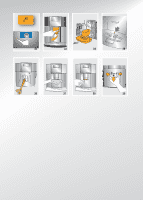
M A X 16 17 18 19 20 21 22 23 24 25 26 27 CLEAN 28 29 30 31 5 - DeLonghi ESAM5600SL | Owner Manual - Page 4
32 33 34 35 36 37 38 39 6 - DeLonghi ESAM5600SL | Owner Manual - Page 5
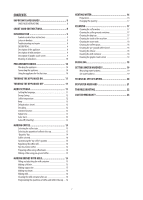
Contents IMPORTANT SAFEGUARDS 8 SAVE THESE INSTRUCTIONS 8 short cord instructions 8 introduction 9 Symbols used in these instructions 9 Letters in brackets 9 Troubleshooting and repairs 9 DESCRIPTION 9 Description of the appliance 9 Description of milk container 9 Description of graphic - DeLonghi ESAM5600SL | Owner Manual - Page 6
accidentally caught or entangled. • Do not place the appliance or its electrical parts on or near electric stoves, cooking surfaces, or gas burners. • Plug by authorized service personnel only! SAVE THESE INSTRUCTIONS THIS APPLIANCE IS FOR HOUSEHOLD USE ONLY short cord instructions A short power - DeLonghi ESAM5600SL | Owner Manual - Page 7
it is advisable to read these instructions before using the appliance. This Drip tray A13. Service door A14. Coffee guide A15. Coffee container Troubleshooting and repairs In the event of problems, repairs are required, contact De'Longhi Customer Services only. The addresses are manual rinse. 9 - DeLonghi ESAM5600SL | Owner Manual - Page 8
new. • You should customize water hardness as soon as possible following the instructions in the section "Setting water hardness" on page 19. 1. Plug the use the appliance if it is visibly damaged. Contact De'Longhi Customer Services. Please see enclosed guarantee leaflet. Installing the appliance - DeLonghi ESAM5600SL | Owner Manual - Page 9
5. "Press OK": then press the icon corresponding to OK on the display (fig. 2)."Please wait..."is displayed and the appliance begins to deliver water from the hot water spout. The appliance ends the first start up procedure and goes off. The coffee maker is now ready for normal use. Please Note: • - DeLonghi ESAM5600SL | Owner Manual - Page 10
yed (l = low; llll = high); 5. Press the icon to confirm. 6. Press the P icon a number of times to exit the menu. Setting water hardness For instructions on setting water hardness, see page 19. Setting display contrast To increase or reduce the contrast of the display, proceed as follows: 1. Choose - DeLonghi ESAM5600SL | Owner Manual - Page 11
Adjust time To adjust the time on the display, proceed as follows: 1. Choose the"CLOCK"section as described above. 2. Press the selection icons < or > until "Adjust time" is di- splayed. 3. Press the icon to confirm: the hours flash on the di- splay; 4. Press the selection icons < or > to modify the - DeLonghi ESAM5600SL | Owner Manual - Page 12
"Quantity" bar -- + + Coffee selected MY COFFEE EXTRA SHORT COFFEE SHORT COFFEE STANDARD COFFEE LONG COFFEE EXTRA LONG COFFEE Quantity (fl. oz.) Program from ≃0.68 to ≃6.1 ≃ 1 ≃ 1.35 ≃ 2.35 ≃ 3.04 ≃ 4.06 For full bodied creamier coffee, turn one click anticlockwise towards "1" (finer - DeLonghi ESAM5600SL | Owner Manual - Page 13
not creamy enough or too cold, read the tips in the "Troubleshooting" section on page 22. Various alarm messages could be displayed while the special compartment in the cup tray (fig. 22). 8. Follow the instructions below for each function. 1. Repeatedly press the selection icon (C4) corresponding - DeLonghi ESAM5600SL | Owner Manual - Page 14
Please Note! If during delivery you want to stop preparing milk, press the CAPPUCCINO icon or interrupt preparation of the coffee by pressing the icon. Making macchiato 1. After attaching the milk container (see previous section), position the froth regulator on LATTE MACCHIATO (fig. 27) printed on - DeLonghi ESAM5600SL | Owner Manual - Page 15
manually parts service door (A13), - water tank (A7), - coffee spouts (A15) and hot water nozzle (A16), - pre-ground coffee funnel (A4), - infuser (A8), - milk container (B) - touch screen (C) Important! • Do not use solvents, abrasive detergents or alcohol to cle- an the coffee maker. With De'Longhi - DeLonghi ESAM5600SL | Owner Manual - Page 16
the machine is correctly turned off (see section: "Turning off"). 2. Open the service door (fig. 33). 3. Remove the drip tray and grounds container (fig. 6. After cleaning, replace the infuser by sliding it onto the in- ternal support and pin at the bottom, then push the PUSH symbol fully in until - DeLonghi ESAM5600SL | Owner Manual - Page 17
pack and the warnings relating to the procedure to follow in the event of contact with the skin and eyes. Please Note! Use De'Longhi descaler only. Under no circumstances should you use sulphamic or acetic based descalers. Their use invalidates the guarantee. Failure to descale the appliance - DeLonghi ESAM5600SL | Owner Manual - Page 18
TECHNICAL SPECIFICATION Voltage: 120 V~ 60 Hz max. 10A Absorbed power: 1350W Pressure: 15 bar Water tank capacity: 1,8 L Size: LxHxD: 282x380x441 mm Cable length: 1,5 m Weight: 11,5 Kg Beans container capacity 250 g 20 - DeLonghi ESAM5600SL | Owner Manual - Page 19
grinding adjustment dial another click until delivery is correct. If the problem persists, press the icon corresponding to OK and deliver water from the • After cleaning, the grounds container has not been • Open the service door, remove the drip tray and replaced. insert the grounds container. - DeLonghi ESAM5600SL | Owner Manual - Page 20
service center. TROUBLESHOOTING Below is a list of some of the possible malfunctions. If the problem cannot be resolved as described, contact a Service Center. PROBLEM kitchen brush. the service door. • The coffee guide inside the service door is blocked and cannot swing. • Thoroughly clean - DeLonghi ESAM5600SL | Owner Manual - Page 21
PROBLEM POSSIBLE CAUSE SOLUTION The coffee is delivered too • quickly. Coffee does not the milk container lid as described in the section "Cleaning the milk container". Adjust following the instructions in the section on preparing drinks with milk. Clean the milk container lid as described in - DeLonghi ESAM5600SL | Owner Manual - Page 22
De'Longhi or Kenwood brand names. What does the warranty cover? We warrant each appliance to be free from defects in material and workmanship. Our obligation under this warranty is limited to repair at our factory or authorized service center of any defective parts or part thereof, other than parts
-
 1
1 -
 2
2 -
 3
3 -
 4
4 -
 5
5 -
 6
6 -
 7
7 -
8
-
9
-
10
-
11
-
12
-
13
-
14
-
15
-
16
-
17
-
18
-
19
-
20
-
21
-
22
 |
 |
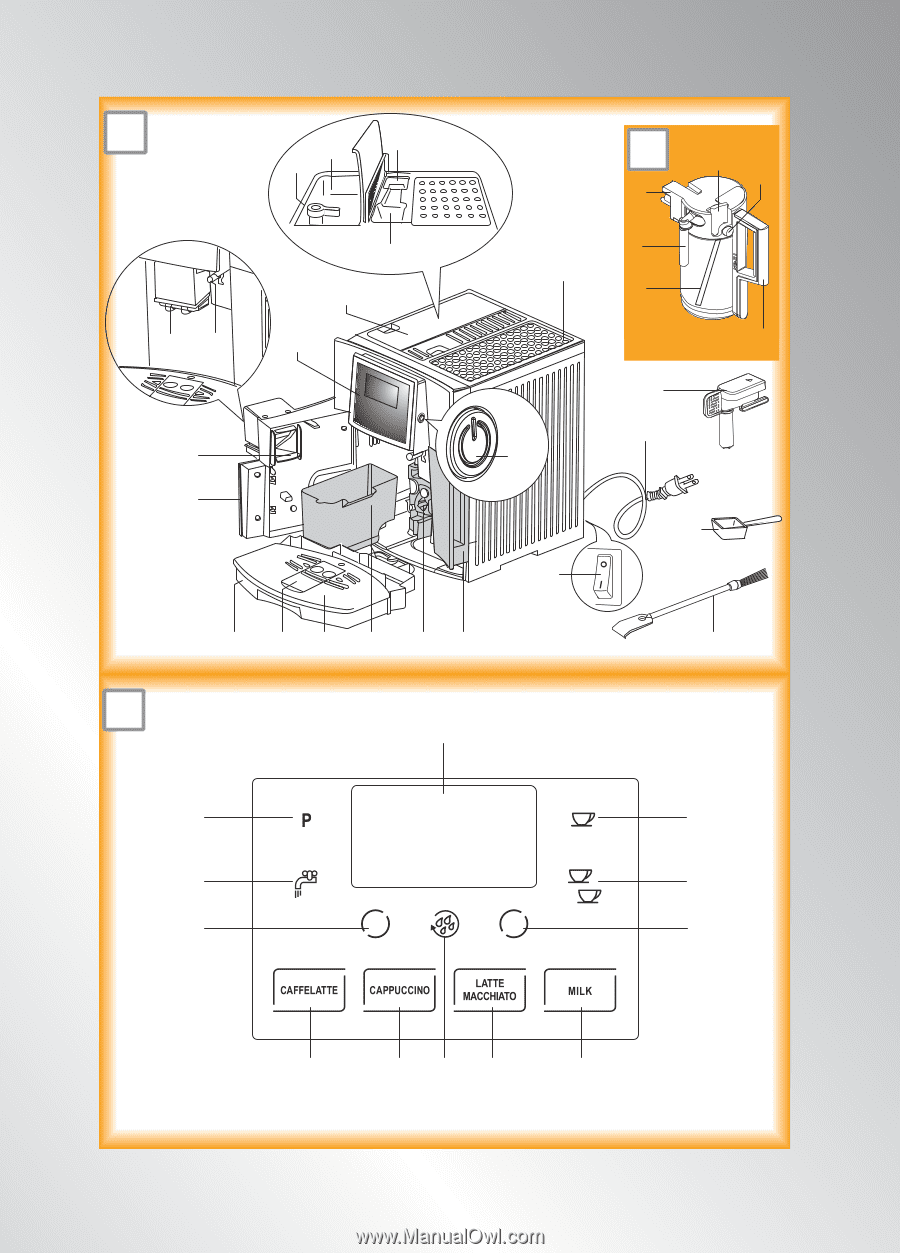
3
C12
C1
C11
C10
C2
C3
C4
C5
C6
C7
C8
C9
B4
B6
B5
B1
B2
B3
A22
A6
A7
A12
A10
A11
A8
A9
A13
A14
A15
A16
A
B
C
A4
A3
A5
A1
A23
A20
A21
A18
A17
A19
A2
3