DELPHI SA10046 Installation Guide - Page 7
Verify that the connector is clear
 |
UPC - 689604154939
View all DELPHI SA10046 manuals
Add to My Manuals
Save this manual to your list of manuals |
Page 7 highlights
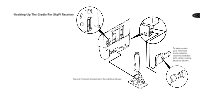
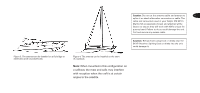
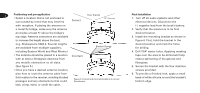
Figure 6. Installing the antenna. Note: Your antenna is equipped with an adjustable ratchet tilt. The angle may be adjusted to improve reception, or folded out of the way when not in use. 7. Route the antenna cable through the antenna extension (if used) and out cabin window opening. Drill new holes 7 as necessary. through the access hole on the side of 9. When you reach the receiver location, fol- the mounting bracket. If an antenna low these steps to attach the antenna cable: extension is not used, firmly tighten • Attach the pink connecting shroud the antenna directly to the bracket by as shown in figure 7. screwing it on. If an extension is used, • Verify that the connector is clear of tighten the antenna to the extension, and obstructions and that the cable is the extension to the bracket. not kinked, crimped, or chafed. 8. Begin routing the cable from the antenna • Gently push the connecting shroud toward the receiver location, using existing over the pink lead on the cradle holes in the boat's hull, along or behind until it locks in place. interior walls below deck, or through a Warning: Take note of all fuel lines, cables, and electrical wiring near where you are installing the antenna to avoid damaging these lines and wiring and to avoid the risk of injury and or property damage. Use extreme caution when cutting or drilling around these areas. Always wear protective eyewear when using tools. Figure 7. Attaching the connecting shroud to the antenna cable.
-
 1
1 -
 2
2 -
 3
3 -
 4
4 -
 5
5 -
 6
6 -
 7
7 -
 8
8 -
 9
9 -
 10
10 -
 11
11 -
 12
12 -
13
-
14
-
15
-
16
 |
 |
