D-Link DES-6300 Product Manual - Page 50
Setting ConfigMaster Options, Error Bar, Status Bar
 |
View all D-Link DES-6300 manuals
Add to My Manuals
Save this manual to your list of manuals |
Page 50 highlights
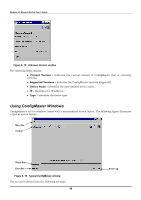
Modular L3 Ethernet Switch User's Guide Icon Function Relevant Shortcut Sends table modifications or additions made in an Ctrl+U Insert or Edit dialog box to the table. Cancels changes in an Insert or Edit window. Erases the data from the entire table. Saves a trap to file in the Traps Table. Accesses the Statistics window. Table 6- 1. ConfigMaster Toolbar Icons Error Bar Displays an explanation of an SNMP action that could not be carried out or that failed for any reason. Status Bar Indicates the last SNMP action status. The most common status bar messages are the following: ♦ Sending Data - Displayed when the device is reading or writing. ♦ Data Arriving - Displayed when the device is getting SNMP data. ♦ Finished - Displayed when a set or get action has been completed. ♦ Sending Window Request! - Displayed when the device is searching for a window or table. Setting ConfigMaster Options The NMS options can be set before starting the applet. The method of accessing the General Options window is as follows: On the main window, click the Options button (or click Ctrl+O). The General Options window opens: 50
-
 1
1 -
2
-
3
-
4
-
5
-
6
-
7
-
8
-
9
-
10
-
11
-
12
-
13
-
14
-
15
-
16
-
17
-
18
-
19
-
20
-
21
-
22
-
23
-
24
-
25
-
26
-
27
-
28
-
29
-
30
-
31
-
32
-
33
-
34
-
35
-
36
-
37
-
38
-
39
-
40
-
41
-
42
-
43
-
44
-
 45
45 -
 46
46 -
 47
47 -
 48
48 -
 49
49 -
 50
50 -
 51
51 -
 52
52 -
 53
53 -
 54
54 -
 55
55 -
56
-
57
-
58
-
59
-
60
-
61
-
62
-
63
-
64
-
65
-
66
-
67
-
68
-
69
-
70
-
71
-
72
-
73
-
74
-
75
-
76
-
77
-
78
-
79
-
80
-
81
-
82
-
83
-
84
-
85
-
86
-
87
-
88
-
89
-
90
-
91
-
92
-
93
-
94
-
95
-
96
-
97
-
98
-
99
-
100
-
101
-
102
-
103
-
104
-
105
-
106
-
107
-
108
-
109
-
110
-
111
-
112
-
113
-
114
-
115
-
116
-
117
-
118
-
119
-
120
-
121
-
122
-
123
-
124
-
125
-
126
-
127
-
128
-
129
-
130
-
131
-
132
-
133
-
134
-
135
-
136
-
137
-
138
-
139
-
140
-
141
-
142
-
143
-
144
-
145
-
146
-
147
-
148
-
149
-
150
-
151
-
152
-
153
-
154
-
155
-
156
-
157
-
158
-
159
-
160
-
161
-
162
-
163
-
164
-
165
-
166
-
167
-
168
-
169
-
170
-
171
-
172
-
173
-
174
-
175
-
176
-
177
-
178
-
179
-
180
-
181
-
182
-
183
-
184
-
185
-
186
-
187
-
188
-
189
-
190
-
191
-
192
-
193
-
194
-
195
-
196
-
197
-
198
-
199
-
200
-
201
-
202
-
203
-
204
-
205
-
206
-
207
-
208
-
209
-
210
-
211
-
212
-
213
-
214
-
215
-
216
-
217
-
218
-
219
-
220
-
221
-
222
-
223
-
224
-
225
-
226
-
227
-
228
-
229
-
230
-
231
-
232
-
233
-
234
-
235
-
236
-
237
-
238
-
239
-
240
-
241
-
242
-
243
-
244
-
245
-
246
-
247
-
248
-
249
-
250
-
251
 |
 |
