Brother International TD-4550DNWB Users Guide - Page 84
Print the Templates Related to a Database (Database Lookup Printing)
 |
View all Brother International TD-4550DNWB manuals
Add to My Manuals
Save this manual to your list of manuals |
Page 84 highlights
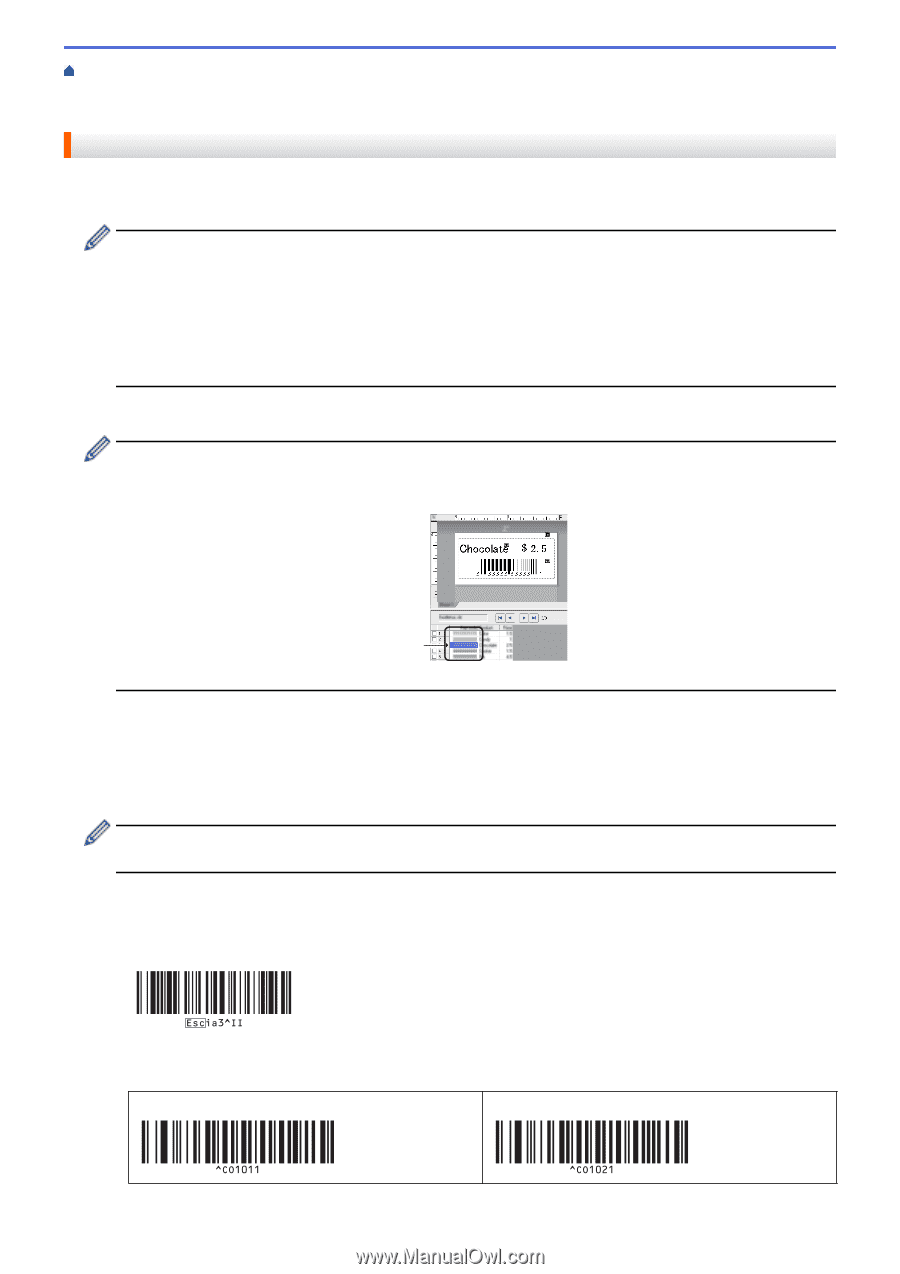
Home > Print Labels Using Barcode Scanner or Other Devices (P-touch Template) > Try the P-touch Template Function Using the Barcode List > Print the Templates Related to a Database (Database Lookup Printing) Print the Templates Related to a Database (Database Lookup Printing) You can download a database linked to a template, scan a barcode as a keyword to find a record containing the keyword, and then insert the record into the template to print. • For more information on the barcodes scanned using various settings, see Related Information. • The printer has reserved the leftmost column (A) of a downloaded linked database for this operation, therefore the keyword scanned from a barcode must be in this column of the database. • For the printer to find keywords successfully, the data in the leftmost column (A) must exactly match the keywords scanned from a barcode. • P-touch Editor and the printer can read only one line of data in each field of a linked database so we do not recommend using databases with two or more lines of data in the leftmost column (A). 1. Use P-touch Editor to create a template and connect to a database file. • You can link as many columns to a text and barcode objects in the template as needed. • Make sure the keywords are included in the leftmost column (A) but do not link any text or barcode object in the template with field (A) if you do not need the data on the printed label. A • For more information on specifying the settings, refer to the P-touch Editor Help menu. 2. Use P-touch Transfer Manager to transfer a template or label layout from the computer to the printer. For more information, see Related Information. The linked database file will also be transferred. When a template is transferred to the Configurations folder in P-touch Transfer Manager, the Key Assign number is automatically assigned. You can add a custom folder under Configurations, and drag-and-drop a transferred template into the custom folder to manage different sets of templates. 3. Select the transferred template, and then click Transfer to download the template to the Key Assign number in the printer. 4. Scan the following barcode: • P-touch template command (Initialize + begin specifying settings) 5. From the following barcode list, scan each barcode to send a command or setting to the printer: • Basic settings Auto cut on (Cut every one label) + Cut at end on Auto cut on (Cut every two labels) + Cut at end on 80
-
 1
1 -
2
-
3
-
4
-
5
-
6
-
7
-
8
-
9
-
10
-
11
-
12
-
13
-
14
-
15
-
16
-
17
-
18
-
19
-
20
-
21
-
22
-
23
-
24
-
25
-
26
-
27
-
28
-
29
-
30
-
31
-
32
-
33
-
34
-
35
-
36
-
37
-
38
-
39
-
40
-
41
-
42
-
43
-
44
-
45
-
46
-
47
-
48
-
49
-
50
-
51
-
52
-
53
-
54
-
55
-
56
-
57
-
58
-
59
-
60
-
61
-
62
-
63
-
64
-
65
-
66
-
67
-
68
-
69
-
70
-
71
-
72
-
73
-
74
-
75
-
76
-
77
-
78
-
 79
79 -
 80
80 -
 81
81 -
 82
82 -
 83
83 -
 84
84 -
 85
85 -
 86
86 -
 87
87 -
 88
88 -
 89
89 -
90
-
91
-
92
-
93
-
94
-
95
-
96
-
97
-
98
-
99
-
100
-
101
-
102
-
103
-
104
-
105
-
106
-
107
-
108
-
109
-
110
-
111
-
112
-
113
-
114
-
115
-
116
-
117
-
118
-
119
-
120
-
121
-
122
-
123
-
124
-
125
-
126
-
127
-
128
-
129
-
130
-
131
-
132
-
133
-
134
-
135
-
136
-
137
-
138
-
139
-
140
-
141
-
142
-
143
-
144
-
145
-
146
-
147
-
148
-
149
-
150
-
151
-
152
-
153
-
154
-
155
-
156
-
157
-
158
-
159
-
160
-
161
-
162
-
163
-
164
-
165
-
166
-
167
-
168
-
169
-
170
-
171
-
172
-
173
-
174
-
175
-
176
-
177
-
178
-
179
-
180
-
181
-
182
-
183
-
184
-
185
-
186
-
187
-
188
-
189
-
190
-
191
-
192
-
193
-
194
-
195
-
196
-
197
 |
 |