Black & Decker GH900 Type 1 Manual - GH900 - Page 5
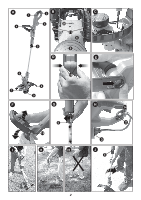
Save These Instructions - parts
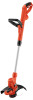 |
View all Black & Decker GH900 manuals
Add to My Manuals
Save this manual to your list of manuals |
Page 5 highlights
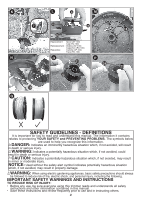
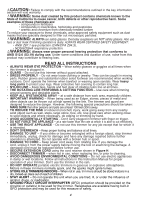
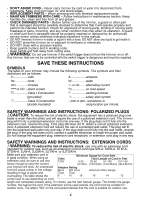
• Don't Abuse Cord - Never carry trimmer by cord or yank it to disconnect from receptacle. Keep cord from heat, oil, and sharp edges. • Replacement Parts - When servicing use only identical replacement parts. • MAINTAIN TRIMMERS WITH CARE - Follow instructions in maintenance section. Keep handles dry, clean and free from oil and grease. • CHECK DAMAGED PARTS - Before further use of the trimmer, a guard or other part that is damaged should be carefully checked to determine that it will operate properly and perform its intended function. Check for alignment of moving parts, binding of moving parts, breakage of parts, mounting, and any other condition that may affect its operation. A guard or other part that is damaged should be properly repaired or replaced by an authorized service center unless otherwise indicated elsewhere in this manual. • DO NOT immerse trimmer in water or squirt it with a hose. DO NOT allow any liquid to get inside it. • DO NOT store the trimmer on or adjacent to fertilizers or chemicals. • DO NOT clean with a pressure washer. • Keep guards in place and in working order. • Keep hands and feet away from cutting area. WARNING: Do not use trimmer if the switch trigger does not turn the trimmer on or off. Any trimmer that can not be controlled with the switch trigger is dangerous and must be repaired. SAVE THESE INSTRUCTIONS Symbols The label on your trimmer may include the following symbols. The symbols and their definitions are as follows: V volts A amperes Hz hertz W watts min minutes or Ac.........alternating current or DC....direct current no no load speed Class I Construction earthing terminal (grounded) safety alert symbol Class II Construction .../min or rpm...revolutions or (double insulated) reciprocation per minute SACFAEUTTYIOWN:ATRoNreIdNucGeStheAriNskDof INSTRUCTIONS: POLARIZED PLUGS electric shock, this equipment has a polarized plug (one blade is wider than the other) and will require the use of a polarized extension cord. The trimmer plug will fit into a polarized extension cord only one way. If the plug does not fit fully into the extension cord, reverse the plug. If the plug still does not fit, obtain a correct polarized extension cord. A polarized extension cord will require the use of a polarized wall outlet. This plug will fit into the polarized wall outlet only one way. If the plug does not fit fully into the wall outlet, reverse the plug. If the plug still does not fit, contact a qualified electrician to install the proper wall outlet. Do not change the equipment plug, extension cord receptacle, or extension cord plug in any way. SAFETY WARNINGS AND INSTRUCTIONS: EXTENSION CORDS WARNING: To reduce the risk of electric shock, use only with an extension cord intended for outdoor use, such as an extension cord of cord type SW-A, SOW-A, STW-A, STOW-A, SJW-A, SJOW-A, SJTW-A. or SJTOW-A. Make sure your extension cord is in good condition. When using an extension cord, be sure to use one heavy enough to carry the current Volts 120V Minimum Gauge for Cord Sets Total Length of Cord in Feet 0-25 26-50 51-100 101-150 (0-7,6m) (7,6-15,2m) (15,2-30,4m) (30,4-45,7m) your product will draw. An undersized cord will cause a drop in line voltage Ampere Rating More Not more American Wire Gauge resulting in loss of power and Than Than overheating. The table shows the 6 - 10 18 16 14 12 correct size to use depending on cord length and nameplate ampere rating. If in doubt, use the next heavier gauge. The smaller the gauge number, the heavier the cord. If the extension will be used outside, the cord must be suitable for outdoor work. The letters "WA" on the cord jacket indicate that the cord is suitable for outdoor use. 5
-
 1
1 -
 2
2 -
 3
3 -
 4
4 -
 5
5 -
 6
6 -
 7
7 -
 8
8 -
 9
9 -
 10
10 -
 11
11 -
12
-
13
-
14
-
15
-
16
-
17
-
18
-
19
-
20
-
21
-
22
-
23
-
24
-
25
-
26
-
27
-
28
-
29
-
30
-
31
-
32
 |
 |
