Black & Decker GH900 Type 1 Manual - GH900
Black & Decker GH900 Manual
 |
View all Black & Decker GH900 manuals
Add to My Manuals
Save this manual to your list of manuals |
Black & Decker GH900 manual content summary:
- Black & Decker GH900 | Type 1 Manual - GH900 - Page 1
Trimmer/Edger INSTRUCTION MANUAL Catalog Numbers GH900, GH912 KEY INFORMATION YOU SHOULD KNOW: • The guard must be installed before trimming or edging - if not, the motor will overheat. • When replacing the line, use only .065 inch diameter ROUND line a problem with your Black & Decker purchase, - Black & Decker GH900 | Type 1 Manual - GH900 - Page 2
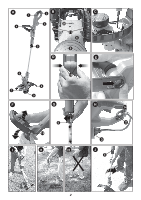
A 1 2B 25 8C 3 26 4 10 11 6 5 9 D E 6 12 8 7 9 F G 5 13 I I1 I2 H 14 2 3 J 5 2 - Black & Decker GH900 | Type 1 Manual - GH900 - Page 3
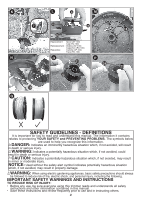
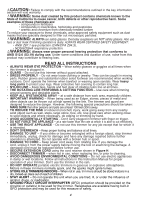
15 18 16 Replacement: Spool (AF-100) Cap (RC-100) Remplacement : Bobine (AF-100) Capuchon (RC-100) Repuestos: Carrete (AF-100) Tapa (RC-100) N O P 21 24 23 20 22 19 Q SAFETY GUIDELINES - DEFINITIONS It is important for you to read and understand this manual. The information it - Black & Decker GH900 | Type 1 Manual - GH900 - Page 4
- when not in use, when replacing line, or prior to cleaning. • AVOID DANGEROUS ENVIRONMENTAL CONDITIONS - Do not use electric appliances in damp or wet locations. Follow all instructions in this Instruction Manual for proper operation of your trimmer. Don't use the trimmer in the rain. • DO NOT - Black & Decker GH900 | Type 1 Manual - GH900 - Page 5
Replacement Parts - When servicing use only identical replacement parts. • MAINTAIN TRIMMERS WITH CARE - Follow instructions part that is damaged should be properly repaired or replaced by an authorized service center unless otherwise indicated elsewhere in this manual. • DO NOT immerse trimmer line 14 - Black & Decker GH900 | Type 1 Manual - GH900 - Page 6
Spool ASSEMBLY and Adjustment WARNING: Unplug the trimmer before attempting to attach the guard, EDGE GUIDE Once the guard is installed, remove the covering from the line cut-off blade, located on the edge of the guard cord about 8 inches (203mm) from the end, and insert it into the slot (14) in the - Black & Decker GH900 | Type 1 Manual - GH900 - Page 7
retightening the collar. Edging Your string trimmer is equipped with Smart Edge trimmer position. Cutting Line / LINE FEEDING Your trimmer uses .065 inch (1.65 mm) diameter, ROUND nylon line. During use, the tips of the nylon lines will become frayed and worn and the special self feeding spool - Black & Decker GH900 | Type 1 Manual - GH900 - Page 8
. • Other replacement parts (guards, spool caps, etc.) are available through Black & Decker service centers. To find your local service location call: 1-800-544-6986 or visit wWwAwR.bNlacINkaGn:ddTehcekuesre.coofma.ny accessory not recommended by Black & Decker for use with this trimmer could be - Black & Decker GH900 | Type 1 Manual - GH900 - Page 9
qualified service organizations, always using identical replacement parts. Troubleshooting trimmer runs slowly • Unplug the trimmer. • Check that the spool housing can rotate freely. Carefully clean it if necessary. • Check that the cutting line does not protrude more than approximately 5-3/8 inches - Black & Decker GH900 | Type 1 Manual - GH900 - Page 10
are beyond the time set for exchanges. The second option is to take or send the product (prepaid) to a Black & Decker owned or authorized Service Center for repair or replacement at our option. Proof of purchase may be required. This warranty does not apply to accessories. This warranty gives you - Black & Decker GH900 | Type 1 Manual - GH900 - Page 11
COUPE-BORDURE MODE D'EMPLOI Numéro de modèle GH900, GH912 VOICI DES RENSEIGNEMENTS IMPORTANTS QU'IL VOUS FAUT Si des questions ou des problèmes surgissent après l'achat d'un produit Black & Decker, consulter le site Web www.blackanddecker.com/instantanswers pour obtenir des réponses instantané - Black & Decker GH900 | Type 1 Manual - GH900 - Page 12
lignes directrices en matière de sécurité - définitions Il est important que vous lisiez et compreniez ce mode d'emploi. Les informations qu'il contient concernent VOTRE SÉCURITÉ et visent à ÉVITER TOUT PROBLÈME. Les symboles ci-dessous servent à vous aider à reconnaître cette information. DANGER : - Black & Decker GH900 | Type 1 Manual - GH900 - Page 13
l'extérieur. Ne pas utiliser l'outil avec les pieds nus ou des sandales ouvertes. Porter des pantalons longs pour protéger vos jambes. Se couvrir les cheveux s'ils sont longs. • FIL EN NYLON - Tenir le visage, les mains et pieds loin du fil de nylon rotatif en tout temps. • LE FIL EN ROTATION EXÉ - Black & Decker GH900 | Type 1 Manual - GH900 - Page 14
et leurs définitions sont indiqués ci-après : V volts A ampères Hz hertz W watts min minutes ou DC......courant continu ou moyen des fils (AWG) cordon de calibre inférieur causera 6 - 10 18 16 14 12 une chute de tension de ligne et donc une perte de puissance et une surchauffe. - Black & Decker GH900 | Type 1 Manual - GH900 - Page 15
Retirer la pile de l'outil avant d'essayer de fixer le pare-main, le guide de coupe ou la poignée. NE JAMAIS UTILISER L'OUTIL SANS LE PARE-MAIN SOLIDEMENT environ 203 mm (8 po) de lʼextrémité, puis lʼinsérer dans lʼencoche (14) logée à lʼextrémité de la poignée (Figure H). Fixer la boucle ainsi form - Black & Decker GH900 | Type 1 Manual - GH900 - Page 16
bout du fil. Pour se tenir à distance des surfaces dures, utiliser le guide de coupe (7). • Maintenir une distance minimale de 609,6 mm (24 po) Remarque : Le système d'alimentation automatique risque de mal fonctionner si le guide de coupe n'est pas utilisé. Remarque : Vous ferez l'expérience plus - Black & Decker GH900 | Type 1 Manual - GH900 - Page 17
) logé dans la tête du taille-bordure (figure L). • Pour obtenir des résultats optimaux, remplacer la bobine par une bobine de modèle AF-100 de Black & Decker. • Tenir la bobine vide d'une main et le boîtier de bobine de l'autre, puis sortir la bobine en tirant dessus. • Si le levier (17 - Black & Decker GH900 | Type 1 Manual - GH900 - Page 18
• Enrouler le fil de coupe sur la bobine dans le sens indiqué par la flèche inscrite sur la bobine. Prendre soin d'enrouler le fil de façon nette et ordonnée par couches successives. Ne pas croiser le fil (figure Q). • Couper le fil enroulé lorsqu'il atteint les encoches (23). (figure P). • Ajuster - Black & Decker GH900 | Type 1 Manual - GH900 - Page 19
pour faire réparer ou échanger le produit, à notre discrétion. Une preuve d'achat peut être requise. Les centres Black & Decker et les centres de service autorisés sont répertoriés dans les pages jaunes, sous la rubrique « Outils électriques ». Cette garantie ne s'applique pas aux accessoires. Cette - Black & Decker GH900 | Type 1 Manual - GH900 - Page 20
DE PODADORA / BORDEADORA MANUAL DE INSTRUCCIONES Catálogo N° GH900, GH912 INFORMACION CLAVE QUE DEBE SABER: • El protector debe instalarse ón. LEA EL MANUAL antes de devolver este producto por cualquier motivo: Si tiene una consulta o algún inconveniente con su producto Black & Decker, visite http:// - Black & Decker GH900 | Type 1 Manual - GH900 - Page 21
y comprenda todas las instrucciones y advertencias de seguridad incluidas en este manual. • Guarde estas instrucciones y revíselas con frecuencia antes de usar , como máscaras para polvo especialmente diseñadas para filtrar partículas microscópicas. ADVERTENCIA: USE SIEMPRE LENTES DE SEGURIDAD. - Black & Decker GH900 | Type 1 Manual - GH900 - Page 22
. Cualquier protección u otra pieza que esté dañada debe ser reparada correctamente o reemplazada por un centro de mantenimiento autorizado, a menos que este manual indique otra cosa. • NO sumerja la herramienta en agua ni la salpique con una manguera. NO permita que ningún líquido entre en ella - Black & Decker GH900 | Type 1 Manual - GH900 - Page 23
leurs définitions sont indiqués ci-après : V volts A ampères Hz hertz W watts min minutes ou DC......courant continu ou 4m) (30,4-45,7m) Amperaje Más de No más de AWG 6 - 10 18 16 14 12 voltaje de la línea que producirá pérdida de potencia y sobrecalentamiento. La tabla muestra - Black & Decker GH900 | Type 1 Manual - GH900 - Page 24
se desenchufe. Para utilizarlo, simplemente doble aproximadamente 203 mm (8 pulgadas) del cable prolongador desde el extremo y colóquelo en la ranura (14) que está en la parte inferior del área del mango (figura H). Para enganchar el bucle que se forma, doble el cable sobre la lengüeta (2). Jale - Black & Decker GH900 | Type 1 Manual - GH900 - Page 25
o el modo de recortar bordes sobresalientes hierba a lo largo de los bordes del césped y macizos de flores. ADVERTENCIA: Cuando se utiliza como un Edger, piedras, trozos de metal y otros objetos que pueden ser lanzados a gran velocidad por la línea. El corte y la protección están diseñados para - Black & Decker GH900 | Type 1 Manual - GH900 - Page 26
RC-100 de Black & Decker. Vuelva a cargar la cuerda de nailon (de paquete o el carrete de repuesto pre-enrollado) como se muestra en este manual. • UTILICE SÓ (19) figura N. • Tome el carrete nuevo y empújelo sobre la parte saliente (18) (figura M) de la cubierta. Gire el carrete ligeramente hasta - Black & Decker GH900 | Type 1 Manual - GH900 - Page 27
• Pliegue el final de la cuerda de corte a alrededor de 19 mm (3/4 pulgada)(21). Introduzca la cuerda de corte dentro de una de las ranuras de anclaje de la cuerda (22) como se muestra en la figura O. • Inserte el extremo de la cuerda a granel de 19 mm (3/4 pulgada) en el orificio (23) dentro del - Black & Decker GH900 | Type 1 Manual - GH900 - Page 28
cercano a fin de recibir ayuda con su producto, visite nuestro sitio Web www.blackanddecker. com.mx o llame a la línea de ayuda BLACK & DECKER al 01 800 847 2309/01 800 847 2312 mantenimiento ADVERTENCIA: Para evitar lesiones graves, apague y desenchufe la herramienta antes de realizar cualquier - Black & Decker GH900 | Type 1 Manual - GH900 - Page 29
tener otros derechos que pueden variar según el estado o la provincia. Si tiene alguna pregunta, comuníquese con el gerente del Centro de servicio de Black & Decker de su zona. Este producto no está diseñado para uso comercial. AMÉRICA LATINA: esta garantía no se aplica a los productos que se venden - Black & Decker GH900 | Type 1 Manual - GH900 - Page 30
acuerdo con el instructivo de uso que se acompaña. El producto hubiese sido alterado o reparado por personas no autorizadas por nosotros. Importador: Black & Decker S.A. de .C.V Bosque de Cidros Acceso Radiatas No.42 3ra.Seccion de Bosques de las lomas C.P.05120, Mexico, D.F. Tel: (01 55) 5326 7100 - Black & Decker GH900 | Type 1 Manual - GH900 - Page 31
. No. 1104 Col. Arboledas Queretaro, Qro. Tel. 01 442 245 25 80 PARA OTRAS LOCALIDADES LLAME AL 01 800 847 2309 o 01 800 847 2312. Black & Decker S.A. DE C.V. BOSQUES DE cidros acceso RADIATAS NO. 42 col. BOSQUES DE LAS LOMAS. 05120 México, D.F TEL. (01 55) 5326 7100 01 800 847 2309/01 - Black & Decker GH900 | Type 1 Manual - GH900 - Page 32
Catalog Number GH900, GH912 Form # 90602174 August 2013 Printed in China 32
-
 1
1 -
 2
2 -
 3
3 -
 4
4 -
 5
5 -
 6
6 -
 7
7 -
8
-
9
-
10
-
11
-
12
-
13
-
14
-
15
-
16
-
17
-
18
-
19
-
20
-
21
-
22
-
23
-
24
-
25
-
26
-
27
-
28
-
29
-
30
-
31
-
32
 |
 |
1
INSTRUCTION MANUAL
TRIMMER/EDGER
KEY INFORMATION YOU SHOULD KNOW:
•
The guard must be installed before trimming or edging - if not, the motor will overheat.
•
When replacing the line, use only .065 inch diameter ROUND line (B&D Model #AF-100 is
recommended) - otherwise the trimmer will not function properly.
•
Do not bump the feed head against the ground - it will disrupt the automatic feed mechanism.
•
Always use the cord retention feature
Thank you for choosing Black & Decker! To register your new product go to
www.BlackandDecker.com/NewOwner
PLEASE READ BEFORE RETURNING THIS PRODUCT FOR ANY REASON.
If you have a question or experience a problem with your Black & Decker purchase, go to
If you can’t find the answer or do not have access to the Internet,
call 1-800-544-6986 from 8 a.m. to 5 p.m. EST Mon. - Fri. to speak with an agent.
Please have the catalog number available when you call.
SAVE THIS MANUAL FOR FUTURE REFERENCE.
VEA EL ESPANOL EN LA CONTRAPORTADA.
INSTRUCTIVO DE OPERACIÓN, CENTROS DE SERVICIO Y PÓLIZA DE GARANTÍA.
ADVERTENCIA:
LÉASE ESTE INSTRUCTIVO ANTES DE USAR EL PRODUCTO.
CATALOG NUMBERS
GH900, GH912