BenQ TH585 User Manual - Page 31
D Mode, 3D Sync Invert, Settings, The default setting is
 |
View all BenQ TH585 manuals
Add to My Manuals
Save this manual to your list of manuals |
Page 31 highlights
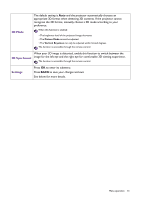
3D Mode The default setting is Auto and the projector automatically chooses an appropriate 3D format when detecting 3D contents. If the projector cannot recognize the 3D format, manually choose a 3D mode according to your preference. When this function is enabled: • The brightness level of the projected image decreases. • The Picture Mode cannot be adjusted. • The Vertical Keystone can only be adjusted within limited degrees. The function is accessible through the remote control. When your 3D image is distorted, enable this function to switch between the 3D Sync Invert image for the left eye and the right eye for comfortable 3D viewing experience. The function is accessible through the remote control. Settings Press OK to enter its submenu. Press BACK to save your changes and exit. See below for more details. Menu operation 31
-
 1
1 -
2
-
3
-
4
-
5
-
6
-
7
-
8
-
9
-
10
-
11
-
12
-
13
-
14
-
15
-
16
-
17
-
18
-
19
-
20
-
21
-
22
-
23
-
24
-
25
-
 26
26 -
 27
27 -
 28
28 -
 29
29 -
 30
30 -
 31
31 -
 32
32 -
 33
33 -
 34
34 -
 35
35 -
 36
36 -
37
-
38
-
39
-
40
-
41
-
42
-
43
-
44
-
45
-
46
-
47
-
48
-
49
-
50
-
51
-
52
-
53
-
54
-
55
 |
 |
