Apple MA998Z/A User Manual - Page 44
About the, Asset Info Window, Choose a metadata set for the asset from the Metadata Set pop-up menu
 |
UPC - 885909166015
View all Apple MA998Z/A manuals
Add to My Manuals
Save this manual to your list of manuals |
Page 44 highlights
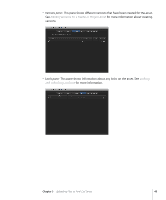
5 Choose a metadata set for the asset from the Metadata Set pop-up menu, and add metadata to one or more fields, defining this as a bundle asset. 6 If necessary, choose a new destination device from the Destination pop-up menu. This specifies the device on which the file will be stored. If you have questions about which device to choose, contact your Final Cut Server administrator. Note: Media and Library are the primary Final Cut Server devices. Talk with your Final Cut Server administrator about which other configured devices are appropriate for media file storage. 7 Click the Upload button to create the asset. The file is uploaded and the bundle asset is created. 8 After the bundle asset is created, select the Productions pane, click the production you created, and click the Search button to view the new asset in Final Cut Server. The bundled Motion project asset has a generic project icon in the top-left corner and a Motion application icon as its thumbnail. If you need to identify the bundle asset later, you can open the asset's info window and view the metadata you added at upload. Use the metadata you added at upload to identify the bundle asset. To learn how to get information about the asset that was just created, see About the Asset Info Window. 44 Chapter 3 Uploading Files to Final Cut Server
-
 1
1 -
2
-
3
-
4
-
5
-
6
-
7
-
8
-
9
-
10
-
11
-
12
-
13
-
14
-
15
-
16
-
17
-
18
-
19
-
20
-
21
-
22
-
23
-
24
-
25
-
26
-
27
-
28
-
29
-
30
-
31
-
32
-
33
-
34
-
35
-
36
-
37
-
38
-
 39
39 -
 40
40 -
 41
41 -
 42
42 -
 43
43 -
 44
44 -
 45
45 -
 46
46 -
 47
47 -
 48
48 -
 49
49 -
50
-
51
-
52
-
53
-
54
-
55
-
56
-
57
-
58
-
59
-
60
-
61
-
62
-
63
-
64
-
65
-
66
-
67
-
68
-
69
-
70
-
71
-
72
-
73
-
74
-
75
-
76
-
77
-
78
-
79
-
80
-
81
-
82
-
83
-
84
-
85
-
86
-
87
-
88
-
89
-
90
-
91
-
92
-
93
-
94
-
95
-
96
-
97
-
98
-
99
-
100
-
101
-
102
-
103
-
104
-
105
-
106
-
107
-
108
-
109
-
110
-
111
-
112
-
113
-
114
-
115
-
116
-
117
-
118
-
119
-
120
-
121
-
122
-
123
-
124
-
125
-
126
-
127
-
128
-
129
-
130
-
131
-
132
-
133
-
134
-
135
-
136
-
137
-
138
-
139
-
140
-
141
-
142
-
143
-
144
-
145
-
146
-
147
-
148
 |
 |
