2011 Yamaha Motorsports RS Venture GT Owners Manual - Page 85
2011 Yamaha Motorsports RS Venture GT Manual

Page 85 highlights
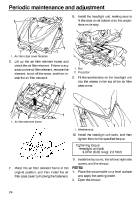
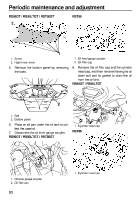
Periodic maintenance and adjustment 6. If the engine oil is below the "L" level mark, add sufficient oil of the recommended type to raise it to the "H" level mark. (See page 122 for the recommended oil.) NOTICE: When adding the engine oil, be careful not to fill above the "H" level mark on the dipstick. Use only the recommended oil. (See page 122.) Make sure that no foreign material enters the engine oil tank. [ECS00462] Insert the dipstick into the oil filler hole, and then tighten the oil filler cap. Connect the oil level gauge coupler. Install the right side cover and the shroud (RS90GT / RS90LTGT / RST90GT), or close the shroud (RST90). 1. Oil filler cap 2. Dipstick 7. 8. 9. TIP The engine oil should be between the "H" and "L" level marks on the dipstick. RS90GT / RS90LTGT / RST90GT To change the engine oil (with or without oil filter cartridge replacement) 1. 2. 3. Place the snowmobile on a level surface and apply the parking brake. Start the engine, warm it up for several minutes, and then turn it off. Remove the shroud, the right side cover, and the top cover (RS90GT / RS90LTGT / RST90GT), or open the shroud and remove the right side cover (RST90). [See page 63 (RS90GT / RS90LTGT / RST90GT) or page 67 (RST90) for the procedures.] Remove the screws, and then pull the right lower cover outward to remove it. (RS90GT / RS90LTGT / RST90GT) 1. "H" level mark 2. "L" level mark RST90 4. 1. "H" level mark 2. "L" level mark 79
-
 1
1 -
2
-
3
-
4
-
5
-
6
-
7
-
8
-
9
-
10
-
11
-
12
-
13
-
14
-
15
-
16
-
17
-
18
-
19
-
20
-
21
-
22
-
23
-
24
-
25
-
26
-
27
-
28
-
29
-
30
-
31
-
32
-
33
-
34
-
35
-
36
-
37
-
38
-
39
-
40
-
41
-
42
-
43
-
44
-
45
-
46
-
47
-
48
-
49
-
50
-
51
-
52
-
53
-
54
-
55
-
56
-
57
-
58
-
59
-
60
-
61
-
62
-
63
-
64
-
65
-
66
-
67
-
68
-
69
-
70
-
71
-
72
-
73
-
74
-
75
-
76
-
77
-
78
-
79
-
 80
80 -
 81
81 -
 82
82 -
 83
83 -
 84
84 -
 85
85 -
 86
86 -
 87
87 -
 88
88 -
 89
89 -
 90
90 -
91
-
92
-
93
-
94
-
95
-
96
-
97
-
98
-
99
-
100
-
101
-
102
-
103
-
104
-
105
-
106
-
107
-
108
-
109
-
110
-
111
-
112
-
113
-
114
-
115
-
116
-
117
-
118
-
119
-
120
-
121
-
122
-
123
-
124
-
125
-
126
-
127
-
128
-
129
-
130
-
131
-
132
-
133
-
134
-
135
-
136
-
137
-
138
-
139
-
140
 |
 |
