2011 Yamaha Motorsports RS Venture GT Owners Manual - Page 47
2011 Yamaha Motorsports RS Venture GT Manual

Page 47 highlights
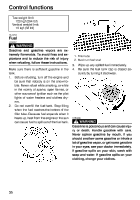
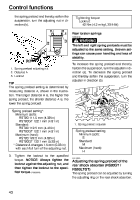
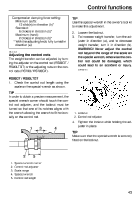
Control functions To increase the spring preload and thereby harden the suspension, turn the adjusting ring in direction (a). To decrease the spring preload and thereby soften the suspension, turn the adjusting ring in direction (b). (a) 1. 2-up adjusting block (b) TIP G 1. Spring preload adjusting ring G Spring preload setting: Minimum (soft): 1 Standard: 4 Maximum (hard): 7 Be sure to make this adjustment when there is no load (rider or cargo) on the snowmobile. Use the special tools included in the owner's tool kit to make the adjustment. Insert the special tools into the 2-up adjusting block as shown. 1. TIP The spring preload can be further adjusted by changing the position of the spring seat. Have a Yamaha dealer make this adjustment as it requires special tools. ESU13094 Adjusting the 2-up adjusting blocks (RST90) EWS00760 WARNING Make sure that the 2-up adjusting blocks are installed in the same position on both sides of the snowmobile, otherwise poor handling and loss of stability may result. The spring force can be adjusted by changing the position of the 2-up adjusting blocks. 1. 2. 3. 4. 2-up position (rider and passenger) Solo rider position Special tool Lock pin 2. 3. 4. Pull the lock pin and turn the special tools to change the block position. Release the lock pin. Remove the special tools from the 2-up adjusting block. 41
-
 1
1 -
2
-
3
-
4
-
5
-
6
-
7
-
8
-
9
-
10
-
11
-
12
-
13
-
14
-
15
-
16
-
17
-
18
-
19
-
20
-
21
-
22
-
23
-
24
-
25
-
26
-
27
-
28
-
29
-
30
-
31
-
32
-
33
-
34
-
35
-
36
-
37
-
38
-
39
-
40
-
41
-
 42
42 -
 43
43 -
 44
44 -
 45
45 -
 46
46 -
 47
47 -
 48
48 -
 49
49 -
 50
50 -
 51
51 -
 52
52 -
53
-
54
-
55
-
56
-
57
-
58
-
59
-
60
-
61
-
62
-
63
-
64
-
65
-
66
-
67
-
68
-
69
-
70
-
71
-
72
-
73
-
74
-
75
-
76
-
77
-
78
-
79
-
80
-
81
-
82
-
83
-
84
-
85
-
86
-
87
-
88
-
89
-
90
-
91
-
92
-
93
-
94
-
95
-
96
-
97
-
98
-
99
-
100
-
101
-
102
-
103
-
104
-
105
-
106
-
107
-
108
-
109
-
110
-
111
-
112
-
113
-
114
-
115
-
116
-
117
-
118
-
119
-
120
-
121
-
122
-
123
-
124
-
125
-
126
-
127
-
128
-
129
-
130
-
131
-
132
-
133
-
134
-
135
-
136
-
137
-
138
-
139
-
140
 |
 |
