2010 Yamaha Motorsports FX Nytro MTX Owners Manual - Page 35
2010 Yamaha Motorsports FX Nytro MTX Manual

Page 35 highlights
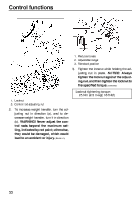
Control functions TIP To allow pressure to escape from the pump and the shock absorber, push the button halfway down and hold it. To allow only a small amount of pressure to escape, push the button all the way down and quickly release it. 6. Push the hose connector lock lever down, and then remove the hose connector from the air valve. the damping force. Be sure to stop the adjusting knob at a position where there is a click. [ECS00910] 1 (b) (a) TIP When removing the connector, the sound of air escaping may be heard, but this is from the pump hose, not the shock absorber. 7. Install the air valve cap. 1. Compression damping force adjusting knob TIP If the shock absorber bottoms too easily or rolls too much during cornering, increase the air pressure by 34 kPa (0.3 kgf/cm², 5 psi). If the shock absorber is too firm and you want a more compliant ride, decrease the air pressure by 34 kPa (0.3 kgf/cm², 5 psi). ESU13290 Compression damping force setting: Minimum (soft): 12 click(s) in direction (b)* Standard: 6 click(s) in direction (b)* Maximum (hard): 2 click(s) in direction (b)* * With the adjusting knob fully turned in direction (a) ESU11034 Adjusting the control rods (FX10M53) EWS00770 Adjusting the compression damping force of the rear shock absorber (FX10M53) The compression damping force can be adjusted by turning the adjusting knob. To increase the compression damping force, turn the adjusting knob in direction (a). To decrease the compression damping force, turn the adjusting knob in direction (b). NOTICE: Do not continue to turn the adjusting knob in direction (a) after it stops. The shock absorber could be damaged and damping force adjustments will not be able to be made. Do not turn the adjusting knob in direction (b) more than 12 click(s). Even if the adjusting knob is continually turned after 12 click(s), there will be no change in WARNING The left and right adjusting nuts must be set to the same position. Uneven settings can cause poor handling and loss of stability. The weight transfer can be adjusted by turning the adjusting nuts on the control rods. 1. Loosen the locknut while holding the adjusting nut. 29
-
 1
1 -
2
-
3
-
4
-
5
-
6
-
7
-
8
-
9
-
10
-
11
-
12
-
13
-
14
-
15
-
16
-
17
-
18
-
19
-
20
-
21
-
22
-
23
-
24
-
25
-
26
-
27
-
28
-
29
-
 30
30 -
 31
31 -
 32
32 -
 33
33 -
 34
34 -
 35
35 -
 36
36 -
 37
37 -
 38
38 -
 39
39 -
 40
40 -
41
-
42
-
43
-
44
-
45
-
46
-
47
-
48
-
49
-
50
-
51
-
52
-
53
-
54
-
55
-
56
-
57
-
58
-
59
-
60
-
61
-
62
-
63
-
64
-
65
-
66
-
67
-
68
-
69
-
70
-
71
-
72
-
73
-
74
-
75
-
76
-
77
-
78
-
79
-
80
-
81
-
82
-
83
-
84
-
85
-
86
-
87
-
88
-
89
-
90
-
91
-
92
-
93
-
94
-
95
-
96
 |
 |
