2009 Yamaha Motorsports TMAX Owners Manual - Page 24
2009 Yamaha Motorsports TMAX Manual

Page 24 highlights
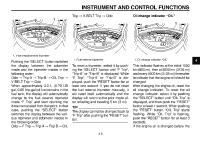
INSTRUMENT AND CONTROL FUNCTIONS G G 1 G 2 3 4 5 6 7 TIP 8 9 G G G G G an odometer (which shows the total distance traveled) two tripmeters (which show the distance traveled since they were last set to zero) a fuel reserve tripmeter (which shows the distance traveled when the remaining fuel in the fuel tank reaches approximately 3.0 L (0.79 US gal, 0.66 Imp.gal)) a self-diagnosis device a clock an oil change tripmeter (which shows the distance traveled since the last engine oil change) a V-belt replacement tripmeter (which shows the distance traveled since the last V-belt replacement) Be sure to turn the key to "ON" before using the "SELECT" and "RESET" buttons. When the key is turned to "ON", all of the display segments of the multi-function display will appear one after the other and then disappear, in order to test the electrical circuits. Tachometer The tachometer allows the rider to monitor the engine speed and keep it within the ideal power range. ECA10031 Odometer and tripmeter modes NOTICE Do not operate the engine in the tachometer red zone. Red zone: 8250 r/min and above Clock To set the clock: 1. Push the "SELECT" button and "RESET" button together for at least two seconds. 2. When the hour digits start flashing, push the "RESET" button to set the hours. 3. Push the "SELECT" button, and the minute digits will start flashing. 4. Push the "RESET" button to set the minutes. 5. Push the "SELECT" button and then release it to start the clock. 4-5 1 1. Odometer/tripmeters 1 1. Oil change tripmeter G
-
 1
1 -
2
-
3
-
4
-
5
-
6
-
7
-
8
-
9
-
10
-
11
-
12
-
13
-
14
-
15
-
16
-
17
-
18
-
 19
19 -
 20
20 -
 21
21 -
 22
22 -
 23
23 -
 24
24 -
 25
25 -
 26
26 -
 27
27 -
 28
28 -
 29
29 -
30
-
31
-
32
-
33
-
34
-
35
-
36
-
37
-
38
-
39
-
40
-
41
-
42
-
43
-
44
-
45
-
46
-
47
-
48
-
49
-
50
-
51
-
52
-
53
-
54
-
55
-
56
-
57
-
58
-
59
-
60
-
61
-
62
-
63
-
64
-
65
-
66
-
67
-
68
-
69
-
70
-
71
-
72
-
73
-
74
-
75
-
76
-
77
-
78
-
79
-
80
-
81
-
82
-
83
-
84
-
85
-
86
-
87
-
88
-
89
-
90
-
91
-
92
-
93
-
94
-
95
-
96
-
97
-
98
-
99
-
100
-
101
-
102
 |
 |
