Vtech CLP99486 User Manual - Page 21
Installation options, Tabletop to wall-mount installation
 |
View all Vtech CLP99486 manuals
Add to My Manuals
Save this manual to your list of manuals |
Page 21 highlights
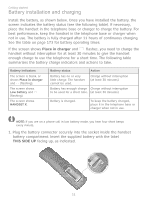
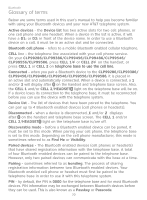
Getting started Installation options Your telephone base is ready for tabletop use. If you want to mount your telephone on a wall, follow the steps mentioned below, to connect the telephone base with a standard dual-stud telephone wall-mounting plate. You may need a professional to install the mounting plate. Tabletop to wall-mount installation 1. Unplug the power adapter from the power outlet. Unplug the telephone line cord from the wall jack (or DSL filter). 2. Position the telephone base, as shown below. Insert the extended tabs (marked B in the following illustration) of the wall-mount bracket into the slots on the back of the telephone base. Push the telephone base down until it is securely in place. 3. Plug the telephone line cord (or DSL filter) into the wall jack. Plug the power adapter into a power outlet not controlled by a wall switch. 4. Align the holes on the wall-mount bracket with the standard wall plate and slide the wall-mount bracket down until it locks securely. Bundle the telephone line cord and power adapter cord neatly with twist ties, if necessary. 1 2 3 4 15
-
 1
1 -
2
-
3
-
4
-
5
-
6
-
7
-
8
-
9
-
10
-
11
-
12
-
13
-
14
-
15
-
 16
16 -
 17
17 -
 18
18 -
 19
19 -
 20
20 -
 21
21 -
 22
22 -
 23
23 -
 24
24 -
 25
25 -
 26
26 -
27
-
28
-
29
-
30
-
31
-
32
-
33
-
34
-
35
-
36
-
37
-
38
-
39
-
40
-
41
-
42
-
43
-
44
-
45
-
46
-
47
-
48
-
49
-
50
-
51
-
52
-
53
-
54
-
55
-
56
-
57
-
58
-
59
-
60
-
61
-
62
-
63
-
64
-
65
-
66
-
67
-
68
-
69
-
70
-
71
-
72
-
73
-
74
-
75
-
76
-
77
-
78
-
79
-
80
-
81
-
82
-
83
-
84
-
85
-
86
-
87
-
88
-
89
-
90
-
91
-
92
-
93
-
94
-
95
-
96
-
97
-
98
-
99
-
100
-
101
-
102
-
103
-
104
-
105
-
106
-
107
-
108
-
109
-
110
-
111
-
112
-
113
-
114
-
115
-
116
-
117
-
118
-
119
-
120
-
121
-
122
-
123
-
124
-
125
-
126
-
127
-
128
-
129
-
130
-
131
-
132
-
133
-
134
-
135
-
136
-
137
-
138
-
139
-
140
-
141
-
142
-
143
-
144
-
145
-
146
-
147
-
148
-
149
-
150
-
151
-
152
-
153
-
154
-
155
-
156
-
157
-
158
-
159
-
160
-
161
-
162
-
163
-
164
-
165
-
166
-
167
-
168
-
169
-
170
-
171
-
172
-
173
-
174
-
175
-
176
-
177
-
178
-
179
-
180
-
181
-
182
-
183
-
184
 |
 |
