TASCAM DP-03SD Owners Manual - Page 36
Setting input levels, Record additional tracks, Undoing an operation
 |
View all TASCAM DP-03SD manuals
Add to My Manuals
Save this manual to your list of manuals |
Page 36 highlights
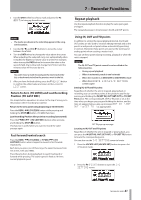
6 - Basic Recording Setting input levels After making the above settings, press the PLAY (Á) button to start playback. Just as though you were recording, you can monitor the sound of already recorded tracks playing back and the input sources on the tracks for recording, allowing you to check the monitoring balance and volume. Adjust the input levels suitably as you monitor both playback and input signals. Record additional tracks Press and hold the RECORD (-) button and press the PLAY (Á) button to start the new recordings to the other tracks while monitoring the playback signal Undoing an operation This unit allows you to undo an operation or recording that did not work as planned or was otherwise unsatisfactory. Undo can be used on many ordinary operations, including editing and recording operations. This unit has two types of undo functions. Single undo can be used with a simple button press, while multi-undo allows you to return to a specific past operation and undo the operations that occurred after it. NOTE The UNDO/REDO indicator lights when a single undo or multi-undo has been conducted Undoing the last operation (single undo) Press the UNDO/REDO [HISTORY] button to return to the state before the last operation was conducted. After doing this, the UNDO/REDO indicator lights, showing that redo (see below) is possible. UNDO/REDO indicator Cancelling an undo operation (redo) Press the UNDO/REDO [HISTORY] buttons when its indicator is lit to return to the state of the last operation. The UNDO/REDO indicator becomes unlit. NOTE If single undo is used when multi-undo (described below) has already been used to return the unit to a previous state, it will go one more step backward. If you press the UNDO/REDO [HISTORY] button again to redo, the single undo operation is cancelled, and the previous multi-undo state is restored. In this case, the operations undone by multi-undo are still retained in history, so the UNDO/REDO indicator stays lit. Undoing a previous operation (multi-undo) 1 Press and hold the UNDO/REDO [HISTORY] button to open the HISTORY screen. This screen shows the operation history as a list. Each operation in the list is called an "event." The event list starts at the bottom with event number "0" (-START UP-) and proceeds up to the most recent event at the top, which has a * next to it. All events in this list that occurred after a selected event can be undone at once. This operation is called "multi-undo" because it allows you to undo multiple events and return to an earlier state. 2 Use the DATA wheel to select the event that you want to return to (all events after the selected event will be undone). 36 TASCAM DP-03SD
-
 1
1 -
2
-
3
-
4
-
5
-
6
-
7
-
8
-
9
-
10
-
11
-
12
-
13
-
14
-
15
-
16
-
17
-
18
-
19
-
20
-
21
-
22
-
23
-
24
-
25
-
26
-
27
-
28
-
29
-
30
-
 31
31 -
 32
32 -
 33
33 -
 34
34 -
 35
35 -
 36
36 -
 37
37 -
 38
38 -
 39
39 -
 40
40 -
 41
41 -
42
-
43
-
44
-
45
-
46
-
47
-
48
-
49
-
50
-
51
-
52
-
53
-
54
-
55
-
56
-
57
-
58
-
59
-
60
-
61
-
62
-
63
-
64
-
65
-
66
-
67
-
68
-
69
-
70
-
71
-
72
-
73
-
74
-
75
-
76
 |
 |
