Stihl RE 80 Instruction Manual - Page 21
Inserting and Removing the Spray Nozzle
 |
View all Stihl RE 80 manuals
Add to My Manuals
Save this manual to your list of manuals |
Page 21 highlights
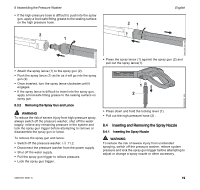
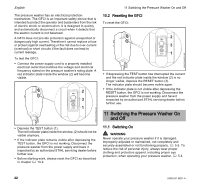
8 Assembling the Pressure Washer ► If the high-pressure hose is difficult to push into the spray gun, apply a food-safe fitting grease to the sealing surface on the high pressure hose. 2 1 21 English 0000-GXX-4351-A0 0000-GXX-4350-A0 0000097567_002 ► Attach the spray lance (1) to the spray gun (2). ► Push the spray lance (1) as far as it will go into the spray gun (2). ► Once inserted, turn the spray lance clockwise until it engages. ► If the spray lance is difficult to insert into the spray gun, apply a food-safe fitting grease to the sealing surface on spray gun. 8.3.2 Removing the Spray Gun and Lance WARNING To reduce the risk of severe injury from high-pressure spray, always switch off the pressure washer, shut off the water supply, relieve any remaining pressure in the system and lock the spray gun trigger before attempting to remove or disassemble the spray gun or lance. To remove the spray gun and lance: ► Switch off the pressure washer, @ 11.2. ► Disconnect the pressure washer from the power supply. ► Shut off the water supply. ► Pull the spray gun trigger to relieve pressure. ► Lock the spray gun trigger. ► Press the spray lance (1) against the spray gun (2) and pull out the spray lance(1). 1 2 ► Press down and hold the locking lever (1). ► Pull out the high-pressure hose (2) . 8.4 Inserting and Removing the Spray Nozzle 8.4.1 Inserting the Spray Nozzle WARNING To reduce the risk of severe injury from unintended spraying, switch off the pressure washer, relieve system pressure and lock the spray gun trigger before attempting to adjust or change a spray nozzle or other accessory. 0458-001-8621-A 19
-
 1
1 -
2
-
3
-
4
-
5
-
6
-
7
-
8
-
9
-
10
-
11
-
12
-
13
-
14
-
15
-
 16
16 -
 17
17 -
 18
18 -
 19
19 -
 20
20 -
 21
21 -
 22
22 -
 23
23 -
 24
24 -
 25
25 -
 26
26 -
27
-
28
-
29
-
30
-
31
-
32
-
33
-
34
-
35
-
36
-
37
-
38
-
39
-
40
-
41
-
42
-
43
-
44
-
45
-
46
-
47
-
48
-
49
-
50
-
51
-
52
-
53
-
54
-
55
-
56
-
57
-
58
-
59
-
60
-
61
-
62
-
63
-
64
-
65
-
66
-
67
-
68
-
69
-
70
-
71
-
72
-
73
-
74
-
75
-
76
-
77
-
78
-
79
-
80
 |
 |
