Sonos Dock User Guide - Page 6
Changing DOCK Settings
 |
View all Sonos Dock manuals
Add to My Manuals
Save this manual to your list of manuals |
Page 6 highlights
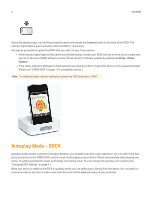
4 User Guide Changing DOCK Settings You can change your SONOS DOCK settings anytime. Using a handheld Sonos controller 1. Using a handheld Sonos controller, select Settings->Dock Settings from the Music Menu. 2. Select the SONOS DOCK you want to make changes for. 3. Choose one of the following options: • Select Dock Name to type a new name for the DOCK (the default name is DOCK.) • Select Autoplay Zone to select the zone that will automatically play audio when you start music directly from an iPod or iPod touch and then place it in the DOCK. • Select Include Grouped Zones to include (yes) or exclude (no) currently grouped zones from Autoplay mode. • Select Autoplay Volume to adjust the volume level for the Autoplay zone. • Select White Status Indicator Light to turn the white status indicator on or off when the DOCK is in normal operation. Using the Sonos Controller for Mac or PC 1. Using the Sonos Controller for Mac or PC, select Dock Settings from the Zones menu. 2. Choose the DOCK you want to make changes for, and select Settings. 3. Choose one of the following options: • Select Dock Name to type a new name for the DOCK (the default name is DOCK.) • Select White Status Indicator Light to turn the white status indicator on or off when the DOCK is in normal operation. • Select Autoplay Zone to select the zone that will automatically play audio when you start music directly from an iPod or iPod touch and then place it in the DOCK. 4. Click Apply, and then click OK when you are finished making changes.
-
 1
1 -
 2
2 -
 3
3 -
 4
4 -
 5
5 -
 6
6 -
 7
7 -
 8
8 -
 9
9 -
 10
10
 |
 |
