Sharp XG-PH50X XG-PH50X Operation Manual - Page 25
Quick Start, s 38
 |
View all Sharp XG-PH50X manuals
Add to My Manuals
Save this manual to your list of manuals |
Page 25 highlights
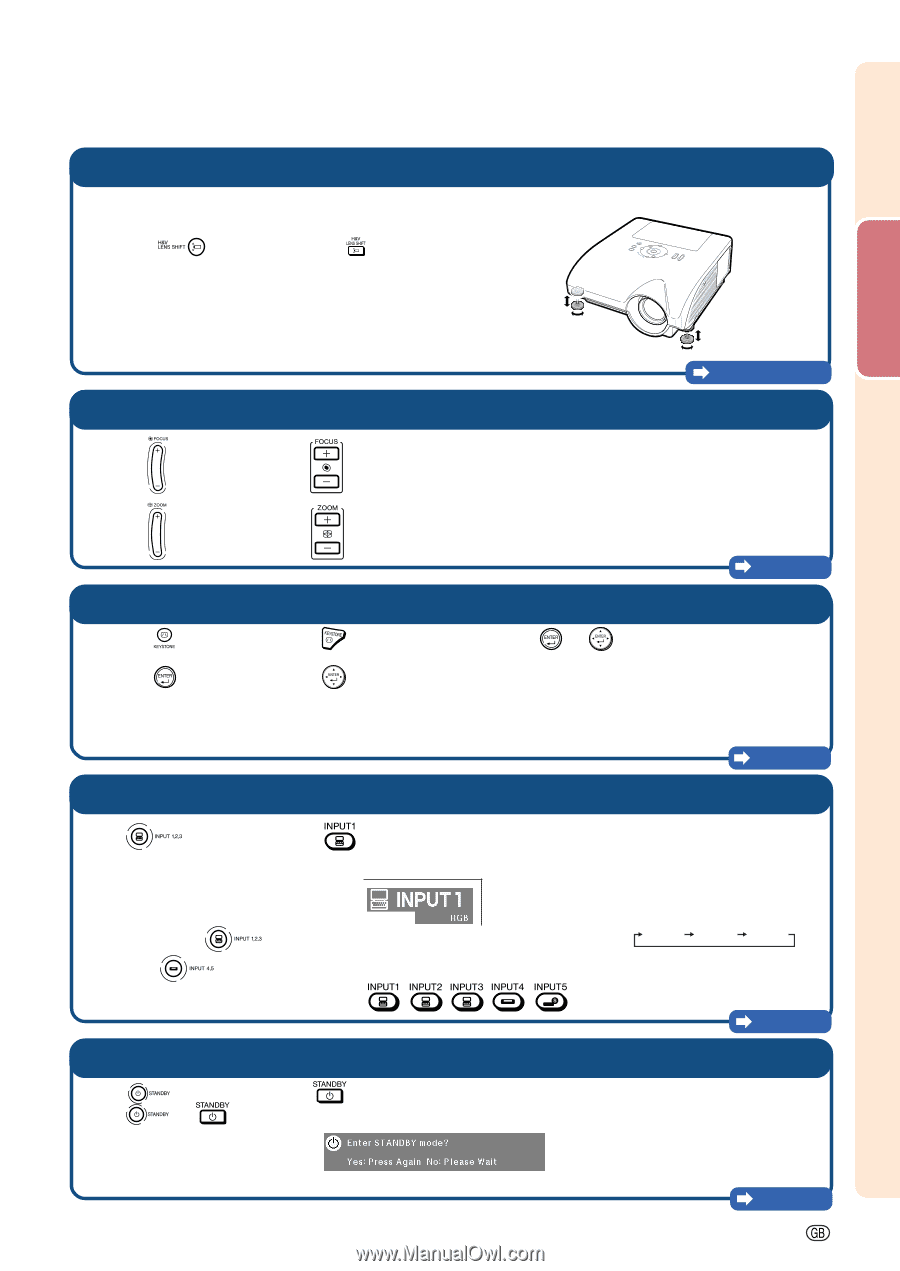
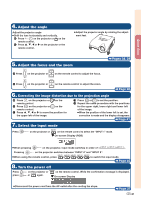
Quick Start 4. Adjust the angle Adjust the projector angle • Shift the lens horizontally and vertically. 1 Press on the projector or on the remote control. 2 Press ', ", \ or | on the projector or the remote control. • Adjust the projector angle by rotating the adjustment feet. 5. Adjust the focus and the zoom 1 Press on the projector or on the remote control to adjust the focus. Pages 38, 39 2 Press on the projector or on the remote control to adjust the zoom. Page 40 6. Correcting the image distortion due to the projection angle 1 Press on the projector or on the remote control. 2 Press on the projector or on the remote control. 3 Press ', ", \ or | to move the position for the upper left of the image. 7. Select the input mode 4 Press or to set the position. 5 Repeat the same procedure with the positions for the upper right, lower right and lower left of the image. • When the position of the lower left is set, the correction is made and the display disappears. Page 41 Press on the projector or on the remote control to select the "INPUT 1" mode. " On-screen Display (RGB) • When pressing Pressing on the projector, input mode switches in order of : INPUT 1 INPUT 2 INPUT 3 . on the projector switches between "INPUT 4" and "INPUT 5". • When using the remote control, press 8. Turn the power off //// to switch the input mode. Page 45 Press press on the projector or on the remote control. While the confirmation message is displayed, or again. " On-screen Display • Disconnect the power cord from the AC outlet after the cooling fan stops. Page 37 -21
-
 1
1 -
2
-
3
-
4
-
5
-
6
-
7
-
8
-
9
-
10
-
11
-
12
-
13
-
14
-
15
-
16
-
17
-
18
-
19
-
 20
20 -
 21
21 -
 22
22 -
 23
23 -
 24
24 -
 25
25 -
 26
26 -
 27
27 -
 28
28 -
 29
29 -
 30
30 -
31
-
32
-
33
-
34
-
35
-
36
-
37
-
38
-
39
-
40
-
41
-
42
-
43
-
44
-
45
-
46
-
47
-
48
-
49
-
50
-
51
-
52
-
53
-
54
-
55
-
56
-
57
-
58
-
59
-
60
-
61
-
62
-
63
-
64
-
65
-
66
-
67
-
68
-
69
-
70
-
71
-
72
-
73
-
74
-
75
-
76
-
77
-
78
-
79
-
80
-
81
-
82
-
83
-
84
-
85
-
86
-
87
-
88
-
89
-
90
-
91
-
92
-
93
-
94
-
95
-
96
-
97
-
98
-
99
-
100
-
101
-
102
-
103
-
104
-
105
-
106
-
107
-
108
 |
 |